Paint Covered Kids
  • Blog
  • About
  • Contact
  • The Gallery
  • DIY
  • Mommy Camp
  • Freebies
  • Subscribe!
  • Blog
  • About
  • Contact
  • The Gallery
  • DIY
  • Mommy Camp
  • Freebies
  • Subscribe!
Paint Covered Kids

​

diy playhouse revisit

4/23/2021

0 Comments

 
Picture
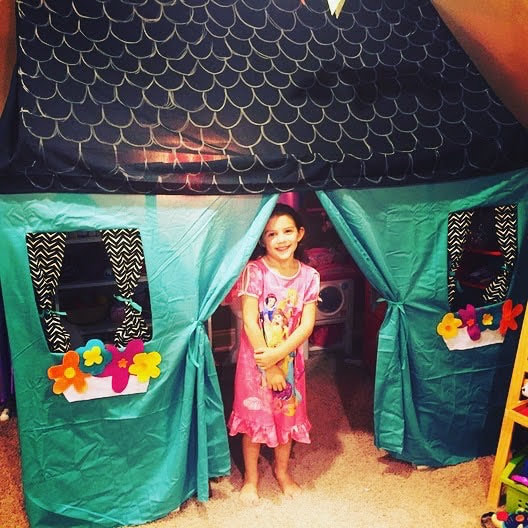
Lilly 6 years ago with the playhouse.
Picture
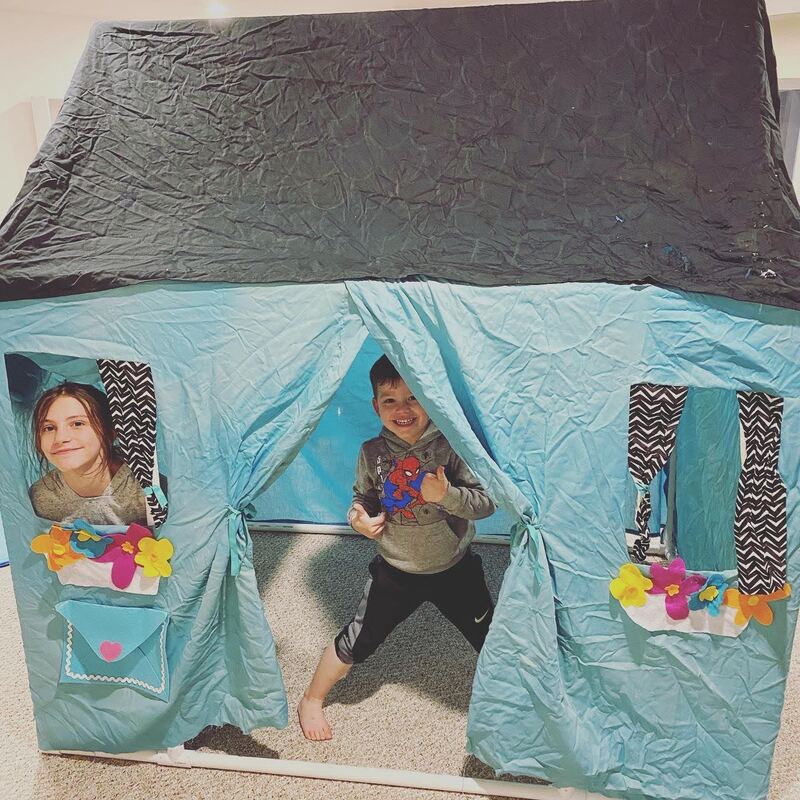
Lilly now with the playhouse and Alan at the same age Lilly was when the playhouse was new.
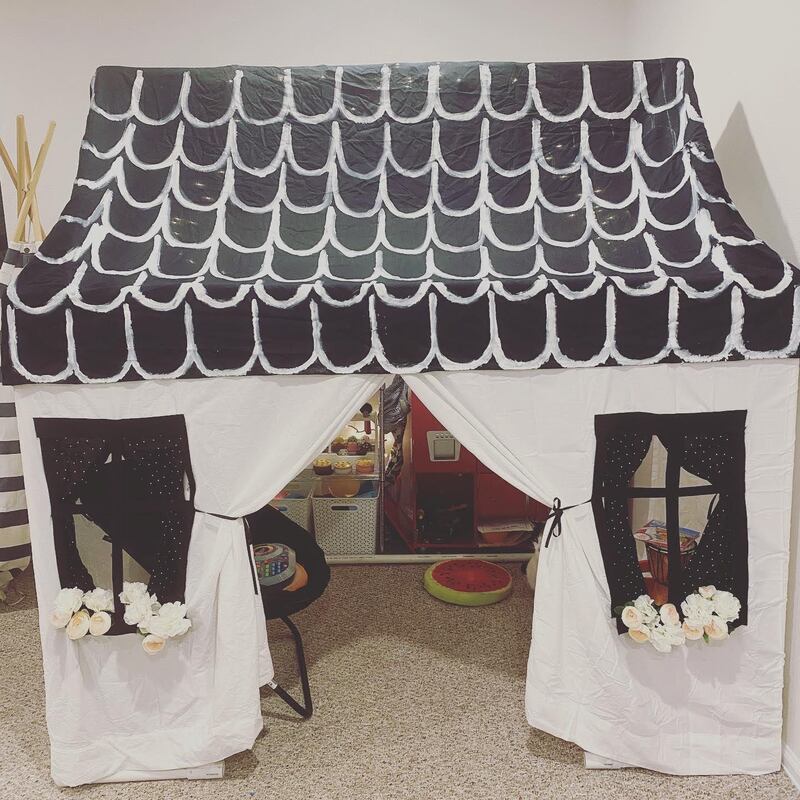
Six years ago I built a PVC playhouse. It was super cute, easy to take apart and I spent a lot of time creating it so, when we moved from our first home to our second and there wasn't a place to put it, I kept it in the attic. I'm not throwing away all that work! So, it sat in the attic for four years until our recent move across the country. When we found it hidden in the far corner of the attic my reaction was the same. We are not throwing that away! So it made the trip with us. Our new home has a HUGE basement which has a dedicated play area for the kids and is a perfect place to bring the playhouse back to life. I was able to rebuild it by referring to my old blog post without any issues and the kids were pumped. But, the cover had seen better days so I spent a few days making a new, more aesthetically pleasing one. I bought a king sized white sheet and scrounged around my fabric scraps where I found a black and white polka dot material for curtains I used black felt for the flower boxes and instead of making felt flowers like before I thought an added element of being able to switch the flowers for the seasons would be fun so I bought cheap fake flowers and trimmed the stems so they would fit. To finish it off I used another king sized sheet but in black for the roof and painted white shingles on it. I also put some Christmas lights in the top of the house. 
Picture
Picture
Picture
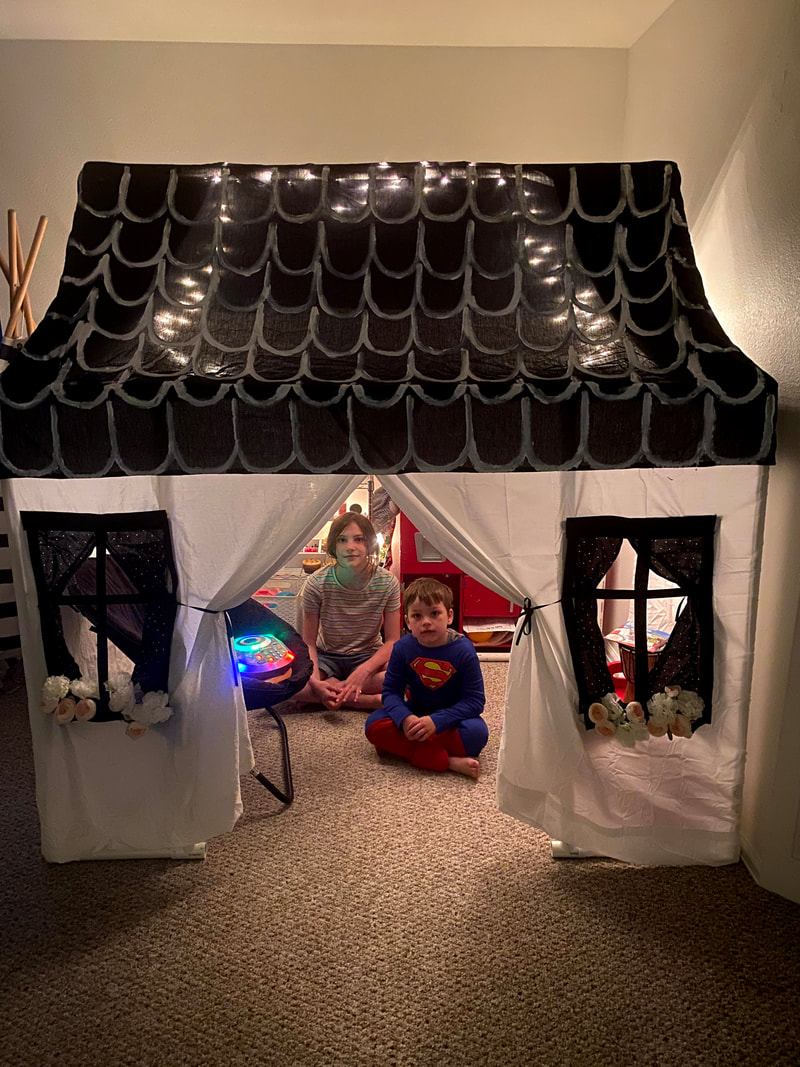
I was not about to sew anything this time and just hot glued the cover to the frame this time. I figure I can always pull it off pretty easily when it's time to retire the playhouse again. But, rest assured, I plan on keeping it until I have grandkids who will find it just as magical as my kids do right now and I will be MiMi of the year!
0 Comments

at home pirate party

2/22/2021

0 Comments

 
PWith covid still a very real thing we did not have a big party for Arthur's 7th birthday. However, just because we can't have people over doesn't mean we can't have a party! With three kids we basically have a party anyway. So, I planned a day full of activities revolving around pirates, his chosen theme. We had a great day doing all the things and, the best part for my son was that he never had to change out of his pajamas. He's a real home body and if allowed, he would choose to almost never leave the house.

I made a party planning sheet and Pinterest board to make sure I didn't forget anything, hit Hobby Lobby hard for supplies and headed home to get it all prepped! 
Picture
He woke up to find a pirate themed basement with a cardboard ship, pirate costumes, treasure, a shark infested "ocean", pin the teeth on the shark and a piñata.
Picture
Picture
After a riddle filled treasure hunt we did a lot of crafts including making a shoulder parrot, coloring pirate accessories for our stuffed animals so they could join in on the fun, decorating swords and making maps.
Picture
Picture
Picture
Picture
Mixed into all of the fun we had jell-o ocean cups with orange ships, his fav breakfast (apple fritters), gold oreos and birthday cake in his chosen flavor, strawberries and cream. I even made the cake twice because the first time the altitude killed it and I had to start over. But, I made chocolate covered cake balls out of the failed attempt that turned out delicious.
Picture
Picture
Picture
We all had a great day of togetherness and celebration and I don't think he missed having a huge group of people over in the least.

You can find links to all of my inspiration ideas on my pinterest board here. 

Thanks for visiting!
0 Comments

Mommy Camp 2017 - Week six: Construction

7/17/2017

0 Comments

 
Picture
This week was the most popular dramatic play theme of the summer so far and the other activities were pretty popular too. You can download the lessons by clicking the image below and read about all of the fun further down.
Picture

dramatic play

This week they had a construction zone dramatic play area. They had a table with foam blocks next to a square of contact paper that I taped to the wall. They could stick the foam blocks onto the contact paper to build. They freakin' loved it! They also had giant foam blocks to build with and I made them diy wrecking balls using long socks and soft rubber balls. I placed the ball in the bottom of the sock and they simply swing it at their towers. It was also a huge hit. They also had regular blocks to build with. To finish off the area, I provided construction worker hats, caution tape and some signs. This was the most popular dramatic play area so far and they played for a really long time multiple times through the week.
Picture
Picture
Picture
Picture
Picture
Picture

day one: engineering

We talked about what an engineer is and what they do. We read some stories about great women inventors and watched a video. Then we discussed the engineering process. Afterwards, we made lego prints. 
Picture

day two: blueprints

We learned about blue prints and listened to a fun song from Phineas and Ferb. Then Lilly did some measuring using a worksheet and followed a recipe to make mug cake. It's kind of like a blueprint in the overall idea because it is the directions for creating a cake just like the blueprints are directions for building a house.
Picture
Picture

day three: tools

We read a book and discussed different types of tools. Then we did some hammer painting using cotton pads, paint and a rubber mallet. It was a big hit. (get it? lol)
Picture
Picture
Picture

day four: machines

We learned about different kinds of simple machines by watching an episode of Bill Nye and discussed where we have seen and used simple machines in our every day life. Then we made a pendulum using a paper cup, broom stick and string. We used it to create a pendulum painting. We also made a painting using an inclined plane and discussed what that meant.
Picture
Picture
Picture

day five: architecture

We had a lot of options but, as always, we didn't get to much of it and instead simply read a book about the three little pigs from an architectural point of view, watched a few informative videos and created graham cracker houses. Then we tried to blow our housed down. They were sturdy enough to resist. Honestly, we skipped a bunch of the activities this week. I think we're all tired and would rather just have free play. They really loved the dramatic play area and spent a lot of their free time in there this week.
Picture
0 Comments

Mommy Camp 2017 - Week five: My Body

7/9/2017

0 Comments

 
Picture
Week five was fun! My kids always love playing doctor. You can find all of the lessons and activities by clicking the image below. You can also read about the activities we did below!
Picture

dramatic play

They had a blast with the doctor dramatic play set-up. Alan even joined in! In the area I set up their doctor tools and laminated some prints of x-rays and an eye chart as well as a patient form. I also bought a box of bandaids from the dollar store and made "casts" from an old whit sock with the toe cut off. I threw in a few gauze and wrap tape for extra fun and made doctor's coats with white t-shirts cut up the middle.
Picture
Picture
I was thoroughly doctored.
Picture
Picture

day one: the five senses

We watched some videos and read a book. Then we explored our senses with pop rocks by analyzing how we experienced them with each sense. Lilly did the worksheet but Arthur and I just talked about it. After that we made scented paintings with Kool aid and paint!
Picture
Picture
Pop rocks fun!
Picture
"It smells so GOOD!" - Lillian
Picture
Picture

day two: staying healthy

We had fun with a very active game of Simon Says, read a book or two and watched a short video. Then we made frushi (fruit sushi)! Yum!
Picture
Learning about being healthy!
Picture
Picture
Frushi was simple. Rice and fresh fruit in a fruit roll-up.

day three: body parts

My most successful activity yet was on the agenda for this day. I made a brain shaped mound of play dough using a brain mold we've had for years. They played with it for at least 45 minutes as "brain surgeons"! It was amazing. While Arthur napped, Lilly created a picture of what was in her head, basically what she thinks about. And, she made a double doodle where she used both hands at the same time to draw a picture. It was crazy impressive what she created. I think she might be a tad bit ambidextrous which is cool. We also watched a few videos and read a book.
Picture
Picture
Picture
Picture
Picture

day four: my blood

 We watched a Storybots video and read a book. Then we attempted an activity using play dough and a toothpick to see our pulse but it didn't work. We weren't feeling particularly up for the other activities so we ended the day with some syringe art. Right out of the gate Lilly squirted red paint all over the blinds and window in my office. So that was frustrating and I will forever have pink cords on my blinds now. Oh well. The art was pretty cool.
Picture
Picture

day five: My bones

We read the book for this day and watched the video but didn't manage anything else. I guess that's ok. It's all about learning and having fun and it's no fun for anyone if everyone would rather be doing other things.
0 Comments

mommy camp 2017 - week four:transportation

7/7/2017

0 Comments

 
Picture
We had a fun week learning about different forms of transportation! Keep reading to see the recap and click the image below to download the free lessons!
Picture

Dramatic play

The kids got to get hands on with a dramatic play auto shop this week. They LOVED this and it was so stupid easy. They played with it consistently all week and would spend up to 45 minutes playing together with no arguing. It was magic. In my original plans I was going to create a car out of cardboard but, when I began setting up the night before, I realized that I didn't have a box large enough. So, I improvised and used a plastic tub instead. I just created some wheels and taped colored paper inside. I even added paper to the inside bottom to look like mechanical parts that they could work on. Honestly, I think this was more successful than the box would have been. To complete the area, I gave them some forms and signs, toolbox with kid tools, safety goggles, empty spray bottles and work gloves.
Picture
Picture
Picture
Picture
Alan enjoyed watching.
Picture

day one: land

We talked about the different kinds of vehicles that are used on land, read a book, painted with cars and created train track stencil art!
Picture
Picture

day two: bridges & roads

We created Monet inspired bridge art, created bridges with index cards and blocks and watched a video about different types of bridges.
Picture
Picture
Picture

day three: traffic safety

We learned about being safe and road signs and then Lilly took a scooter and bike safety quiz and earned her own scooter/bike license! Arthur got one too but I'm pretty sure he would fail the safety test.
Picture
Picture

day four: water

We talked about water transportation, watched a video, made aluminum foil boats and tested them out in the sink with Shopkins passengers and created collage boat art.
Picture
Picture
Picture
They were so excited that all of the Shopkins floated!

day five: air

Similarly to the past weeks, we were all tired by Friday and with this week being the 4th of July even more so. So, our last day didn't get our best efforts. In fact, all we did was make a few paper airplanes and test them out. Oh well! Maybe you'll do better than me and get to all of the things I didn't have time for this week!
Picture
We had a great week and learned a lot! Check back for the next few weeks of Mommy Camp 2017 soon!
0 Comments

Mommy camp 2017 - week three:community

6/25/2017

0 Comments

 
Picture
I modified the schedule this week and we skipped the ocean week. We will be doing it a bit later in the summer right before we take a trip to the beach! So, this week we focused on the community. You can download the plans for this week by clicking the picture below.
Picture

dramatic play

The dramatic play set up this week was a map and community creation theme. I purchased a printable from teachers pay teachers for a few dollars and created roads, trees, bushes, ponds, rivers and houses out of felt. 
Picture
Picture
Lilly and her map of a city.

day one - maps

Day one focused on using, reading and playing with maps. Kids got to be pirates and use maps to find hidden treasure. Both kids also got compasses and telescopes to enhance the fun! We also made satchels and maps using paper bags and rounded out the costume with some appropriate items from the closet and eye patches made from craft foam and elastic string. We attempted an origami pirate hat but they didn't fit very well so I found a free printable instead. We used a pirate name generator worksheet but, Lilly wasn't too excited about her name, Stinky Blue Pearl. She also drew a map of her bedroom.
Picture
Picture
Picture
An ill fitting pirates hat.
Picture
Much better.
Picture
Picture
Picture
Picture
Off on a treasure hunt!

day two - where i live

We started by learning about our neighborhood. Then Lilly stepped outside to draw our house. She also worked on a few worksheets to learn our address and phone number. Then we watched a few videos about our state and city.
Picture
Drawing our house.
Picture

day three - economy

We reviewed money and it's value. Then we watched a few videos about consumers and producers. We wrapped up the idea of what builds our economy by creating a product and storefront. Lillian chose to create "Lillian's Lollipops". It was a great way to reinforce the content from the day. Apparently, I forgot to get pictures of her set up with the shop! Ooops!
Picture
Picture
Making lollipops for her store.

Day four - community helpers & day five - how can I help

We ran out of time this week to finish everything though we did discuss some of the topics for days four and five. They spent a brief time playing pretend play with police and firemen but I didn't manage to snap a photo. We also decorated some rocks with uplifiting phrases to leave around the park and plan on getting around to making wands to leave for the magic wand project too. We just didn't get them done yet. 

Honestly, this was the week I was least excited about and I guess I let that feeling be reflected in the amount of focus I put towards it.
0 Comments

Mommy camp 2017 - week one: the great outdoors

6/12/2017

0 Comments

 
Picture
Mommy Camp is off to a great start with our first week all about the great outdoors! You can download all of my lessons and materials by clicking the image below.
Picture

Dramatic Play

The dramatic play area was a pretend flower shop and garden. I created the "garden" using a cardboard box, brown fabric, pool tubes, hot glue and fake flowers. I gave them a few signs I printed out, a toy cash register and pulled out my market stand diy from a few years ago to complete the set-up. They always have fun pretending to sell things so this was a definite hit.
Picture
Picture
Picture
Picture

day one: worms, dirt & rocks

I had some lofty goals for this day and not all of them came to fruition. Originally we were going to create a vermicompost bin but, I couldn't find any worms locally! By the time I realized the worms wouldn't get here in time if ordered online so, we skipped a bunch of worm themed things. We did watch a few videos, complete a few worksheets and do a bit of art though. We also headed outside to find a rock to use for creating our very own pet rock. We rounded out the day with some dirt jell-o pudding cups!
Picture
Picture
Picture
Picture
Picture
Picture

day two: seeds

We learned about seeds purpose by watching videos and reading a book. Then we explored them by dissecting some bell peppers and creating seed art. We also began sprouting some beans and created our own chia head pots! We wrapped up the day by creating some bird feeders using toilet paper tubes, peanut butter, string and bird seed and making poppy seed ham sliders and sesame seed candy. Neither of the kids were interested in eating either one so that was phenomenal.
Picture
They were tasked with removing all of the pepper seeds with tweezers. They were entertained for at least 20 minutes!
Picture
Picture
Picture
TP roll + peanut butter + birdseed = super easy bird feeder!
​The chia head activity was super easy. I took a picture of each of them and printed it out. I taped the photos to the front of the pots and we sprinkled chia seeds onto soil, watered and put in the sun. They had grown this much in only one day!
Picture
Picture
Picture
Picture
Making sesame seed candy that no one will eat. It was worthwhile.
Picture
Picture
Glue and dried seeds/beans to create some art!
Picture
My delicious poppy seed Hawaiian sliders. My husband and I ended up eating the whole pan. The kids did not help.

day three: flowers 

We learned about how flowers grow by watching a video and reading a book. Then we experimented with flowers and how they drink water, created Georgia O'Keefe inspired paintings and learned how to make tissue paper flowers for our dramatic play flower shop!
Picture
Painting a still life of flowers.
Picture
My O'Keefe inspired watercolor flower.
Picture
I encouraged Lilly to draw it large like Georgia O'Keefe. She didn't want to. But, I was impressed with her still life!
Picture
Making paper flowers.
Picture
Experimenting with flowers and how they absorb water. I forgot to get an after pic but we ended up with some colored carnations.
Picture
Flower snack!

day four: trees

We learned about how trees grow by watching a video and reading a book. Then we headed out side to collect a tree limb for some process art, made fruity rainbow yogurt bark and painted some q-tip trees.
Picture
I drew a tree trunk and then gave each a wad of q-tips rubber banded together. Dip in paint and dap to create leaves!
Picture
Picture
Greek yogurt, food coloring, dried fruit and sprinkles, then freeze and a yummy treat is made!
Picture
Hiking into the yard to find a tree branch.
Picture
Picture
Process art is where there are basically no rules and creativity reigns. I presented them with a bunch of options and they decorated the tree branch however they wanted. It turned out great and is now a focal point in my craft room and sits on top of the piano.

day five: leaves

We learned about how leaves get water by watching a video. Then we headed outside to collect a few. We attempted to make prints and rubbings but didn't have a lot of luck. I'm not sure what went wrong. But, we were tired at the end of the week and not much got done with the leaves day. Ooops.

I hope you enjoyed learning about our week! Check back soon for more recaps of each week of Mommy Camp!
0 Comments

DIY Princess Jasmine Costume Jewelry

10/3/2016

0 Comments

 
Picture
I get excited every year when it's time to plan and create our Halloween costumes! This year I'm a little less enthused because I will either be gigantically pregnant and overdue by almost one week or I will have JUST had a baby. So, either way trick-or-treating may not be in the cards for me. But, I can still participate in the costume part...maybe. So, when the time came to make a plan I was at a bit of a loss. How do I prepare for two very different costume sizes without making two costumes? After chatting with my daughter and asking her what she would like to be she said she wanted to be Princess Jasmine. That got me thinking. I could be Raja the tiger! An orange t-shirt, black leggings and some face paint and I can either be super huge Raja or Raja with a baby Raja! Perfect. My husband is going to be Aladdin and my son will be Abu the monkey. It's going to be adorable. But, enough about the thought process. You're here to learn about the Jasmine costume. 

Usually, I create the entire costume myself but, the Jasmine costumes looked like they would require a bit more sewing than I was interested in and pre-made ones were pretty cheap. So, I purchased this one on Amazon. I opted for a non-navel showing one because, you know, she's six. I also purchased these gold shoes. But, when looking for Jasmine jewelry and accessories I couldn't find any that looked like the actual cartoon. So, I decided I could do it myself.

What You'll Need:
- clip-on earring backs
- 1 sheet blue glitter craft foam
- 1 sheet yellow glitter craft foam
- 1 yellow glitter craft foam visor
- 1 turquoise stretch headband
- hot glue gun and glue sticks
- scissors

I pulled up an image of Princess Jasmine to make sure I knew what I was doing and then free-handed a rounded edge triangle for the earrings. Then I cut it out and used it as a stencil for my other earring and cut it out too. Once I had my earring shapes I simply glued them to the earring backs and I had my earrings!
Picture
Picture
Obviously they're not perfect but who cares! They definitely look like Jasmine's earrings. If I'd wanted to I could have made a stencil and created perfectly shaped earrings. But, I didn't feel like it and she loves them as is.

Now, on to the necklace. For the necklace I used the craft visor and simply cut it down to be the shape of Jasmine's necklace. Again, I eye-balled this and didn't use a stencil or anything. I just looked at the Jasmine image and hoped for the best. Once it was cut she could just slip it on as a necklace instead of a visor. Perfect, cheap and easy!

Finally, creating the headband. I cut out a large oval from the yellow glitter foam and then a slightly smaller one from the blue. Then I hot glued them together and glued a safety pin onto the back. Then I pinned the glued ovals onto the headband. Sure, I could have glued it to the headband but, I thought I'd rather have the ability to re-use it.

There ya have it! It only took about 20 minutes and I only spent about $6. I also had plenty of craft foam leftover plus an awesomely cute new headband! She's happy, I'm ecstatic and at least one of us is ready for Halloween!

Stay-tuned for the tutorials for the rest of the family costume tutorials including Raja the tiger, Abu the monkey and Aladdin!
Picture
Picture
0 Comments

Diy mermaid tails and shark fins

9/18/2016

1 Comment

 
Picture
I know kids love to play dress-up so, I always incorporate an element of that when I throw a birthday party. For my daughter's mermaid/shark themed party this year I created mermaid tails and shark fins for each party guest to take home and wear for the party. They were a big hit with everyone, including the adults and only took about 2 hours and $20 to make!
DIY Shark Fin
You will need:
- gray craft foam (I was able to fit three shark fins on one piece for .88 and I made 12 just to be safe.)
- hot glue and glue gun
- free template (courtesy of itsthelife.typepad.com)
​- large safety pins
Picture
I found the tutorial for felt shark fins at It's the Life but their design required multiple steps and sewing! I avoid sewing at all costs so I quickly begin brainstorming ways to make it without sewing. I figured craft foam was stiff enough and super cheap so it was worth a go and it worked beautifully! To make the foam shark fin:
​Simply cut out the template, dividing the fin from the base and draw an outline onto your craft foam. Once you've made your outlines, cut them out and then glue one fin to the top of one base. Be sure to hold it there until it dries or it will fall over and/or not stand up straight. 
Picture
DIY Mermaid Tails
You will need:
- about 4 yards cheap, stiff material (I cannot remember what this stuff is called but it is only $4 per yard and has a stiffness to it. I believe it is used for putting under things and at hobby lobby they have it displayed being used to make a pretend cape.)
- about 3 yards iridescent sheer material (This stuff is a bit more at $6 per yard but it is important.)
- 1 30ft. spool of ribbon (I chose a sheer turquoise.)
Picture
Picture
Picture
Picture
Picture
Admittedly, the mermaid tails take more time and have more steps but, they are sooooo worth it! They look adorable! To make the mermaid tails you will need to:
1. Cut out a mermaid tail shape. I freehanded a tail while looking at a picture and then used that one as my stencil for the others. The material was the perfect length for kids as is so I didn't have to worry about the tail length. But, you might want to measure your kid to be sure.
2. Cut out about a million semi-circles from the sheer material. I used every available inch of my material and just barely had enough. I didn't use a stencil so the "scales" varied in size and shape but, I think that adds to the look and is waaaaay easier.

I hope you find this helpful and that your little monsters enjoy these crafts as much as mine did! Good luck!
Oh, and if you'd like to see the whole mermaid shark party you can check it out here!
1 Comment

Mommy Camp Around the World: Russia

8/18/2016

0 Comments

 
Due to all sorts of things including back to school, moving to a new home, my husband dislocating his shoulder and more, this is the final week of Mommy Camp for this summer! I prepared activities and planned on "visiting" China, India, South Africa and Australia but, things don't always go as planned. So, I will try to get to those countries at different points throughout the year when we find time. So, without further ado I present Russia!
Picture
I didn't really set up a dramatic play area for Russia this week because I couldn't think of anything but, I created a mural for decoration and grabbed both of their winter coats, an old Russian style fur hat, a set of Russian nesting dolls, fake currency and the books for the week. I also cut out some (pretty pitiful looking) snowflakes and stuck them on the wall. The mural turned out to be pretty neat looking and the kids had fun helping me color it.
Before we "flew" to Russia, we looked at our map and discussed where it was and their weather. Then we did our normal security check and airplane trip dramatic play.
Picture
Picture
Picture
Picture
Picture
Picture
Once we "arrived" we started off by learning about Fabergé eggs and reading a book called "Rechenka's Eggs". Then we made our own versions using egg shaped paper, glue and plastic gems. Both kids really enjoyed this craft and spent a good thirty minutes or more busily glueing their gems. Afterwards we learned about the Russian dance Kalinka and watched a  video.
Picture
Picture
Picture
For lunch, I cooked pierogi which are one of my all-time favorite foods. But, I cheated and used frozen ones that I sautéed with some butter and herbs. I served it with a mixed greens salad and some pear. Lillian loved them and was a big fan. Arthur refused to even give it a try but, at least one of them liked it! For dessert I made Russian orange cream and it was sooooo good and super simple. You can get the recipe here in my original summer mommy camp post.
Picture
Picture
Our next activity was learning about the Russian artist Kandinsky and creating our own versions of his art. However, neither kid was super into it and the projects never reached completion. You win some, you lose some. I think with all of our crazy things going on they were preoccupied. We read "The Noisy Paintbox" to go along with the Kandinsky lesson because he suffered from synesthesia. It's a great book and the kids really enjoyed it.
Picture
After the failed Kandinsky projects we learned about dymkovo toys and tried to create our own. I found a tutorial in Russian and we tried our best but they didn't really whistle like they were supposed to. However, they kids had fun making them using air dry clay and paint.
Picture
Picture
For dinner one of the nights I made borscht and piroshki. Borscht is a beet and vegetable soup and piroshki are basically meat buns. They were both really good and I even made the dough for the meat buns from scratch! The kids wanted absolutely nothing to do with it but Derek and I really enjoyed it.
Picture
Picture
We ended the week with chocolate filled Russian pancakes. They weren't my favorite recipe for pancakes because they used ricotta cheese and were a bit wet and dense. The kids didn't like them either.
Picture
Picture
After a somewhat disappointing breakfast we talked about Russian nesting dolls and made our own paper version as well as reading the book, We also talked about the famous Russian ballet, watched a video for a mini dance lesson and read the book "When Stravinsky met Nijinsky"
Picture
Picture
We had a great final week of Mommy Camp! Check back soon to see the weeks we didn't have time for as well as all sorts of other crazy things that I decide to get into like planning my daughter's 6th birthday. She wants a mermaid theme! Oh and here are my silly photoshopped pics of us in Russia!
Picture
St. Basil's Cathedral in Moscow
Picture
Palace Square in St. Petersburg
Picture
Palais Catherine in St. Petersburg
0 Comments

Mommy Camp Around the World: The U.K.

7/29/2016

0 Comments

 
Wow! I've been ridiculously busy with all sorts of things that have kept me from posting for a bit. We listed our home for sale and sold it within two weeks! We then had to find ourselves a new home that met the needs of our growing family. We've been dealing with all of the technicalities involved with selling and buying homes along with packing and planning. Oh, and my husband dislocated his shoulder being a big kid with our son. He decided to head down a tube slide on his belly and the end result was a hefty bill, pain meds and three doctors who worked for forty-five minutes to put everything back where it belongs. So now, we're quite a pair with him having only one functional arm and me being almost 7 months pregnant. But, we've hired a moving company and are actually moving in today!

Between all of those things going on, I did manage to complete two weeks of Mommy Camp but have unfortunately fallen behind my goal and will probably not make it to the last few countries for a bit. But, in the rest of this post you can find out about all of the fun we had learning about The U.K.!
Picture
We kicked off the U.K. on the week of the 4th of July which I thought fit nicely in regards to gaining our independence. After a very fun evening with friends, fireworks and ribs, we began our week with a trip in the chunnel, the underground and water tunnel connecting France to Great Britain. To simulate the Chunnel, I covered our dining table with a blanket and had them board the Chunnel and take a ride under the water. Being clever kids they even devised a way to store their luggage in the "overhead compartment" using the clamps for extending the leaf of the table. We also watched a bit of the show Modern Marvels about the building of the chunnel and a few videos of people riding it.
Picture
Picture
Upon arrival, the kids had a blast playing in a diy cardboard castle that I managed to whip up in only 15 minutes! I was really pleased with the result and am excited to share it with you!
Picture
15 min. DIY Cardboard Castle!
Picture
Picture
After cutting one fold of the box rendering it flat, make slits from the top of the box and fold them over to create the classic castle shape.
Picture
Draw your arch and then cut it out to create the entry.
Picture
Reinforce joints with popsicle sticks and hot glue. Then add silver duct tape that is taped to itself to create two non-sticky sides to the entryway.
To create the diy cardboard castle all you need is a large box (I purchased a new one from home depot for about $2.), some scissors and/or an exacto knife, some silver duct tape and large popsicle sticks. To begin, I cut one fold of the box all the way down so that it was no longer a box but instead, a large flat piece of cardboard. Then, I cut about four inch sections down from the top to the first fold all the way across and folded down every other one to denote the stone structure found at the top of many castles. I used hot glue (you could just use duct tape) to secure the folded flaps. Then I drew an arch shape across the center part of my cardboard and cut it out to create the entrance. Afterwards I realized that cutting the entrance compromised the stability and had to reinforce sections with popsicle sticks to make it sturdy enough to stand on its' own. I then took the silver duct tape and taped the sticky sides of two pieces together to create a metallic looking hanging gate at the arch entrance. That's it! It stands on its own, folds flat and the kids love it! I placed it near a corner to create a closed feel and added some prince/princess dramatic play items, table and chairs and tea set to complete the play area. Later that day I even made cucumber sandwiches and we had afternoon tea inside the castle. It was pretty awesome and definitely kept both kids busy for a while. 
Picture
Picture
Because the U.K. is comprised of multiple, distinct places like Scotland, Ireland and Great Britain, we focused on a different one each day. We started with Great Britain by discussing the role of a king and queen and watching a short video about visiting London and read the book "Katie in London". We also listened to The Beatles for a while and I did a small reading activity using the lyrics from the classic song, "Here Comes the Sun" to analyze and find sight words.We also talked about double decker buses and completed a bus craft. After that we learned about Big Ben by watching this great video and drawing a picture. We ended the day with some fish and chips!
Picture
Lillian's depiction of Big Ben. I provided her with a "How to Draw" sheet of the whole tower but she wanted to make her own version of just the bell after watching the video.
Picture
Crafting double decker buses.
Picture
After learning about Great Britain we journeyed to Scotland by watching this video and reading about castles in the book "Castle Life". After reading about and looking at castles, we drew our own using black construction paper and white crayon.  Then we listened to some bagpipe music and created our own bagpipes using a ziplock bag, tape and party blowers. To make them you cut the tip off of each end of the bag, insert one party blower in each corner (one blower in and one blower out) and taped them to seal it. These were a huge hit but didn't stand the test of time and were quickly destroyed. 
Picture
Lillian with her bagpipe.
Picture
Arthur with his bagpipe.
Picture
Arthur was really proud of his "castle" otherwise known as scribbles. But, whatever works.
Picture
Lilly wasn't very pleased with her castle. Hence the yuck face.
After the bagpipes we learned about the legend of the loch ness monster and watched this cute video after reading the book "Nessie the Loch Ness Monster". Then we created our own Nessie's with this free printable. For dinner I made shepard's pie. The kids wouldn't touch it but my husband and I were both pretty pleased.
Picture
Picture
Picture
We ended the week discussing Ireland. (I had plans for Wales but there wasn't much and the kids were not interested in the few activities I had so, fail.) We read an Irish folk tale called "Finn Maccoul and His Fearless Wife" and I made potato pancakes for breakfast. As usual, the kids had zero interest in eating them but my husband and I thought they were delish. After breakfast we watched some Irish dancing and a tutorial on a few basic steps. Then we made Irish harps out of cardboard, duct tape, and stretchy string. (It called for rubber bands which I thought I had. I was wrong and had to come up with a substitution.)
Picture
Picture
Picture
It was a fun week and I hope you found something inspirational to do with your kiddos!
0 Comments

Mommy Camp Around the World: France

7/4/2016

0 Comments

 
Our trip to France was full of art projects and fun! We learned about three major French artists, ate a little French fare, attempted a few ballet moves and had fun with our dramatic play bakery!
Picture
As with each week of MC Around the World, first we had to "travel" to our focus country. Last week we ended our travels in Rome, Italy so, we looked at the map and discussed how we would travel from Rome to Paris. We decided to fly and then looked at the weather in Paris to make sure we had the right clothes. Then we went through airport security and boarded our plane. Upon arrival they each handed their passports over for checking and stamping. Once we arrived we took a quick tour of the city by watching this video and then visited the main attraction, The Eiffel Tower. We learned about it by watching this video and then we did some tape resist painting art to create our own mini Eiffel Towers. 
Picture
Navigating airport security.
Picture
There was a bit of confusion over who should fly this week. Immediately after this photo there was a meltdown. Arthur ended up taking a much longer plane trip than Lilly as he was happier flying after Lilly disembarked and he had the controls to himself.
Picture
Lilly with her passport stamps so far!
Picture
Lilly and her Eiffel Tower.
Picture
This was an easy project to set up. Using fingerpaint paper, I applied painters tape in the shape of the tower and then let them paint the paper however they chose using only red, white and blue; the colors of the French flag. Once they were dry I removed the tape. Voila!
Picture
Arthur mixed his colors and ended up with a purple tower painting which gave us the opportunity to discuss color mixing. :)
After the long flight and fun at the tower, we needed a break and stopped for a baked treat at a French café. The kids played with this forever and loved taking my order using free printables from here, here and here that I laminated. We used things we already had from the play kitchen and I pulled out the diy doctor's window that I made last summer to be transformed into the bakery storefront. To add to the fun we made some play dough using this quick recipe (and used some store bought I had on hand) and created custom play dough cupcakes complete with their own cupcake liners! 
Picture
Picture
The bakery stand was made from a three panel science fair board that I made for health week last summer. It's an easy project and you can get the how to at the link above.
Picture
In the café I placed a bunch of items from their play kitchen including a coffee maker, desserts and utensils. I also placed the laminated recipe cards, some pretend euros I made and books for the week.
Picture
Picture
Picture
Picture
Making the play dough was super quick and easy!
Picture
Picture
Picture
I had a hard time finding French food that I thought the kids would even attempt to try. So, I ended up making crepes for breakfast one day. We actually make them quite often so my kids are not strangers to them. Lilly enjoys peanut butter on hers and Arthur likes jelly/jam like me. The only other French item that was made was for breakfast over the weekend. My husband made Croque Madam which is kind of like a ham and cheese breakfast sandwich with a super yummy mustard based cream sauce and it was fantastic. The kids outright refused and had cinnamon toast crunch instead.
Picture
Crepes, eggs and fruit.
Picture
Little toot with cinnamon toast crunch.
Picture
Little toot #2 with his cereal.
Picture
Croque Madam
Picture
Even though they may have had limited exposure to French cuisine, they learned a lot about art! We discussed the Impressionist art movement which began in France and learned a little about a few major players including Van Gogh and Degas. To begin, we read a book about each artist for Van Gogh we read "The Starry Night" which was a made up story but gave some great info about the artist, his style and his art. For Degas we read "Chasing Degas" and I really enjoyed this one! It followed a ballerina in search of Degas throughout the city of Paris where she ran into many other famous Impressionists. We also read "Katie Meets the Impressionists" which gave more great info using a fictional tale.

In addition to reading about the artists, we also watched a few videos including more "Art with Mati and Dada" about both Degas and Van Gogh. We also watched this cute video of a 5 year old teaching how to paint like Van Gogh. Lilly was really into it and then created her own version of "The Starry Night". I was super impressed. For more Degas knowledge we watched this short video and also had a mini ballet lesson using this video to get us in the ballerina spirit before learning how to draw our own ballerinas.
Picture
Creating her own version of "The Starry Night"
Picture
Picture
Lilly's version. I didn't help her at all!
Picture
Lillian participating in a mini ballerina lesson.
Picture
Learning how to draw a ballerina.
Picture
In addition to the focus on learning about art, we focused a little on the French language by reading an adorable book called "Everybody Bonjours" and watching several videos that taught a few key French phrases like hello, thank you, please and numbers as well as some classic French songs like "Alouette" and "Frére Jacques".

As always, here are my horrible but fun photo shopped pics of our trip!
Picture
Picture
Picture
Picture
We had fun and are ready to visit the U.K. next week! See you soon!
0 Comments

Mommy Camp Around the World: Italy

6/27/2016

0 Comments

 
We had a blast on our "trip" to Italy! We had fun with a dramatic play pizza shop, learned about opera, drew like Michelangelo and made some yummy Italian food!
A full week of fun devoted to Italy! DIY Pizza Parlor, Free Printables, Links and more!
Just like the previous weeks, we had to get to Italy first! This week we discussed train travel and I used a train tent that we already had as our transportation. They were both issued train tickets (you can find your own printable train tickets here), grabbed their suitcases and boarded the train! We also looked at the map and discussed how far away Barcelona, Spain and Venice, Italy are and why we decided to take the train instead of fly.
Picture
Picture

Once we "arrived" in Italy we started with a dramatic play pizza kitchen. I created a pizza oven and pizza using a cardboard box, brown craft paper, paint, a sponge, felt and an electric tea light. To make the oven I folded one side of the box in on itself and cut out the bottom. Then I wrapped it in brown paper and used a sponge and red paint to make faux bricks. For the fire element, I used a piece of the box that I cut out and drew a flame shape and painted it. Then I hot-glued it to a longer strip of cardboard and glued it to the inside on the bottom of the box. Then I placed an electric tea light behind the flame. I think the effect was really great and it only took about 15 minutes to make!
Picture
Picture
For the pizza I took various pieces and colors of felt and cut out shapes to look like different toppings, crust and sauce. I used tan cut into a circle to create the crust and red cut into a circle for the sauce. The toppings I made matched the order form that I found here for free! For the pineapple I cut yellow felt into semi triangles and added a few lines to make it look segmented. For the purple onion I cut crescent shapes out of purple felt. For pepperoni I cut smaller circles out of red and did the same for ham but used pink. I used black circles without centers for black olives, pink with red lines cut into rectangles for bacon and green squiggle circle shapes without centers for green bell pepper. For the cheese I used cream colored yarn cut into 3 inch pieces. I also made spaghetti and sauce using cream yarn for noodles and red for sauce. I grabbed a few containers and quickly drew labels for the lids to store each topping. Then collected a few plates, bowls, utensils, aprons and a chef's hat from the play kitchen, made a quick sign stating "Arthur and Lillian's Pizza Joint" out of craft paper and, Voila! Dramatic play pizza kitchen! This was a major hit! They played for hours off and on throughout the week and the best part is that now it is a permanent addition to their current play kitchen so, they'll get to continue enjoying it!
Picture
Picture
Picture
Picture
Picture
Picture
Picture
Picture
For breakfast one day I made zepoli which are kind of like donuts but actually a little more nutritious as they contain ricotta cheese. It may not seem like a big deal to you but, I actually fried something! I usually avoid it like the plague. However, I decided these sounded so yummy that I would go for it. I thought they were fantastic and actually easy but the kids weren't as enthusiastic. I think they're crazy. Lillian ate one and Arthur just licked the powdered sugar off before declaring they were "ucky". Ugh! Seriously?! Kids! Whatever, more for me! (I actually had a playdate with a friend and let her try them. She thought they were awesome too. So, I'm not crazy, just my kids.) You can find the recipe in the MC recipe book here.
Picture
Picture
Picture
Picture
To finish out the day we discussed the city of Venice by watching a this video, making a gondola craft using this free printable and reading the book "Olivia Goes to Venice" and "This is Venice". Both were big hits and were read multiple times throughout the week.
Picture
Picture
After learning about Venice, we discussed the city of Pisa and the Leaning Tower of Pisa. We watched this video and then we made a craft version for ourselves using an empty toilet paper roll, white paint, paper, black marker and green crayon. Surprisingly, they really enjoyed this simple craft and were very proud of their creations. To make them lean, I cut an small portion from the bottom of the roll at an angle and taped it to the paper.
Picture
Picture
Picture
For lunch we made our own pizza. It was pretty simple using pre-made pillsbury pizza crust, a jar of pizza sauce, fresh and shredded mozzarella, pepperoni and I added basil from our garden and black olives to my portion. Yum!
Picture
Picture
Our next focus was on opera since it's a pretty big deal in Italy. We watched quite a few videos on youtube to get a good idea of what it is including the following: "What is Opera", "Sesame Street: People in Your Neighborhood Opera Singer", "Sesame Street: Marilyn Sings C is for Cookie"and "Zoom: A Soup Opera" Once we had a good idea of what opera was, we watched "Mozart's Magic Flute: An animated plot summary" to learn about a popular opera story line and then watched these segments from a performance of that opera: "Metropolitan Opera: The Magic Flute" and "Erika Miklosa: Queen of the Night". I actually thought I had really worn out the opera thing and that they were both totally over it but, Lilly said she would like to watch a whole opera in real life and at various points throughout the day I caught her singing about her actions in an operatic style. Including a point when she sang, "Arthur has a poopy!" in a very dramatic, Queen of the Night manner. It was pretty hilarious and let me know that she got something out of the whole lesson.
Picture
Picture
After learning about opera we discussed Michelangelo and watched this video about him. Then we practiced creating art like he did when he painted the Sistine Chapel after looking at pictures of the ceiling located there. I taped paper to the underside of our piano bench and gave them a bucket of crayons. At first they weren't really into it but in the end they each created multiple masterpieces and spent about 30 minutes or more drawing. I call that a win!
Picture
We finished the week by creating laurel crowns using paper plates, glue and green construction paper. I prepped the plates by cutting the center out and cut out leaf shapes from the green paper. We discussed how in ancient Italy, they were often given to scholars upon completion of schooling and, since we finished learning about Italy they got to wear them! I was super impressed with Arthur and his focus on this craft. He spent at least 30 minutes and actually completed the crown. He did insist on looking fabulous with Lillian's sun hat while working which made it even more adorable. It even looked pretty ok for a two year old! I was, however, unable to capture a good photo as the apple sauce was more important at the time. Lilly was into though.
Picture
Picture
Picture
We wrapped up the week by making ravioli from scratch. I purchased this handy ravioli press, we made the dough and mixed up the filling and boom! Ravioli! We made a bacon, basil, cream sauce to go with them and boy was it delicious! You can get the recipe from the MC Recipe book here. I also made the Roman Apple Cake recipe found in the book. It was ok, but not my favorite. It may fave been because I ran out of flour and had to use coconut flour instead.
Picture
Picture
Picture
Picture
Picture
Picture
Finally, here are my horrible photo shopped pics from our "trip" to Italy. So silly!
Picture
Picture
Picture
Picture
It was a fun week and I'm ready for our next country, France! See you soon!
0 Comments

Mommy Camp Around the World: Spain

6/18/2016

0 Comments

 
Week two of Mommy Camp focused on a country close to my heart, Spain! As a Spanish teacher and past visitor to the beautiful country, I was pretty excited to share a little of it's culture and color with my kids. We learned about bullfighting and flamenco. Got crafty with some culture based projects. Made some delicious food and got inspired by Picasso, Miró and Gaudí.
Before we could experience Spain we had to "fly" there first! We got the dramatic play airport items and travel stuff. The kids were issued new tickets from Brazil to Spain (Brazil was last week) and took a plane ride. It was just as fun this week as the first when we travelled to Brazil. You can see how I created all of the dramatic play airport items in this post.
Picture
Picture
Lilly was pretty excited about our pretend trip and ticket.
Picture
The security area with "x-ray" baggage check is very popular.
Picture
Arthur was the pilot this week!
Picture
Once we "landed" the kids were able to enter the area I set up to represent Spain. I created a mural of sorts using brown butcher paper and oil pastels. On their table I placed the books for the week, two Spanish fans, some fake euros and castanets. We also looked at the map to discuss where we travelled and the weather there versus the weather where we live. Then we watched this video about Madrid.
Picture
Picture
Once we had "landed" it was time for breakfast. We made magdalenas which are a very eggy lemon muffin that is popular in Barcelona. You can find the recipe in my original MC post that includes ALL of the recipes! (I had planned to make something different and save these for later when we focused on Barcelona but these were quick and we were hungry!) After eating we learned about Miró and his art, watched this video and created Miró inspired art by looking at google images.
Picture
Zesting a lemon for the Magdalena muffins.
Picture
Arthur had to help too.
Picture
Mixing the dough. I forgot to snap a picture of them when finished but, they just look like yellow muffins. :) They tasted nice.
Picture
Getting inspired by Miró.
Picture
Arthur just did a little scribbling. He get's really excited when he's given a marker.
Picture
Lilly's finished Miró inspired drawing.
After all of that fun we learned a little about bull fighting by reading the book "The Story of Ferdinand" and then watching the cartoon. We discussed how the practice of bull fighting is not nice even though it is a popular element in Spanish culture. Then we created a toilet paper tube bull using a free printable from crayola. We also watched a video of men in Spain doing the Corrida or bull fighting dance. Before nap we also had a blast playing a popular hand clapping game called "Mariposa" we literally spent at least 40 minutes doing this over and over again. They loved it!
Picture
Once we finished learning about bull fighting, we focused on flamenco. We started out by reading the book "Lola's Fandango". We also listened to it using the CD that came with the book. Then we played with some flamenco dancer finger puppets that I made, colored a worksheet, made castanets and Spanish fans and even attempted to learn a few flamenco steps using this video. ​
Picture
I sketched out these dancing figures onto a piece of cardboard that was leftover from the tambourine pie pans of Brazil week. Then I cut them out. Easy and fun!
Picture
Flamenco dancer finger puppet!
Picture
Picture
They were both proud of their flamenco coloring sheets.
Picture
Making castanets was SUPER easy! A piece of cardboard with two buttons hot glued and the cardboard folded in half. Voila!
Picture
Once they were made, they colored the outside portion of the cardboard.
Picture
Lilly posing like a flamenco dancer.
Picture
Making the fans was also very easy. All you need is construction paper, hot glue, two popsicle sticks and a small rubber band. I used a tiny hair elastic.
Picture
After they decorated their paper, we accordion folded it and got glued the popsicle sticks to both end. Then I wrapped the two sticks together with the hair elastic.
Picture
So silly! You'll have to excuse the mostly naked baby. This is how I roll.
Picture
Attempting to learn a few flamenco steps.
Picture
Arthur thought his fan was really fun...for hitting with. It was promptly taken away.
We ended the day with breakfast for dinner by making Spanish tortilla and churro waffles. Both recipes can be found at my original MC post. Let me say, those churro waffles were Ah-May-Zing! Lilly helped with making them and everyone had seconds!
Picture
Picture
Picture
Picture
Our final focus was on famous artists from Spain. First we discussed Picasso and looked at some of his art. Then we created our own Picasso inspired cubist portrait paper bag costumes inspired by this website. They literally spent at least 20 minutes walking around with paper bags on their heads and giggling whenever they ran into anything. It was hilarious! We also had a Spanish inspired lunch of bocadillos which is just a fun way of saying sandwiches. We ended our Spain week by learning about Antoní Gaudí. We watched this fantastic video for kids about him and then worked on our own mosaic animals. Lilian, however, got a bit bored with the detail required to complete it and ended up coloring a large portion of her unicorn yellow. She is only 5 so coloring any portion with "tiles" was good with me. Arthur wanted nothing to do with it and was promptly put down for a nap after writhing in the floor in protest.
Picture
Picture
Picture
Picture
Picture
Picture
And here are my horrible photoshopped pics of our trip!
Picture
Picture
Picture
Picture
We had a great time on our "visit" to Spain! Next week we're off to Italy! There'll be a dramatic play italian restaurant, lessons about the opera and so much more! I can't wait!
0 Comments

Around the World: Brazil Continued

6/15/2016

0 Comments

 
In my last MC post I detailed all of the fun we had on our first day "visiting" Brazil. In this post, I'll let you know about all of the other fun activities, crafts and craziness that we completed including our very own Carnaval celebration, more yummy treat tasting and learning about the rainforest!
Picture
Picture
We started off by learning about the rainforest and discussing it's four layers. We watched this video about the layers and then we made a diagram demonstrating them. We also learned about some of the animals found in the rainforest like the morpho butterfly which is found in both Central and South America, the toucan and snakes and watched this video. After that we made some pretty adorable paper plate butterfly collages with tissue paper, learned how to draw a toucan and made a spiral snake craft that was both easy and cool! We also learned about how chocolate is made and where it comes from by watching this video before making a chocolaty snack called brigadieros (chocolate fudge balls). Then we read a few books including "The Umbrella" and "The Great Kapok Tree". After reading "The Great Kapok Tree" we did a little learning comprehension using a free worksheet and game. We rounded it all out with a fun jungle dance video!
Picture
Lillian's layers of the rainforest.
Picture
Learning how to draw a toucan.
Picture
Lillian's toucan.
Picture
Making the morpho butterflies.
Picture
Arthur with his morpho butterfly craft.
Picture
The jungle dance!
Picture
Lillian with her spiral snake.
Picture
The Kapok Tree worksheet.
Picture
The Kapok tree game.
Let's talk about the fun we had with food! We made all sorts of Brazilian deliciousness including Brazilian lemonade, empanadas, Abacaxi com Hortela (pineapple mint juice), Macarronda com Requeijao (macaroni and cheese), brigadiers (chocolate fudge balls), Páo de Queijo (cheesy bread) and brazilian ham and cheese rolls. All of the recipes can be found in my first post about this summer's mommy camp here.
Picture
Brazilian Lemonade
Picture
Ham and Cheese Empanadas
Picture
Pineapple and Mint Juice/Smoothie
Picture
Making Brigadeiros/Fudge Balls
Picture
The Cheesy Bread was a BIG hit!
Picture
Brazilian Cheesy Breads
Picture
Ham and Cheese Rolls
Picture
Brazilian Mac n' Cheese
After learning about the rainforest, we learned about the city of Rio de Janeiro. We watched a video about the city and then talked about where it was located. After that we learned about Carnaval! We watched this video of carnaval dancers, tried to learn the Samba with this video and then made our own Carnaval themed headdresses, arm/leg bands and tambourines! Finally, we held our own Carnaval parade. They both had a ton of fun 
Picture
Making tambourines! All you need is two aluminum pie pans, stickers/markers, a hole puncher, pipe cleaners and small jingle bells. Super easy and very fun!
Picture
Arthur with his DIY Carnaval headdress! You need a foam visor (flipped wrong ways) feathers, stickers and glue! Bam! A fun project and costume!
Picture
Feathered armbands for Carnaval. You simply glue colorful feathers onto a toilet paper roll that is cut in half length wise and width wise.
Picture
Lilly decided to go all out and raided her dress-up stuff to make it extra fun!
Picture
Lilly's finished headdress.
Picture
Lilly's finished tambourine.
We ended by discussing a the popular artist, Romero Britto, from Brazil. We watched a video about his work and then looked at some of his art using google images. Then, Lilly created her own Britto inspired art with a sharpie and markers.
Picture
Getting inspired by Britto's work using Google images.
Picture
Picture
Lilly with her second Britto inspired piece.
As a close to our first week of MC, we filled out our travel journal. I created the journal and you can download it here. It was a great way to reflect on what we learned as well as get in a little reading and writing practice.
Picture
Picture
Just for fun, I did some really quick and not super impressive but very fun photoshopping to make us look like we actually visited Brazil. Goofy, I know. I did it all on my phone using the free adobe photoshop app.
Picture
Picture
Picture
Picture
It was a great start to our Mommy Camp for the summer and I can't wait until our next week when we travel to Spain!
0 Comments
<<Previous
    Picture

    RSS Feed

    meet rachel

    Rachel is a mother of three, elementary Spanish teacher and part-time blogger who loves crafting, creating fun and engaging activities for her children and students and hanging with her friends and family. She blogs about what she's doing and her interests at any given time which vary. She's a little OCD and always looking for her next project. Her husband calls it, "focusing her crazy", but she just calls it fun. 

    Archives

    February 2022
    December 2021
    November 2021
    October 2021
    September 2021
    August 2021
    July 2021
    May 2021
    April 2021
    March 2021
    February 2021
    January 2021
    November 2020
    October 2020
    August 2020
    July 2020
    June 2020
    March 2020
    February 2020
    December 2019
    November 2019
    October 2019
    August 2019
    July 2019
    May 2019
    March 2019
    February 2019
    January 2019
    December 2018
    November 2018
    October 2018
    September 2018
    July 2018
    June 2018
    April 2018
    March 2018
    February 2018
    December 2017
    October 2017
    September 2017
    July 2017
    June 2017
    May 2017
    April 2017
    March 2017
    February 2017
    January 2017
    December 2016
    November 2016
    October 2016
    September 2016
    August 2016
    July 2016
    June 2016
    May 2016
    April 2016
    March 2016
    February 2016
    January 2016
    December 2015
    November 2015
    October 2015
    September 2015
    August 2015
    July 2015
    June 2015
    May 2015
    April 2015
    February 2015
    September 2014
    August 2014
    February 2013
    January 2013
    December 2012
    November 2012
    October 2012
    September 2012

    Categories

    All
    Baby
    Beauty
    Clothing
    Crafts
    Decor
    DIY
    DIY Gifts
    Dramatic Play
    Freebies
    Free Wallpapers
    Fun With Paint
    Holiday
    Inspire
    Kids
    Kid Snacks
    Mommy Camp
    My Thoughts
    Organize
    Parenting
    Party Time
    Photography
    Science Stuff
    Sensory Play
    Silhouette
    Toddlers
    Whole 30

    Picture
    Picture
    Mom Buzz Media
Proudly powered by Weebly