Paint Covered Kids
  • Blog
  • About
  • Contact
  • The Gallery
  • DIY
  • Mommy Camp
  • Freebies
  • Subscribe!
  • Blog
  • About
  • Contact
  • The Gallery
  • DIY
  • Mommy Camp
  • Freebies
  • Subscribe!
Paint Covered Kids

​

An up-cycle project for earth day

4/24/2017

3 Comments

 
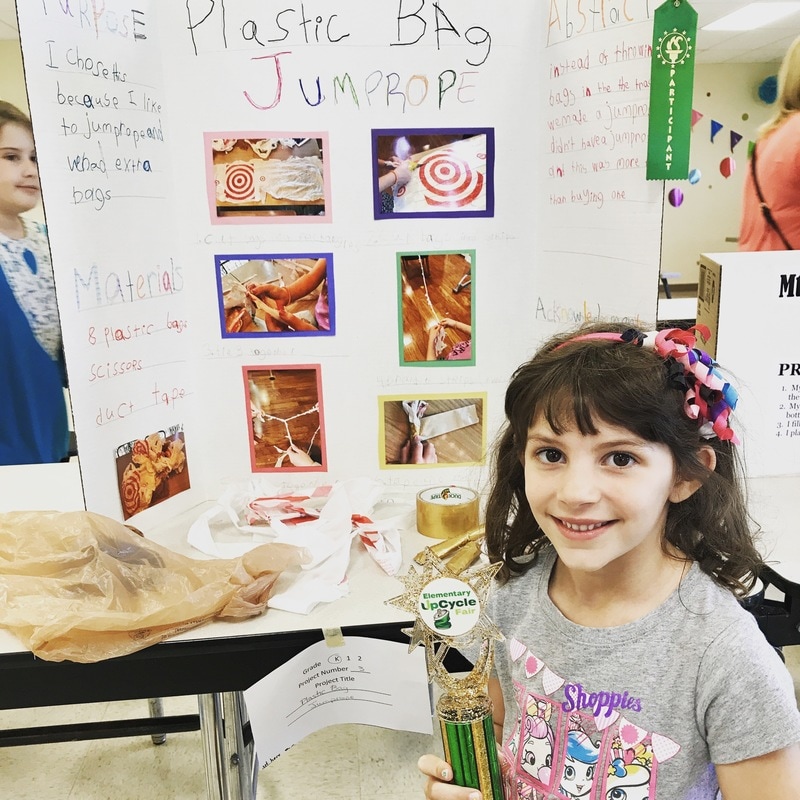
My daughter's school hosted an up-cycle fair and we chose to participate. The goal was to encourage young people to think about recycling and ways to re-use items so they can help keep the Earth happy! It was done similarly to a science fair where you created your item and then made a project board to display with it. Judges then awarded prizes for each grade.
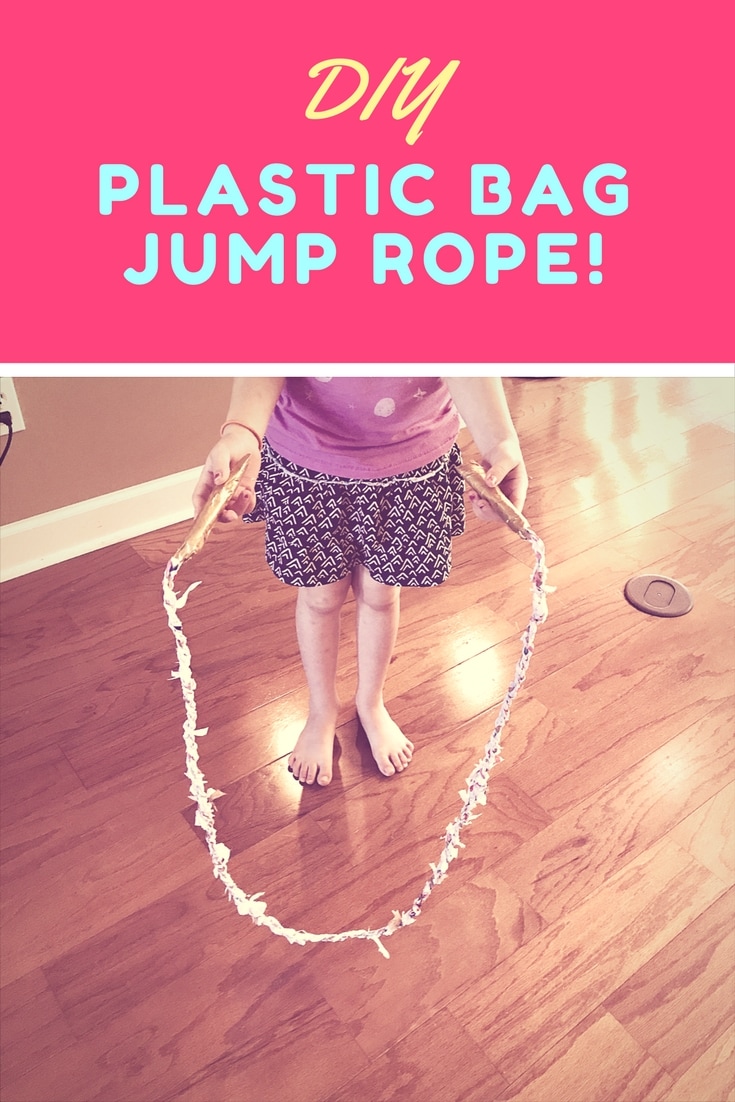
My daughter decided to make a jump rope out of plastic bags and even though she needed our help, she did most of the project on her own. It was fairly easy to make and we truly had all of the materials already. In fact, I think we have enough plastic bags to make at least 8 more jump ropes if we really wanted! She ended up winning 3rd place for her grade and was given an adorable trophy. It was a lot of fun and we look forward to participating next year! 

Want to make your own? Check out the directions below!
Make use of all of those plastic bags with this fun and easy craft!
DIY PLASTIC BAG JUMPROPE

You will need:
- plastic bags (Number varied depending on the length of your rope. We used 10.)
- scissors
- duct tape

1. Cut the bag open and remove the handles creating a flat rectangle.
2. Cut the rectangle into long strips about 1 inch wide.
3. Knot strips end to end until desired jump rope length is reached. You will need 12 pieces of tied strips.(We tied three strips together for ours. It is perfect for my 6 year old but too short for an adult.)
4. Gather 6 tied lengths of bag and tape to the back of a chair. Then separate into two's and braid the entire length. Repeat with other 6 tied strips.
5. Once both groups of strips are braided, twist them together to create a thicker rope.
6. Fold over ends and tape with duct tape to create the handles.
​7. Jump!
Picture
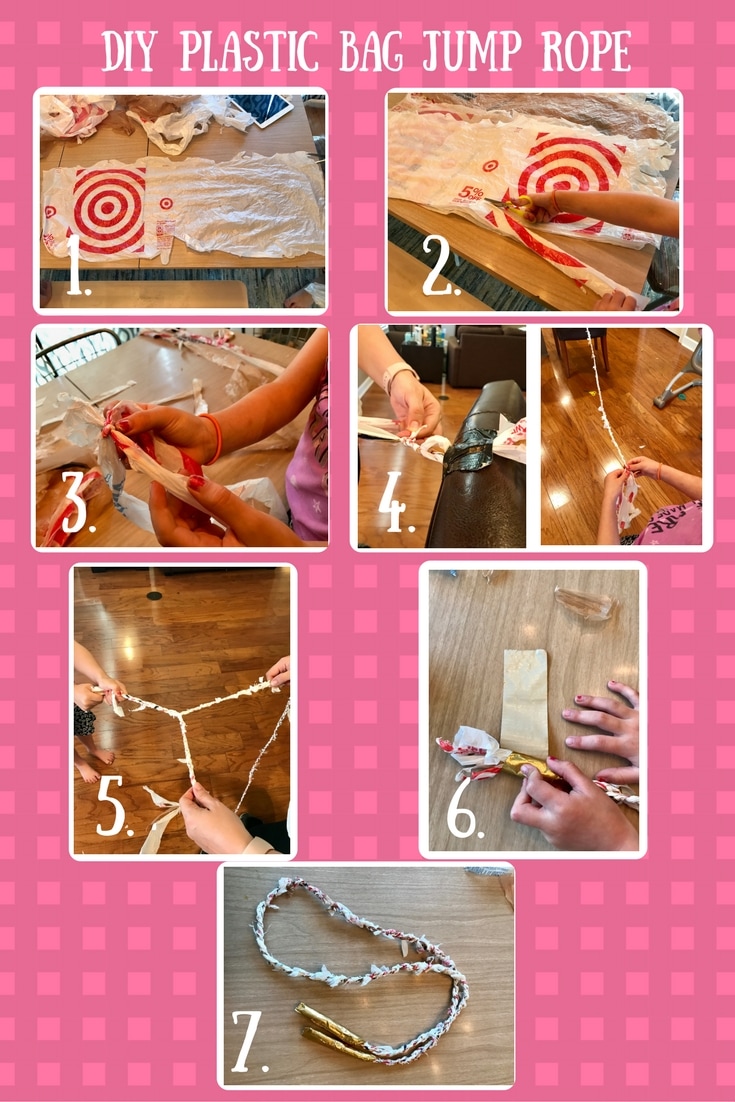
We had a lot of fun with this project and she is loving her new jump rope! Winning 3rd place was an added bonus! Hopefully your little one will enjoy the project too! Have fun and thanks for visiting!
Picture
Picture
3 Comments

custom tshirts with freezer paper stencils

4/24/2017

0 Comments

 
I've become disillusioned with vinyl t-shirt creating. No matter what I do, they never look as good as I imagine they will. They take a lot of effort and don't end up costing much less than if I'd just purchased it already made. So, when I decided to create some shirts for Earth Day I went with a new method: Freezer Paper Stencils! And, let me tell you, I AM IN LOVE! Why do you ask? Well, it was cheaper, faster and way, way, way easier! Let me tell you all about it!
Learn how to make awesome and professional looking t-shirts using paint and freezer paper!
You will need:
- freezer paper (You cannot sub wax paper. Freezer paper is only waxed on one side unlike wax paper.)
- scissors
- exacto blade and/or cutting machine (I used my silhouette machine but, technically you could get extra artsy and use a cutting tool and free hand it. I would never dedicate that time but, to each his own.)
- acrylic paint colors of your choice
- paint brush
- iron
- pre-washed t-shirt

1. Design your stencil. I used my silhouette machine and designed the shirts using it's software. You could design it on a piece of paper or in powerpoint, print it out, and then trace over your design on the wax paper to cut it out.
2. Send your design through the machine. Place the freezer paper shiny side down on your cutting mat. The settings will depend on how detailed your design is and how sharp your blade is but for me, the settings that worked best were: 
         blade: 1
         thickness: 4
         speed: 3
            I did modify for different designs by changing the thickness or speed one or two depending. But, the blade remained at 1.
3. Weed your design and make adjustments if necessary. There were a few times where it didn't cut quite right and I ended up modifying it with scissors. You couldn't even tell when it was all done so don't stress if it's not perfect. 
4. Position your paper on your shirt and apply heat with the iron. This creates a seal on the shirt with the waxy side of the paper but is easily removed with no damage making it great for painting!
5. Paint with desired colors using a paint dobber brush. I really liked the weathered look that was created by using just enough paint and not applying it evenly to all letters. I think it made the shirts look more professionally created. So, imperfection is rewarded here. Don't overdo the paint and don't stress that some letters get more than others. Yay!
6. Allow to dry.
7. Remove freezer paper stencil.
Picture
Picture
Picture
Picture
Picture
Picture
Picture
I couldn't be more pleased with how my shirts turned out and after washing they look as good or even better! I'm excited to make a ton more and am so glad that I don't have to mess with the frustration or cost of vinyl anymore! I hope you're inspired by this post and if you like my shirts you can download the silhouette files below! 
bees.studio3
File Size: 162 kb
File Type: studio3
Download File

magicscience.studio3
File Size: 172 kb
File Type: studio3
Download File

respectearth.studio3
File Size: 104 kb
File Type: studio3
Download File

yallneedscience.studio3
File Size: 115 kb
File Type: studio3
Download File

zygote.studio3
File Size: 220 kb
File Type: studio3
Download File

0 Comments

Mommy camp summer 2017 - Initial Planning

4/10/2017

0 Comments

 
Picture
Summer break is only six weeks away so I've started planning for this summer's Mommy Camp! This year will consist of 8 weeks of plans covering a variety of topics. I've already prepped week one and created my overall plan and you can check it out below! I know I'm super excited and my daughter can hardly contain her excitement.

If you're unfamiliar with my Mommy Camp series you can check out the Mommy Camp page on my site to see previous versions. Being a teacher, I love to create fun activities for my kids and I to do when we're out of school or nearing certain holidays. But, I often found it difficult to plan for the various activities I pinned because I would forget about many or not have the supplies I needed for them. So, when summer was quickly approaching I decided to create actual lessons to do with my children for the entire summer. Each week has a focus/theme and I create varying activities including art, sensory, reading and writing, field trip ideas and videos. I also set up a dramatic play area that relates to the weeks theme for them to interact with throughout the week. The lessons I create are set up in an easy to follow format and include links, worksheets and more so that you can conduct your own Mommy Camp! 

I hope you join us on this learning adventure this summer! Be on the lookout for the full, detailed lessons including everything you need to host your own Mommy Camp with your little ones! But, until then, you can see what I have planned! See you soon!
Picture
0 Comments

A Serene Mountain Nursery

4/10/2017

0 Comments

 
Picture
My son was born in October and I have only recently finished his nursery. I figured I didn't need to rush since he is still sleeping in a bassinet beside me. Plus, we waited to find out what we were having and let it be a surprise on the big day! So, I didn't want to decorate until I knew the gender. Once I began planning, I decided on a mountain theme and am really pleased with how it turned out!
To begin I turned to Pinterest for inspiration, of course, and decided the mountain theme would be perfect. Originally I planned on painting a mountain mural similar to the ones below but, my husband was not a fan of the idea and, after painting the bedroom gray along with two other bedrooms and a bathroom, I was kind of over painting. 
Picture
Picture
I went on a painting spree in our new home and took both of the boys bedrooms (they share a bath jack and jill style) from a seriously bright turquoise hue to a much more subdued and versatile gray from Sherwin Williams called "Evening Shadow". It has a tendency to lean toward the blue end of the gray scale but, from my experience, works well with any colors you throw at it. I also painted my office this color. It is almost complete and I will post about it soon! In addition to painting those three rooms, I also painted the jack and jill bathrooms, taking them from flamingo pink (I know right?! All THREE of our bathrooms were painted this color when we moved in!) to a blue gray from Sherwin Williams called "Rarified Air" and my daughter's bedroom went from boring taupe to a lovely light (almost white) purple shade called "Silver Peony".
Picture
Picture
Whenever we paint my husband or myself wears these hideous pants that my mom got Derek one year. They are pajama pants that look like beat up blue jeans and are hilariously ugly. They are fantastic and make me giggle every time.
So instead, I decided to create faux wallpaper using my silhouette machine and white vinyl. I found a few mountain shaped silhouettes and paired them with various triangle shapes, sent them through my machine and then applied them randomly on the main nursery wall. It took very little time and I love the result! In fact, if you want to create your own faux wallpaper using vinyl and a silhouette machine, you can download my file! Sweet!
Picture
mountains1.studio3
File Size: 661 kb
File Type: studio3
Download File

mountains2.studio3
File Size: 591 kb
File Type: studio3
Download File

Picture
Picture
Picture
After applying the vinyl, I made the name sign for above the crib by purchasing the blank sign at Hobby Lobby for $20 and painting the tops to look like snow covered mountains. Then I created a stencil using letters printed out from my computer and then cut and traced on top of the wood. It was also a quick project but makes a big impact. To finish the room, I added a gray and white striped teepee from Hobby Lobby for $45 (I used the 40% off coupon) and white faux fur rug. The crib is the same one from my other two children but I added white teething covers to lighten it and to cover the destruction left behind from my first son. I hung gray room darkening curtains on a white arrow shaped curtain rod from Ikea. The rocking chair is also a hand me down from the other two kids and the pillow cover was also a clearance Hobby Lobby find for $3. The dresser is a vintage piece from my grandfather. I found an awesome LED moon light on super clearance at Target for $15 and created the national park prints by sending free original images, found online here, to Walgreens for printing and then framed them in $5 frames from Hobby Lobby where I also found the wall vinyl tree. It has the ability to hang hooks on the branches but I haven't gotten around to it yet. 
Picture
Picture
Picture
Picture
Picture
I only have one remaining project to complete for the room which is a mobile. I plan on making a mountain and tree one like the ones below. I've purchased all of the materials but haven't had the time to get it made. I'll definitely post about it when it's complete. I'm also on the lookout for a cool lamp but haven't found one I like yet. I'm sure there will be a few changes and additions once Alan gets moved into his new room but for now it is a lovely place to sit and relax while rocking him. 
Picture
Picture
If you're interested in checking out my inspiration board on Pinterest, you can see it here!
0 Comments
    Picture

    RSS Feed

    meet rachel

    Rachel is a mother of three, elementary Spanish teacher and part-time blogger who loves crafting, creating fun and engaging activities for her children and students and hanging with her friends and family. She blogs about what she's doing and her interests at any given time which vary. She's a little OCD and always looking for her next project. Her husband calls it, "focusing her crazy", but she just calls it fun. 

    Archives

    February 2022
    December 2021
    November 2021
    October 2021
    September 2021
    August 2021
    July 2021
    May 2021
    April 2021
    March 2021
    February 2021
    January 2021
    November 2020
    October 2020
    August 2020
    July 2020
    June 2020
    March 2020
    February 2020
    December 2019
    November 2019
    October 2019
    August 2019
    July 2019
    May 2019
    March 2019
    February 2019
    January 2019
    December 2018
    November 2018
    October 2018
    September 2018
    July 2018
    June 2018
    April 2018
    March 2018
    February 2018
    December 2017
    October 2017
    September 2017
    July 2017
    June 2017
    May 2017
    April 2017
    March 2017
    February 2017
    January 2017
    December 2016
    November 2016
    October 2016
    September 2016
    August 2016
    July 2016
    June 2016
    May 2016
    April 2016
    March 2016
    February 2016
    January 2016
    December 2015
    November 2015
    October 2015
    September 2015
    August 2015
    July 2015
    June 2015
    May 2015
    April 2015
    February 2015
    September 2014
    August 2014
    February 2013
    January 2013
    December 2012
    November 2012
    October 2012
    September 2012

    Categories

    All
    Baby
    Beauty
    Clothing
    Crafts
    Decor
    DIY
    DIY Gifts
    Dramatic Play
    Freebies
    Free Wallpapers
    Fun With Paint
    Holiday
    Inspire
    Kids
    Kid Snacks
    Mommy Camp
    My Thoughts
    Organize
    Parenting
    Party Time
    Photography
    Science Stuff
    Sensory Play
    Silhouette
    Toddlers
    Whole 30

    Picture
    Picture
    Mom Buzz Media
Proudly powered by Weebly