Paint Covered Kids
  • Blog
  • About
  • Contact
  • The Gallery
  • DIY
  • Mommy Camp
  • Freebies
  • Subscribe!
  • Blog
  • About
  • Contact
  • The Gallery
  • DIY
  • Mommy Camp
  • Freebies
  • Subscribe!
Paint Covered Kids

​

Free Printable "We Can/can't Play" Door Sign

10/17/2016

0 Comments

 
Picture
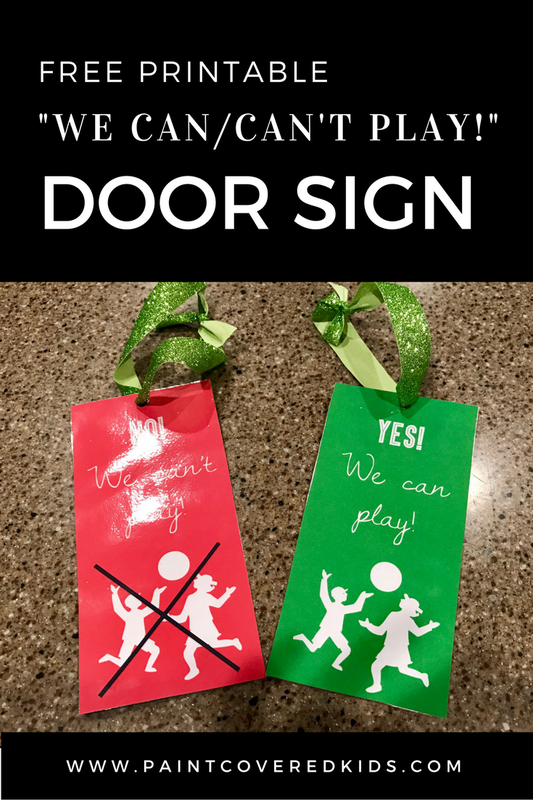
We lucked out and in our new neighborhood there are a bunch of kids our kids ages. We are especially lucky that directly across the street lives one of my daughter's best friends! But, sometimes it can be a struggle when either mine or theirs wants to play when the parents may have other plans. So, my friend/the mom across the street mentioned having door signs so the kids know not to knock/ring the doorbell and cause a meltdown to occur because they can't play. I thought it was a great idea and quickly whipped up these adorable and useful door signs!
Picture
Their easy to make and will definitely save us some heartache!
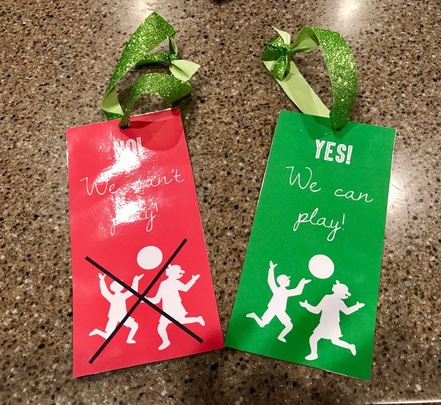
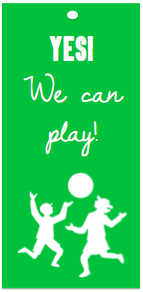
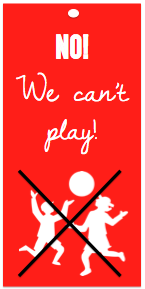
1. Download and print the free printable.
2. Glue the two sides together.
3. Cut the sign out.
4. Laminate (if possible) to enhance durability
5. Hole punch on the white dot and tie a ribbon/string through the hole.
6. Hang on your door!
Picture
Picture
play_door_sign.pdf
File Size: 215 kb
File Type: pdf
Download File

Cute and functional! 
0 Comments

Thrift Shop Finds

10/17/2016

0 Comments

 
After the success I experienced with my mid-century modern table and chair set re-do, I decided to make a point to continue visiting thrift shops in search of hidden treasure. I lucked out again when looking for an entry table and found this great piece for just $65! I plan on doing some sort of update to it but am not sure exactly what that will be. For now, I'm happy to have it as is and created a cute arrangement with sticks from my backyard, a $5 container from Wal-Mart and some fresh mini pumpkins and squash. I've also ordered a round rug which hasn't come in yet.
Picture
Picture
Picture
At the same shop I also found a somewhat mid-mod styled metal bookshelf for $27. It was covered in dirt and cobwebs (I forgot to snap a pic as I was too excited to clean it.) but, once i cleaned it you could appreciate all that it offered. The somewhat distressed looking black metal shelves paired with the modern lined gold metal sides offer a sleek and stylish feel and with a few decorative items it filled my empty wall perfectly. 
Picture
Picture
I'm pretty darn pleased with my finds and I haven't even done anything to them! I LOVE thrift shops!
0 Comments

A Mid-Century Mod Table Re-Do

10/17/2016

0 Comments

 
So, I've finally nailed down my style aesthetic and that is mid-century modern with a twist. Now that we're in a new house I have about 5 million ideas and things I want to change but that costs money. Plus, I want the house to feel like the decor naturally occurred and not like I bought everything to match at one store. Because of that and the fact that mid-century mod is kind of expensive but can also be found at antique shops, I've been making an occasional stop at a few on my way home from work. My first goal was to find a new table set for our breakfast nook. I scoured the web first to see if I could find anything suitable for an acceptable price but didn't have much luck. Then I found this beauty for only $65 at a local thrift shop! 
Picture
Picture
Picture
You have to have vision when looking to re-do old pieces and I figured with a new coat of paint and some new fabric this table could be awesome. The top is the part usually in horrible shape and this one had a near perfect top. Lucky! The basket style back of the chairs paired with the skinny, angled legs was classic mid-century and the chairs would be easy to re-upholster by just unscrewing the seat from the chair. My husband was skeptical but my girlfriends encouraged me and even said if I didn't get it that they would. So, I bought it and headed home with my plan. First, have my husband spray paint the metal with a new coat of silver and second, to re-upholster the chairs with a fun but not too quirky fabric. 

I headed to Home Depot and grabbed about 5 cans of nickel colored spray paint and some supplies to clean the metal of any rust and then visited Hobby Lobby for my fabric. After a brief discussion with a friend to help me decide I settled upon a colorful striped chenille material. But, I started thinking about what we would be using this table for. It is going to be our everyday table and frequented by children. I knew that the fabric would quickly begin to get stained and look atrocious plus be a nightmare to keep clean and at $30 per yard I didn't want to replace it in a year. So, I also purchased some upholstery plastic to cover the chairs with. So, in about 10 years or so we'll be able to enjoy the feel of the fabric. Until then it'll be nice and plasticky.

With  my supplies purchased I headed home to get to work. Removing the seats was simple and I only needed to tape the edge of the table top for spray painting. So, while my husband painted I began to upholster. It went very quickly. I simply laid the seat on top of the fabric and cut with enough to have some extra for pulling the fabric tight. Then, with a manual staple gun I stapled the fabric and then the plastic to the bottom of each seat. Oh! And I looked up the company that created the table set and they were apparently a pretty big deal and made some very desirable furniture sets for those looking for legit mid-century modern antiques. So, major win! I will definitely be able to make my money back if I ever decide to sell the set.
Picture
Picture
Picture
Spray painting went pretty smoothly. After the first attempt to apply the nickel paint with a built in primer wasn't producing the color we wanted we had to apply an actual primer first so, it took quite a bit longer as the primer had to sit for 24 hours to cure too. We used a white kilz primer. But, the end result was great and definitely worth the extra time.
Picture
Picture
After a few days of literally waiting for paint to dry and only a little bit of work we ended up with an adorable table and chairs set for our breakfast nook that fits my mid-mod style perfectly. I placed it next to my DIY Easy-Change gallery wall, purchased a new rug from zulily for only $100 and replaced the froo-froo chandelier with a more fitting sputnik styled one from Amazon. Once we finally get around to re-painting and I pick some new curtains it will be a finished space but, with the new baby about to arrive those things are on-hold for now. But, I love my breakfast nook so far and am super thrilled about the table set transformation!
Picture
Picture
Hopefully you'll be inspired to give those beat-up looking thrift shop finds a second chance too! Thanks for visiting!
0 Comments

DIY Creepy crawly Halloween decor

10/14/2016

0 Comments

 
Picture
Since we have a new house I decided to mix up my Halloween decor this year and I chose a theme. I don't know about you but I have a serious problem with spiders so naturally I think they are super creepy and perfect for Halloween decorations. For my decor this year I found an awesome garland at Hobby Lobby and one at Target as well to hang on my mantel. I also grabbed a spider themed table runner to place on the mantel as the foundation. Then the kids and I added some pipe cleaner spiders to the mantel top as well as a few hanging down from black ribbon. To finish off the mantel I tied black ribbon to my decorative sticks to give the appearance of bats and used sticky tac to adhere some paper bats I made a few years ago to the wall.  I also found a great lantern and glass sign for $5 each at Target. It still needed something so I threw in my Dollar Tree black crows as well as three glitter skulls from years past that light up when turned on.  
Picture
Picture
Picture
Picture
I continued the decor throughout the living room by bringing back my lampshade silhouettes that I made many years ago and adding more bats to my gallery wall. I also changed up my gallery wall art with some Halloween themed art as well as family photos from years past. You can see a tutorial on my gallery wall by clicking here!
Picture
Picture
Picture
Picture
We also did some fun spider themed stuff for the outside of the house but I keep forgetting to snap some photos! I'll definitely add them as soon as I can remember to capture the fun!
0 Comments

Diy Doctor & nurse gifts

10/13/2016

0 Comments

 
Since I could have a baby any day now I went ahead and made some doctor and nurse goody bags for all of the people who are going to help me bring a new life into the world. I did this for the birth of my son over 2 years ago and it went over really well. Everyone likes to be feel appreciated! It only took me about 30 minutes and probably the same in dollars to create something that shows those helping me through a pretty momentous event in my life that I appreciate them and what they do. 
Picture
What you will need:
- small plastic gift bags
- ribbon
- hole punch
- bag filler/confetti stuff
- assorted items for the bags
    For example, I put a granola bar, chapstick, hand lotion and gum in my bags

I cut out the tags and hole punched one corner. Then filled each bag with some bag filler (I used gold leftover from my daughters mermaid party.) and tossed in the items. Then I strung some ribbon through my hole punched tag and tied it onto the bag. Done! It was easy and fast and will hopefully brighten up their day!

You can download the gift tags below. They don't include the  "-The Johnson Family" section at the bottom and instead have a blank space where you could write in your family's name instead. Enjoy!
Picture
hospital_thank_you_tags.pdf
File Size: 637 kb
File Type: pdf
Download File

0 Comments

Getting ready for number 3

10/13/2016

0 Comments

 
I am almost 39 weeks pregnant and could have my baby any day. So, I've been finishing up with the few things that needed to be done. Since we aren't finding out the gender until the baby is born the number of things on my to-do list is not much. I washed the one load of laundry I had, stocked my changing station with diapers and wipes, pulled out a few baby items from my previous two kids that might come in handy and set-up my new halo bassinet which I am super excited about.

With my other pregnancies, I decorated the nursery and had an entire wardrobe plus made a few other personalized items for the new baby. However, not knowing the gender really puts a wrench in that plan. The one thing I have managed to do is create two different going home outfits using a few clothing items from Old Navy, a headband from Hobby Lobby, a hat from my son when he was a newborn and my silhouette machine. 

I designed the silhouette cut myself and chose gold glitter for the girl and navy for the boy. I think the outfits turned out pretty adorable and make me feel like I did SOME special preparation for this child.
Picture
Picture
Picture
I also made big brother and big sister shirts for my other kids that kind of match. So, my daughter has a glitter gold vinyl on a white shirt and my son has a navy vinyl on a baseball tee. I also created big sister and big brother goody bags that include a few gifts, activities and snacks to keep them entertained.
Picture
Picture
Picture
For my son, who's 2.5, I got a boy baby stella doll with a magnetic pacifier and threw in a few other toys we already had for pretend play with a doll. When my son was born my daughter also received a new baby doll and care items so she could pretend to take care of the baby. I think my son will really enjoy it and it is his first baby doll. I also got him a crayola color wonder activity set and a color blast set so he can be creative without coloring everything around him. He's a bit messy. I also got him his first backpack to carry all of his swag. He's a major dinosaur fan so I felt like the dino backpack was appropriate. He is also getting a book about being a big brother. I got the same book for my daughter about being a big sister when Arthur was born. I finished off the bag with some of his favorite snacks and treats.
Picture
Picture
Picture
My daughter's bag was a bit more difficult because she has already gone through this once. But, I managed to find her an adorable book about being a big sister that is geared for a slightly older crowd called "How to be a Baby by Me the Big Sister". It's adorable and perfect for her bossy big sister personality. I also got her two "It's Fun to Draw..." books. She already has one of this series and loves it! To help her with the drawing I got her a set of glitter gel pens. I don't know about you but when I was a little girl these things were all the rage and coveted by any girl who had them. I hope she'll like them as much as I did. Since she didn't need another baby doll I decided to go with another craft project and chose a jewelry making kit. This one has a bunch of different beads including alphabet beads so, she can make a big sister bracelet if she wants. It's definitely something have fun with and will keep her entertained for a good long while. I finished off her bag with a small monogram necklace I picked up at Hobby Lobby, her Leap Pad and games and a few of her favorite snacks. I put them all in the same bag she received when Arthur was born which I custom ordered from Etsy. 
Even though I know  big brother and sister bags are not necessary I feel like letting them know that I am thinking about them and making them feel special is important with such a big life-changing event. Plus, it makes my in-laws lives a bit easier since both kids will have new toys, snacks and activities to keep them entertained while they wait. When I had Arthur I was in labor for 27 unmedicated hours. So...it could be a while.
0 Comments

DIY Princess Jasmine Costume Jewelry

10/3/2016

0 Comments

 
Picture
I get excited every year when it's time to plan and create our Halloween costumes! This year I'm a little less enthused because I will either be gigantically pregnant and overdue by almost one week or I will have JUST had a baby. So, either way trick-or-treating may not be in the cards for me. But, I can still participate in the costume part...maybe. So, when the time came to make a plan I was at a bit of a loss. How do I prepare for two very different costume sizes without making two costumes? After chatting with my daughter and asking her what she would like to be she said she wanted to be Princess Jasmine. That got me thinking. I could be Raja the tiger! An orange t-shirt, black leggings and some face paint and I can either be super huge Raja or Raja with a baby Raja! Perfect. My husband is going to be Aladdin and my son will be Abu the monkey. It's going to be adorable. But, enough about the thought process. You're here to learn about the Jasmine costume. 

Usually, I create the entire costume myself but, the Jasmine costumes looked like they would require a bit more sewing than I was interested in and pre-made ones were pretty cheap. So, I purchased this one on Amazon. I opted for a non-navel showing one because, you know, she's six. I also purchased these gold shoes. But, when looking for Jasmine jewelry and accessories I couldn't find any that looked like the actual cartoon. So, I decided I could do it myself.

What You'll Need:
- clip-on earring backs
- 1 sheet blue glitter craft foam
- 1 sheet yellow glitter craft foam
- 1 yellow glitter craft foam visor
- 1 turquoise stretch headband
- hot glue gun and glue sticks
- scissors

I pulled up an image of Princess Jasmine to make sure I knew what I was doing and then free-handed a rounded edge triangle for the earrings. Then I cut it out and used it as a stencil for my other earring and cut it out too. Once I had my earring shapes I simply glued them to the earring backs and I had my earrings!
Picture
Picture
Obviously they're not perfect but who cares! They definitely look like Jasmine's earrings. If I'd wanted to I could have made a stencil and created perfectly shaped earrings. But, I didn't feel like it and she loves them as is.

Now, on to the necklace. For the necklace I used the craft visor and simply cut it down to be the shape of Jasmine's necklace. Again, I eye-balled this and didn't use a stencil or anything. I just looked at the Jasmine image and hoped for the best. Once it was cut she could just slip it on as a necklace instead of a visor. Perfect, cheap and easy!

Finally, creating the headband. I cut out a large oval from the yellow glitter foam and then a slightly smaller one from the blue. Then I hot glued them together and glued a safety pin onto the back. Then I pinned the glued ovals onto the headband. Sure, I could have glued it to the headband but, I thought I'd rather have the ability to re-use it.

There ya have it! It only took about 20 minutes and I only spent about $6. I also had plenty of craft foam leftover plus an awesomely cute new headband! She's happy, I'm ecstatic and at least one of us is ready for Halloween!

Stay-tuned for the tutorials for the rest of the family costume tutorials including Raja the tiger, Abu the monkey and Aladdin!
Picture
Picture
0 Comments

Quick & Cheap pantry organization

10/3/2016

0 Comments

 
For the first time ever I have a pantry! Now that we've been in our new house for about a month, I finally have time to start doing some more detail oriented organization and decorating. The pantry was in desperate need of organization so I decided to tackle that first. Plus, with the new baby about to be here I want to have spaces where people might try to be helpful by cooking and/or taking care of kid needs be more functional. The pantry was definitely not functional and was more of a "toss it in and quickly shut the door so everything doesn't fall out" kind of situation. See...
Picture
So, to begin I of course went to Pinterest for some inspiration. There were tons of free printables but not many that had my exact requirements or looked how I wanted them to look. So, I created my own! You can get them for free below! After creating them I laminated them and cut them out. I could have used my silhouette machine and done vinyl but in all honesty, I was feeling lazy and it takes so much longer. 

For the containers I hit Target and picked some lovely tubs that were very chic but cost $8 each. When I saw some less designer styled tubs for $1.97 in the dish washing supply isle I decided they were the better choice. I mean, the labels will make them look nice, they function exactly the same way and $6 x 7 tubs is a savings of $42. That's money I can definitely put to use somewhere else without effecting the overall outcome of the pantry. It was a no-brainer. So, I grabbed the tubs, a few extra risers and an expandable 3-tier can shelf and headed home. It only took about 30 minutes to re-organize and now I'm happy to say, there's no more "shut the door quickly" game and the kids can easily access snacks when they want. Plus, I'm now aware of the overwhelming amount of pasta and quinoa we have.
Picture
Picture
Picture
I know it doesn't look like the dreamy, highly organized and designer container pantry's that I was dreaming about on Pinterest but, I know it is something I can maintain. It's reasonable and down-to-earth like me. Everything has somewhere to go and is easy to access. That's the goal right? 

Hopefully you find it helpful and the free printable labels can be found below. 

​Enjoy!
Picture
Picture
pantry_labels.pdf
File Size: 15 kb
File Type: pdf
Download File

0 Comments
    Picture

    RSS Feed

    meet rachel

    Rachel is a mother of three, elementary Spanish teacher and part-time blogger who loves crafting, creating fun and engaging activities for her children and students and hanging with her friends and family. She blogs about what she's doing and her interests at any given time which vary. She's a little OCD and always looking for her next project. Her husband calls it, "focusing her crazy", but she just calls it fun. 

    Archives

    December 2022
    November 2022
    September 2022
    July 2022
    February 2022
    December 2021
    November 2021
    October 2021
    September 2021
    August 2021
    July 2021
    May 2021
    April 2021
    March 2021
    February 2021
    January 2021
    November 2020
    October 2020
    August 2020
    July 2020
    June 2020
    March 2020
    February 2020
    December 2019
    November 2019
    October 2019
    August 2019
    July 2019
    May 2019
    March 2019
    February 2019
    January 2019
    December 2018
    November 2018
    October 2018
    September 2018
    July 2018
    June 2018
    April 2018
    March 2018
    February 2018
    December 2017
    October 2017
    September 2017
    July 2017
    June 2017
    May 2017
    April 2017
    March 2017
    February 2017
    January 2017
    December 2016
    November 2016
    October 2016
    September 2016
    August 2016
    July 2016
    June 2016
    May 2016
    April 2016
    March 2016
    February 2016
    January 2016
    December 2015
    November 2015
    October 2015
    September 2015
    August 2015
    July 2015
    June 2015
    May 2015
    April 2015
    February 2015
    September 2014
    August 2014
    February 2013
    January 2013
    December 2012
    November 2012
    October 2012
    September 2012

    Categories

    All
    Baby
    Beauty
    Clothing
    Crafts
    Decor
    DIY
    DIY Gifts
    Dramatic Play
    Freebies
    Free Wallpapers
    Fun With Paint
    Holiday
    Inspire
    Kids
    Kid Snacks
    Mommy Camp
    My Thoughts
    Organize
    Parenting
    Party Time
    Photography
    Science Stuff
    Sensory Play
    Silhouette
    Toddlers
    Whole 30

    Picture
    Picture
    Mom Buzz Media
Proudly powered by Weebly