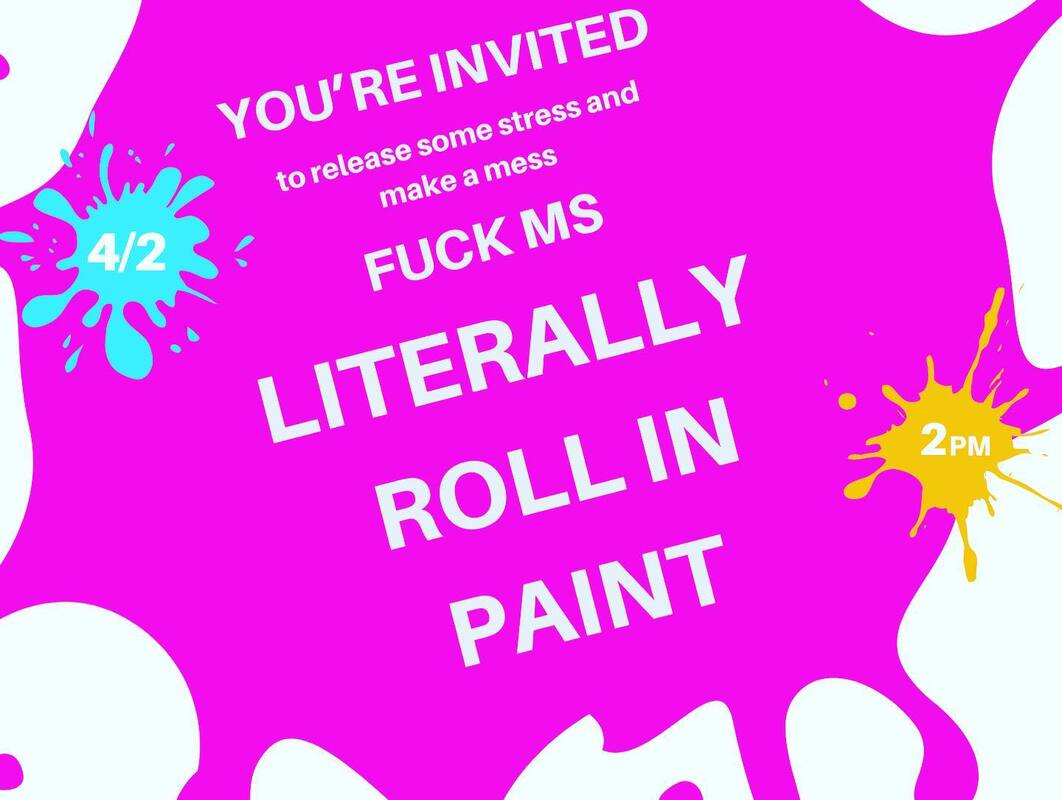
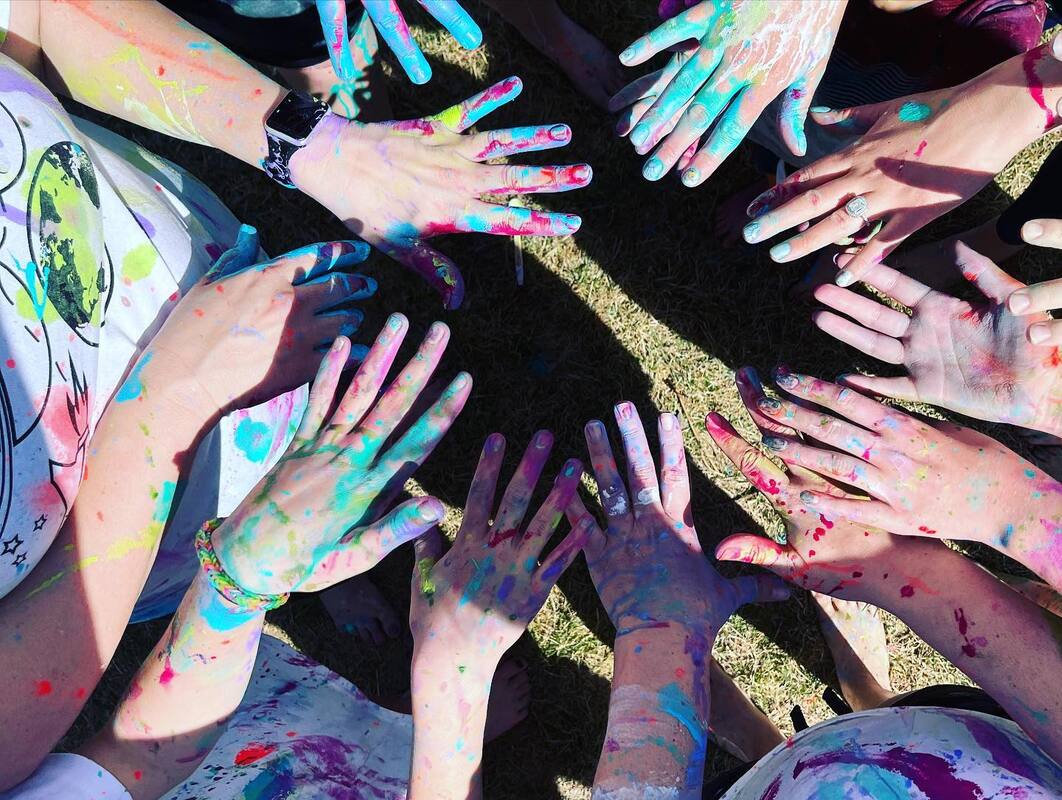
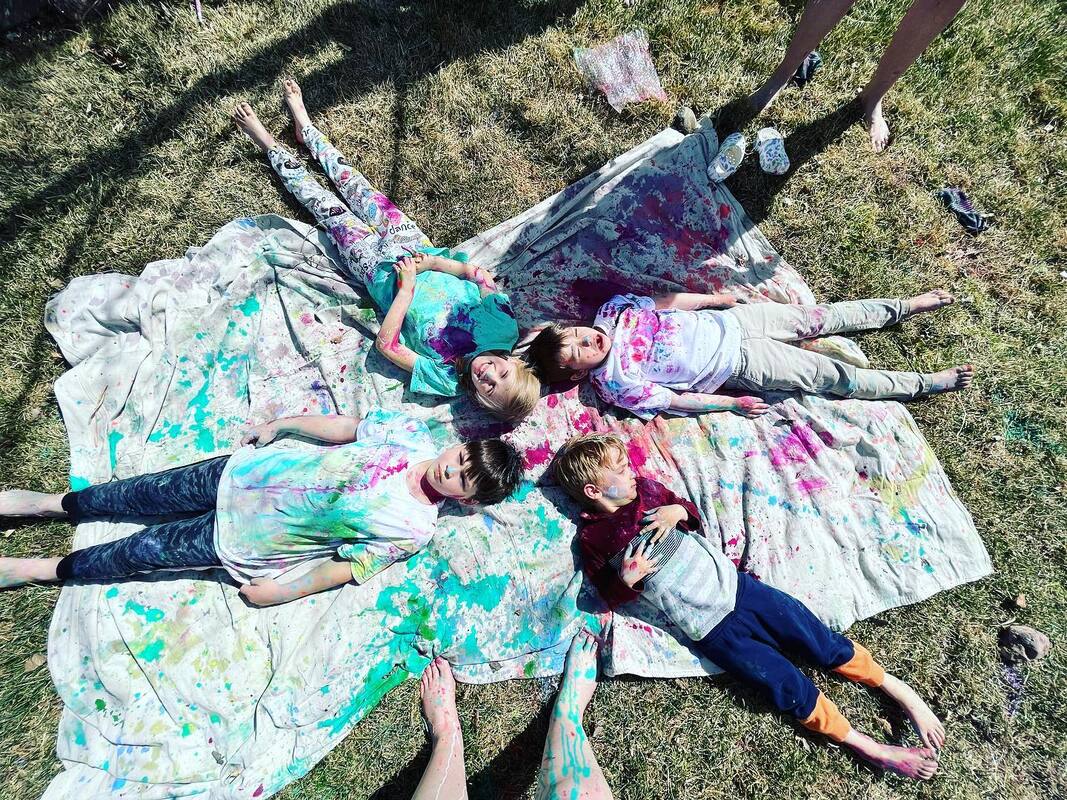
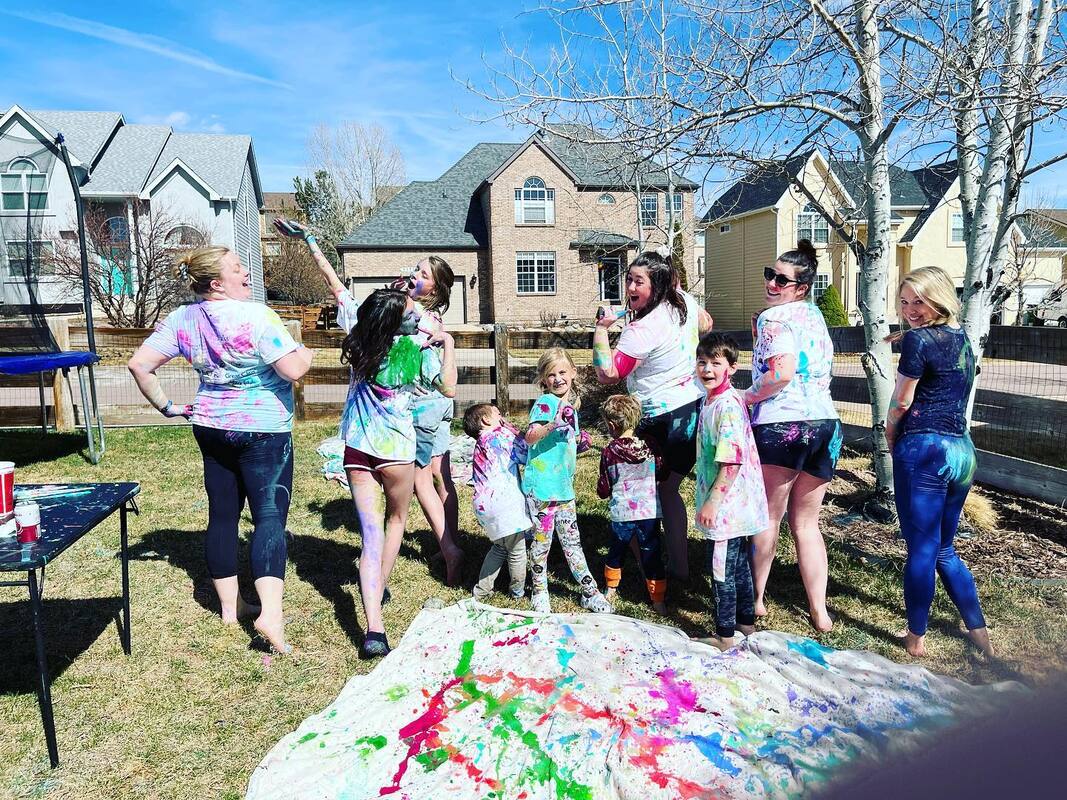
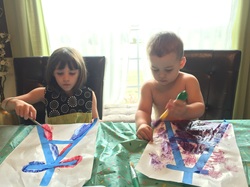
In true Paint Covered Kids fashion I needed to release some stress and anger after my MS diagnoses (see previous post) and decided I needed to do something a little destructive and a lot messy. So, I had a paint throwing party and invited all of my friends and their kids. I grabbed a bunch of fun acrylic paint colors, some canvas tarps and set up in the backyard. Friends were encouraged to wear a white shirt to keep as a memento and bottoms they didn't care about. Then, I laid the tarps on the ground, added some water to the paint to not only extend its use but also to make it easier to throw at each other! Everyone had a lot of fun and we definitely let out some frustration after a pretty rough couple of months. I am so grateful for friends willing to entertain my crazy ideas and join in on a messy but fun day. I encourage everyone to have a day like this. It was fun, stress relieving and rendered some awesome canvases that I plan on eventually framing and putting up in my home.
0 Comments
I always try to throw together a few themed activities depending on the time of year. This year I brought back a popular activity from last year, Pumpkin Destruction! I just gave the kids some pumpkins, water, small hammers, golf tees and paint and let 'em at it. They loved breaking the pumpkins open and exploring the insides or, if they are less into destruction, simply painting them and washing them over and over again. It kept them entertained for at least an hour. There was quite a mess afterwards but, that wasn't a big deal since they did it outside.
Halloween is one of my favorite holidays! Every year I make a good majority of our costumes because I like the craft factor and knowing that no one will have the same costume as me. Sometimes we go with a family theme like last year when we went as characters from "The Greatest Showman" and sometimes we mix it up with some of us going together and others not. This year, Arthur wanted to go as Pikachu so we put the boys in matching costumes as Pikachu, Pichu and Ash. I didn't really love the Pikachu costumes you could buy and decided to make my own. So, I purchased yellow pants and sweat shirts for the base. Then I got stiff yellow, black and brown felt and cut out ear and tail shapes. I used elastic waistband material to attach the tails to and glued the ears to black plastic headband blanks. Then I drew on a little black nose and red cheeks and voila! I thought they were super adorable. Plus, the clothing items can be worn again and again. Ash was even easier. I ordered a blue hoodie and an Ash hat from Amazon along with a pair of green gloves. I cut off the fingertips of the gloves and we had an Ash. Easy. As for my and Lillian, she wanted to go as a witch, but not a cute one. So, we went as the Wicked Witch of the West and Glinda the Good! I happened to have a Glinda costume that I found at Goodwill several years ago so the majority of my costume was ready to go! I simply made a crown using pink glitter craft foam and gems. I also made a wand by purchasing a pre-made wand and painting it pink and adding gems. I also bought a red wig to complete the look. For Lillian, I purchased all of her costume and didn't actually make anything. But, I did paint her green. I purchased all of her items from Amazon. We also went to a pre-Halloween event but didn't want to ruin our costumes so we threw together a few more. Did I mention I love Halloween? I happen to be pretty ok at facepainting and Alan wanted to wear his Spiderman costume. So, I gave him a quick facepainted mask. Arthur wanted to be creepy and decided being covered in spiders fit the bill. So, I drew little spiders all over him. Lillian already had a vampire costume and chose to wear that with a bit of lipstick. I found a fun pic of Lisa Frank style leopard face paint and did my best to recreate it. And Derek went as the Brawny Man. Hope you had a fun Halloween!
As you might already know, I am a high school teacher. This week we had parent-teacher conferences on Tuesday and then had Wednesday off so, while sitting in my classroom between parent meetings I worked on a little plan for entertaining my kids and keeping my sanity during our day off together. As always, we didn't finish everything but, we did have a lot of fun that was pretty low effort on my part and extremely inexpensive too! You can print out my plan at the end of this post! We started the morning with some indoor fun because it was a bit chilly outside. So, I set up an invitation to play with play dough by giving them some spider rings, plastic eyeballs, gems, silk flowers and orange play dough and asked them to make me a monster. You can give them any doo dads you think they might like. I hit up the halloween aisle at Wal-Mart to have a few spooky things like the rings and eyeballs. After the play dough fun, we headed outside for a little bit of messier play. I set up a container with colored water and googly eyes and placed a few large spoons next to it for them to create an eyeball stew. I also had a pumpkin painting station, pumpkin washing station and a pumpkin hammering station. For the washing station I just filled a container with soapy water and for the hammering station I provided a few small hammers and golf tees. They all enjoyed various areas more than others and they were all entertained for almost two hours! We also made some boo hand print art and were going to make a monster wreath but, Arthur wasn't interested and wanted to play with play dough more and Lillian didn't want to make a monster wreath. Instead, she made a "pretty" wreath using ribbon and glue. They were happy so I was happy. If we end up with some free time before Halloween I will try to do the activities we didn't have time for and I'll post about it if I do. There are several fun science ones that I couldn't do because I didn't have any vinegar! So be sure to check out the document for those! We ended the day with a trip to chikfila and I have to say, it was a pretty great day!
Download my very basic but serviceable plan below and enjoy! We celebrated my daughter's 7th birthday this past weekend and it went off without a hitch! I even managed to make a cake that was not an epic fail like previous years! Check out all of the details, activities and fun below! The theme was Flamingos and Dinos with a focus on the flamingo. The cake was one hundred percent boxed mixes in both devil's food and confetti and canned icing but, I made it look extra by making it a tier with ombre icing. I made the two paper figures on top by printing out a dino and flamingo image from the internet and backing it with colored paper and then taping it to a skewer. The rest of the food was simple but yummy with dino scales (chips), flamazing ham and cheese sandwiches, flamingled fruit salad, dinorriffic noodles and dinotastic punch. For activities, we played flamingo ring toss, had a dino and flamingo egg hunt, did a guided flamingo painting, pinned the tail feather on the flamingo and had a competition to see who could stand on one leg the longest. We also had a tropical themed photo wall area. For the art activity, I created cardboard easels by cutting out one side of a small packing box and creating a triangle. Then I used duct tape to tape along the cut edge. Then I taped the canvases onto the sides. You can see how I made them here. I ordered kid aprons online for each kid to wear and bought a pack of big paint brushes as well. The paint was liquid tempera purchased at Hobby Lobby and I put the paint on paper plates. The kids all got to take their aprons, paint brush and art home as party favors. The photo booth props were something I planned on making and then I found a pre-made set in the party aisle at Wal-Mart on clearance for .99 cents! So, I just used that. It even had flamingo glasses! Perfect! I also supplemented with some items from our dress-up collection including tutu's, masks, tiaras and feather boas. In addition to the art themed favors, kids also took home a flamingo or dino mask. The girls above are wearing them while competing in the one-legged standing competition. In the background you can see the pin the tail feather game I made. Somehow it did not get photographed! I just drew a flamingo on some pink paper and game the kids colored feathers with tape to tape onto the bird. They enjoyed it! I found free mask printables, backed them with construction paper and then laminated them. Then I hole punched them and added ribbon for tying. They actually took a lot of time but were essentially free and I think they looked awesome! I purchased pre-filled eggs online one set was regular eggs but the other were dino eggs! I had some other adults hide them while I corralled all of the kids inside and handed them paper bags with their names on them. Then we let them loose! I think the party was a success and all of the guests had fun. I didn't feel too rushed the day of but I'm sure that was mostly due to staying up until one the night before. Now I have to get planning on my son's 1st birthday coming up in October! Thanks for visiting!
For my daughter's birthday we decided to have a guided painting activity. I created these cardboard easels in less than 10 minutes and they worked beautifully! Plus they cost less than a dollar a piece! Keep reading to see the full tutorial below. You will neeed: - small cardboard box - duct tape - scissors/box cutter 1. Remove one of the small sides of the box. I found this pretty easy using just scissors. 2. Pull the two cut sides together to form a triangle shape and duct tape along the edge. 3. Attach your canvas or paper using tape. You could also hot glue a clothes pin or clip. I used two pieces of rolled duct tape to adhere the canvases for the kids at the party. They were easy to remove and we had no issues with canvases falling off.
Another great week of MC! This time we focused on insects! We focused on 5 different insects this week and had a lot of fun learning! You can download the lessons and materials for this week by clicking the image below. dramatic playThe kids got to interact and learn with the dramatic play entomology lab area. I included a microscope, slides, bug posters and more for them to learn and explore. All about beesFirst we learned a bit by reading a book and watching some videos on youtube. Then wee had a lot of fun participating in a pollination activity, singing the baby bumblebee song with homemade squishy bee stress balls, dramatic play beekeeping, painting bee hives, enjoying some Honeycomb cereal and bee sensory play and even bee themed yoga! ants!We didn't finish all of the ant activities but we did learn about them by watching a few videos and completing a few worksheets. Then we completed a fun tape resist ant hill painting. firefliesWe started out by watching a few videos about fireflies and how they create light. Then, we created a watercolor painting of fireflies in a jar. We wrapped it up with a fun glow bath using glow sticks! Just like the day focused on ants, we didn't finish several projects/activities, but we still had a lot of fun. ladybugsWe read the classic Eric Carle book "The Grouchy Ladybug" and then created our own grouchy ladybug art projects. We also completed a few worksheets and watched a few videos about them. Again, didn't finish all of the things I had planned. I think I drastically overestimated how much we could get done. Adding a baby in the mix really sucks up a lot of my time and makes it extra difficult to complete everything. butterfliesI had a ton of really great activities for butterflies but, being the last day of the week really hurt my ability to get to it all. So, we managed to complete a fun salt and watercolor painting of butterflies. We also watched a few videos and Lilly had fun creating her own bug with a dice rolling activity.
Mommy Camp is off to a great start with our first week all about the great outdoors! You can download all of my lessons and materials by clicking the image below. Dramatic PlayThe dramatic play area was a pretend flower shop and garden. I created the "garden" using a cardboard box, brown fabric, pool tubes, hot glue and fake flowers. I gave them a few signs I printed out, a toy cash register and pulled out my market stand diy from a few years ago to complete the set-up. They always have fun pretending to sell things so this was a definite hit. day one: worms, dirt & rocksI had some lofty goals for this day and not all of them came to fruition. Originally we were going to create a vermicompost bin but, I couldn't find any worms locally! By the time I realized the worms wouldn't get here in time if ordered online so, we skipped a bunch of worm themed things. We did watch a few videos, complete a few worksheets and do a bit of art though. We also headed outside to find a rock to use for creating our very own pet rock. We rounded out the day with some dirt jell-o pudding cups! day two: seedsWe learned about seeds purpose by watching videos and reading a book. Then we explored them by dissecting some bell peppers and creating seed art. We also began sprouting some beans and created our own chia head pots! We wrapped up the day by creating some bird feeders using toilet paper tubes, peanut butter, string and bird seed and making poppy seed ham sliders and sesame seed candy. Neither of the kids were interested in eating either one so that was phenomenal. The chia head activity was super easy. I took a picture of each of them and printed it out. I taped the photos to the front of the pots and we sprinkled chia seeds onto soil, watered and put in the sun. They had grown this much in only one day! day three: flowersWe learned about how flowers grow by watching a video and reading a book. Then we experimented with flowers and how they drink water, created Georgia O'Keefe inspired paintings and learned how to make tissue paper flowers for our dramatic play flower shop! day four: treesWe learned about how trees grow by watching a video and reading a book. Then we headed out side to collect a tree limb for some process art, made fruity rainbow yogurt bark and painted some q-tip trees. Process art is where there are basically no rules and creativity reigns. I presented them with a bunch of options and they decorated the tree branch however they wanted. It turned out great and is now a focal point in my craft room and sits on top of the piano. day five: leavesWe learned about how leaves get water by watching a video. Then we headed outside to collect a few. We attempted to make prints and rubbings but didn't have a lot of luck. I'm not sure what went wrong. But, we were tired at the end of the week and not much got done with the leaves day. Ooops.
I hope you enjoyed learning about our week! Check back soon for more recaps of each week of Mommy Camp! We had a fun but busy weekend filled with birthday celebration! We held Lillian's 6th birthday party at our house and I think it was a great success! Check out all of the adorableness and visit the other blog posts to see how some of the items were made and to find some free printables! We planned for an outside party but the weather was very iffy all week long. On Friday evening the forecast predicted an 80% chance of thunderstorms at 10am, the time the party was to begin. So, we cleaned up the garage (Remember, we just moved into our new house a month ago.) which was no small task and set up tables, chairs and activity areas inside it. We set up the food table, gifts and party favor areas inside in the dining room and entryway of the house. But, by 9:00 am the next day it was clear that the weather would cooperate and we enjoyed blue skies and not too hot temperatures! So, we moved the tables and activity areas outside and set up the water sprinkler for extra watery fun. As far as other activities, I left the photo area in the garage and we set up a water table filled with soapy blue and green bubbles and a sign stating "Sea Foam Sensory Play". I also hid a bunch of seashells under the bubbles for kids to find and collect. It was a big hit and rather entertaining to see the kids with their handfuls of shells. We also had a face painting table where kids could get mermaid scales or sharks, an arts and crafts table where they could make a paper bag mermaid or shark puppet as well as color mermaid crowns and I had several games planned. But, we only managed one because the kids were so happy with the other activities and just playing with each other. I created labels (You can download the labels at the end of the post.) for the food but went with easy and quick to prepare items to keep my sanity. I ordered cupcakes from my favorite local bakery in strawberry, s'mores and lemon blackberry flavors with blue icing and fondant mermaid tails, shark fins, clam shells and life preservers. They turned out really cute and were delicious. The riskiest food I went with was a watermelon shark. I hacked away at a watermelon to make a shark and then stuck some googly eyes on it. I had directions but they were way too time intensive and with only 20 minutes before guests were to arrive and still unshowered, I decided to wing it. We also had shells and cheese, skewered grapes or "seaweed", pretzel sticks or "driftwood", baby carrots or "crab legs", a knock-off sonic ocean water, sunbutter and jelly sandwiches shaped like stars for "starfish" and turkey and cheese croissant crabs with googly eyes. It was all completely devoured and looked pretty adorable. For the backdrop I taped a blue tablecloth to the wall and then taped green cellophane cut into wiggly strips on top to create the illusion of seaweed. I topped it off with some clear and pale turquoise balloons and a birthday banner I made with my silhouette machine. I sprinkled the table with some golden confetti strips and seashells. The table was covered with three different colors of blue table cloth to create an ombre that I quickly cut scallops out of the base of each cloth. I did that at a very late hour the night before and wasn't too particular about making it perfect. I didn't even get on my knees but simply bent over and hoped for the best and it turned out fine so don't stress about perfect scallops. It isn't worth the worry. For party favors, kids got a shark fin or mermaid tail handmade by moi and on their way out grabbed a bopper balloon toy. The tails and fins were big hits and I had several moms tell me that their kids refused to take them off long after the party had ended. You can see how I made them in this post. I had a few other small decorations including seaweed and fish taped to the base of the walls inside and I made wreath for the front door using only cardboard, tissue paper and craft paper that turned out really cute and was basically $1! It was made around 11:30 the night before and I completely forgot to take pictures of the process but I can lay it out for you pretty simply. 1. Take some cardboard and cut a donut shape out of it in the size of a wreath. My circle was by no means perfect but it doesn't matter as long as it is close. 2. Make some tissue paper flowers in the colors of your choosing. You can use this tutorial from Pinterest. I went with varying colors of blue. 3. Hot glue the flowers to the cardboard donut shape. 4. I created a few embellishments using glitter card stock and my silhouette machine and simply hot glued them on top of a few of the flowers. 5. Hang and admire! The final touch to the party was the photo area. I always like to have a photo area and I was especially proud of this one because I free-handed the shark and was really impressed with myself. To create the photo area I taped a blue table cloth to the wall and then added a few fish leftover from the seaweed/fish wall decor. Then I grabbed a big piece of cardboard and drew and painted the shark after cutting out his mouth. To create the clam shells I drew two clam shells onto two pieces of poster board and then painted them and added sharpie for the detail. Since I set it up in the garage I realized the floor was somewhat dirty and grabbed a blue rug we had in the playroom and layed it down in front. I also created a few fun signs and hung them above the photo area. (You can download my signs at the bottom of this post.) For my final act of craftiness I made iron-on cut outs with my silhouette machine to create custom t-shirts for me and Lillian. I was going to create ones for all four of us and then I found the "jawsome" shirt for $3 on Amazon for Arthur and the cool button up shark one for Derek so I didn't make theirs. I also managed to reuse Lillians fish scale leggings from last year's Ariel halloween costume. If you're curious about how I made our awesome Ariel and Ursula costumes from last year check them out here and here! I hope my party ideas spark some inspiration for you and that you enjoyed reading about our adventure under the sea. If you want to download the printables I created for the party you can find them below! Thanks for visiting! Download the pdf of the signs shown above by clicking the pdf file below. ![]()
Download the pdf below to get the food labels, mermaid crowns and gift tags. ![]()
Due to all sorts of things including back to school, moving to a new home, my husband dislocating his shoulder and more, this is the final week of Mommy Camp for this summer! I prepared activities and planned on "visiting" China, India, South Africa and Australia but, things don't always go as planned. So, I will try to get to those countries at different points throughout the year when we find time. So, without further ado I present Russia! I didn't really set up a dramatic play area for Russia this week because I couldn't think of anything but, I created a mural for decoration and grabbed both of their winter coats, an old Russian style fur hat, a set of Russian nesting dolls, fake currency and the books for the week. I also cut out some (pretty pitiful looking) snowflakes and stuck them on the wall. The mural turned out to be pretty neat looking and the kids had fun helping me color it. Before we "flew" to Russia, we looked at our map and discussed where it was and their weather. Then we did our normal security check and airplane trip dramatic play. Once we "arrived" we started off by learning about Fabergé eggs and reading a book called "Rechenka's Eggs". Then we made our own versions using egg shaped paper, glue and plastic gems. Both kids really enjoyed this craft and spent a good thirty minutes or more busily glueing their gems. Afterwards we learned about the Russian dance Kalinka and watched a video. For lunch, I cooked pierogi which are one of my all-time favorite foods. But, I cheated and used frozen ones that I sautéed with some butter and herbs. I served it with a mixed greens salad and some pear. Lillian loved them and was a big fan. Arthur refused to even give it a try but, at least one of them liked it! For dessert I made Russian orange cream and it was sooooo good and super simple. You can get the recipe here in my original summer mommy camp post. Our next activity was learning about the Russian artist Kandinsky and creating our own versions of his art. However, neither kid was super into it and the projects never reached completion. You win some, you lose some. I think with all of our crazy things going on they were preoccupied. We read "The Noisy Paintbox" to go along with the Kandinsky lesson because he suffered from synesthesia. It's a great book and the kids really enjoyed it. After the failed Kandinsky projects we learned about dymkovo toys and tried to create our own. I found a tutorial in Russian and we tried our best but they didn't really whistle like they were supposed to. However, they kids had fun making them using air dry clay and paint. For dinner one of the nights I made borscht and piroshki. Borscht is a beet and vegetable soup and piroshki are basically meat buns. They were both really good and I even made the dough for the meat buns from scratch! The kids wanted absolutely nothing to do with it but Derek and I really enjoyed it. We ended the week with chocolate filled Russian pancakes. They weren't my favorite recipe for pancakes because they used ricotta cheese and were a bit wet and dense. The kids didn't like them either. After a somewhat disappointing breakfast we talked about Russian nesting dolls and made our own paper version as well as reading the book, We also talked about the famous Russian ballet, watched a video for a mini dance lesson and read the book "When Stravinsky met Nijinsky" We had a great final week of Mommy Camp! Check back soon to see the weeks we didn't have time for as well as all sorts of other crazy things that I decide to get into like planning my daughter's 6th birthday. She wants a mermaid theme! Oh and here are my silly photoshopped pics of us in Russia!
Wow! I've been ridiculously busy with all sorts of things that have kept me from posting for a bit. We listed our home for sale and sold it within two weeks! We then had to find ourselves a new home that met the needs of our growing family. We've been dealing with all of the technicalities involved with selling and buying homes along with packing and planning. Oh, and my husband dislocated his shoulder being a big kid with our son. He decided to head down a tube slide on his belly and the end result was a hefty bill, pain meds and three doctors who worked for forty-five minutes to put everything back where it belongs. So now, we're quite a pair with him having only one functional arm and me being almost 7 months pregnant. But, we've hired a moving company and are actually moving in today! Between all of those things going on, I did manage to complete two weeks of Mommy Camp but have unfortunately fallen behind my goal and will probably not make it to the last few countries for a bit. But, in the rest of this post you can find out about all of the fun we had learning about The U.K.! We kicked off the U.K. on the week of the 4th of July which I thought fit nicely in regards to gaining our independence. After a very fun evening with friends, fireworks and ribs, we began our week with a trip in the chunnel, the underground and water tunnel connecting France to Great Britain. To simulate the Chunnel, I covered our dining table with a blanket and had them board the Chunnel and take a ride under the water. Being clever kids they even devised a way to store their luggage in the "overhead compartment" using the clamps for extending the leaf of the table. We also watched a bit of the show Modern Marvels about the building of the chunnel and a few videos of people riding it. Upon arrival, the kids had a blast playing in a diy cardboard castle that I managed to whip up in only 15 minutes! I was really pleased with the result and am excited to share it with you! To create the diy cardboard castle all you need is a large box (I purchased a new one from home depot for about $2.), some scissors and/or an exacto knife, some silver duct tape and large popsicle sticks. To begin, I cut one fold of the box all the way down so that it was no longer a box but instead, a large flat piece of cardboard. Then, I cut about four inch sections down from the top to the first fold all the way across and folded down every other one to denote the stone structure found at the top of many castles. I used hot glue (you could just use duct tape) to secure the folded flaps. Then I drew an arch shape across the center part of my cardboard and cut it out to create the entrance. Afterwards I realized that cutting the entrance compromised the stability and had to reinforce sections with popsicle sticks to make it sturdy enough to stand on its' own. I then took the silver duct tape and taped the sticky sides of two pieces together to create a metallic looking hanging gate at the arch entrance. That's it! It stands on its own, folds flat and the kids love it! I placed it near a corner to create a closed feel and added some prince/princess dramatic play items, table and chairs and tea set to complete the play area. Later that day I even made cucumber sandwiches and we had afternoon tea inside the castle. It was pretty awesome and definitely kept both kids busy for a while. Because the U.K. is comprised of multiple, distinct places like Scotland, Ireland and Great Britain, we focused on a different one each day. We started with Great Britain by discussing the role of a king and queen and watching a short video about visiting London and read the book "Katie in London". We also listened to The Beatles for a while and I did a small reading activity using the lyrics from the classic song, "Here Comes the Sun" to analyze and find sight words.We also talked about double decker buses and completed a bus craft. After that we learned about Big Ben by watching this great video and drawing a picture. We ended the day with some fish and chips! After learning about Great Britain we journeyed to Scotland by watching this video and reading about castles in the book "Castle Life". After reading about and looking at castles, we drew our own using black construction paper and white crayon. Then we listened to some bagpipe music and created our own bagpipes using a ziplock bag, tape and party blowers. To make them you cut the tip off of each end of the bag, insert one party blower in each corner (one blower in and one blower out) and taped them to seal it. These were a huge hit but didn't stand the test of time and were quickly destroyed. After the bagpipes we learned about the legend of the loch ness monster and watched this cute video after reading the book "Nessie the Loch Ness Monster". Then we created our own Nessie's with this free printable. For dinner I made shepard's pie. The kids wouldn't touch it but my husband and I were both pretty pleased. We ended the week discussing Ireland. (I had plans for Wales but there wasn't much and the kids were not interested in the few activities I had so, fail.) We read an Irish folk tale called "Finn Maccoul and His Fearless Wife" and I made potato pancakes for breakfast. As usual, the kids had zero interest in eating them but my husband and I thought they were delish. After breakfast we watched some Irish dancing and a tutorial on a few basic steps. Then we made Irish harps out of cardboard, duct tape, and stretchy string. (It called for rubber bands which I thought I had. I was wrong and had to come up with a substitution.) It was a fun week and I hope you found something inspirational to do with your kiddos!
Our trip to France was full of art projects and fun! We learned about three major French artists, ate a little French fare, attempted a few ballet moves and had fun with our dramatic play bakery! As with each week of MC Around the World, first we had to "travel" to our focus country. Last week we ended our travels in Rome, Italy so, we looked at the map and discussed how we would travel from Rome to Paris. We decided to fly and then looked at the weather in Paris to make sure we had the right clothes. Then we went through airport security and boarded our plane. Upon arrival they each handed their passports over for checking and stamping. Once we arrived we took a quick tour of the city by watching this video and then visited the main attraction, The Eiffel Tower. We learned about it by watching this video and then we did some tape resist painting art to create our own mini Eiffel Towers. After the long flight and fun at the tower, we needed a break and stopped for a baked treat at a French café. The kids played with this forever and loved taking my order using free printables from here, here and here that I laminated. We used things we already had from the play kitchen and I pulled out the diy doctor's window that I made last summer to be transformed into the bakery storefront. To add to the fun we made some play dough using this quick recipe (and used some store bought I had on hand) and created custom play dough cupcakes complete with their own cupcake liners! I had a hard time finding French food that I thought the kids would even attempt to try. So, I ended up making crepes for breakfast one day. We actually make them quite often so my kids are not strangers to them. Lilly enjoys peanut butter on hers and Arthur likes jelly/jam like me. The only other French item that was made was for breakfast over the weekend. My husband made Croque Madam which is kind of like a ham and cheese breakfast sandwich with a super yummy mustard based cream sauce and it was fantastic. The kids outright refused and had cinnamon toast crunch instead. Even though they may have had limited exposure to French cuisine, they learned a lot about art! We discussed the Impressionist art movement which began in France and learned a little about a few major players including Van Gogh and Degas. To begin, we read a book about each artist for Van Gogh we read "The Starry Night" which was a made up story but gave some great info about the artist, his style and his art. For Degas we read "Chasing Degas" and I really enjoyed this one! It followed a ballerina in search of Degas throughout the city of Paris where she ran into many other famous Impressionists. We also read "Katie Meets the Impressionists" which gave more great info using a fictional tale. In addition to reading about the artists, we also watched a few videos including more "Art with Mati and Dada" about both Degas and Van Gogh. We also watched this cute video of a 5 year old teaching how to paint like Van Gogh. Lilly was really into it and then created her own version of "The Starry Night". I was super impressed. For more Degas knowledge we watched this short video and also had a mini ballet lesson using this video to get us in the ballerina spirit before learning how to draw our own ballerinas. In addition to the focus on learning about art, we focused a little on the French language by reading an adorable book called "Everybody Bonjours" and watching several videos that taught a few key French phrases like hello, thank you, please and numbers as well as some classic French songs like "Alouette" and "Frére Jacques". As always, here are my horrible but fun photo shopped pics of our trip! We had fun and are ready to visit the U.K. next week! See you soon!
We had a blast on our "trip" to Italy! We had fun with a dramatic play pizza shop, learned about opera, drew like Michelangelo and made some yummy Italian food! Just like the previous weeks, we had to get to Italy first! This week we discussed train travel and I used a train tent that we already had as our transportation. They were both issued train tickets (you can find your own printable train tickets here), grabbed their suitcases and boarded the train! We also looked at the map and discussed how far away Barcelona, Spain and Venice, Italy are and why we decided to take the train instead of fly. Once we "arrived" in Italy we started with a dramatic play pizza kitchen. I created a pizza oven and pizza using a cardboard box, brown craft paper, paint, a sponge, felt and an electric tea light. To make the oven I folded one side of the box in on itself and cut out the bottom. Then I wrapped it in brown paper and used a sponge and red paint to make faux bricks. For the fire element, I used a piece of the box that I cut out and drew a flame shape and painted it. Then I hot-glued it to a longer strip of cardboard and glued it to the inside on the bottom of the box. Then I placed an electric tea light behind the flame. I think the effect was really great and it only took about 15 minutes to make! For the pizza I took various pieces and colors of felt and cut out shapes to look like different toppings, crust and sauce. I used tan cut into a circle to create the crust and red cut into a circle for the sauce. The toppings I made matched the order form that I found here for free! For the pineapple I cut yellow felt into semi triangles and added a few lines to make it look segmented. For the purple onion I cut crescent shapes out of purple felt. For pepperoni I cut smaller circles out of red and did the same for ham but used pink. I used black circles without centers for black olives, pink with red lines cut into rectangles for bacon and green squiggle circle shapes without centers for green bell pepper. For the cheese I used cream colored yarn cut into 3 inch pieces. I also made spaghetti and sauce using cream yarn for noodles and red for sauce. I grabbed a few containers and quickly drew labels for the lids to store each topping. Then collected a few plates, bowls, utensils, aprons and a chef's hat from the play kitchen, made a quick sign stating "Arthur and Lillian's Pizza Joint" out of craft paper and, Voila! Dramatic play pizza kitchen! This was a major hit! They played for hours off and on throughout the week and the best part is that now it is a permanent addition to their current play kitchen so, they'll get to continue enjoying it! For breakfast one day I made zepoli which are kind of like donuts but actually a little more nutritious as they contain ricotta cheese. It may not seem like a big deal to you but, I actually fried something! I usually avoid it like the plague. However, I decided these sounded so yummy that I would go for it. I thought they were fantastic and actually easy but the kids weren't as enthusiastic. I think they're crazy. Lillian ate one and Arthur just licked the powdered sugar off before declaring they were "ucky". Ugh! Seriously?! Kids! Whatever, more for me! (I actually had a playdate with a friend and let her try them. She thought they were awesome too. So, I'm not crazy, just my kids.) You can find the recipe in the MC recipe book here. To finish out the day we discussed the city of Venice by watching a this video, making a gondola craft using this free printable and reading the book "Olivia Goes to Venice" and "This is Venice". Both were big hits and were read multiple times throughout the week. After learning about Venice, we discussed the city of Pisa and the Leaning Tower of Pisa. We watched this video and then we made a craft version for ourselves using an empty toilet paper roll, white paint, paper, black marker and green crayon. Surprisingly, they really enjoyed this simple craft and were very proud of their creations. To make them lean, I cut an small portion from the bottom of the roll at an angle and taped it to the paper. For lunch we made our own pizza. It was pretty simple using pre-made pillsbury pizza crust, a jar of pizza sauce, fresh and shredded mozzarella, pepperoni and I added basil from our garden and black olives to my portion. Yum! Our next focus was on opera since it's a pretty big deal in Italy. We watched quite a few videos on youtube to get a good idea of what it is including the following: "What is Opera", "Sesame Street: People in Your Neighborhood Opera Singer", "Sesame Street: Marilyn Sings C is for Cookie"and "Zoom: A Soup Opera" Once we had a good idea of what opera was, we watched "Mozart's Magic Flute: An animated plot summary" to learn about a popular opera story line and then watched these segments from a performance of that opera: "Metropolitan Opera: The Magic Flute" and "Erika Miklosa: Queen of the Night". I actually thought I had really worn out the opera thing and that they were both totally over it but, Lilly said she would like to watch a whole opera in real life and at various points throughout the day I caught her singing about her actions in an operatic style. Including a point when she sang, "Arthur has a poopy!" in a very dramatic, Queen of the Night manner. It was pretty hilarious and let me know that she got something out of the whole lesson. After learning about opera we discussed Michelangelo and watched this video about him. Then we practiced creating art like he did when he painted the Sistine Chapel after looking at pictures of the ceiling located there. I taped paper to the underside of our piano bench and gave them a bucket of crayons. At first they weren't really into it but in the end they each created multiple masterpieces and spent about 30 minutes or more drawing. I call that a win! We finished the week by creating laurel crowns using paper plates, glue and green construction paper. I prepped the plates by cutting the center out and cut out leaf shapes from the green paper. We discussed how in ancient Italy, they were often given to scholars upon completion of schooling and, since we finished learning about Italy they got to wear them! I was super impressed with Arthur and his focus on this craft. He spent at least 30 minutes and actually completed the crown. He did insist on looking fabulous with Lillian's sun hat while working which made it even more adorable. It even looked pretty ok for a two year old! I was, however, unable to capture a good photo as the apple sauce was more important at the time. Lilly was into though. We wrapped up the week by making ravioli from scratch. I purchased this handy ravioli press, we made the dough and mixed up the filling and boom! Ravioli! We made a bacon, basil, cream sauce to go with them and boy was it delicious! You can get the recipe from the MC Recipe book here. I also made the Roman Apple Cake recipe found in the book. It was ok, but not my favorite. It may fave been because I ran out of flour and had to use coconut flour instead. Finally, here are my horrible photo shopped pics from our "trip" to Italy. So silly! It was a fun week and I'm ready for our next country, France! See you soon!
We started our MC journey this summer by flying south to Brazil! You can see how I made all of the airplane dramatic play items in this post. Before our "trip" we learned about airplanes and read the book "The Noisy Airplane Ride". They showed me their plane tickets (I discuss how I made them here.) , went through airport security with their luggage (described here) and piloted the plane with this handy control panel. We even had an airplane themed treat! The flight there was fun but it was just beginning! In preparation I created all of the dramatic play airplane stuff and you can read about it here. We also decorated our "suitcases". I had lots of different ideas for how we would create the suitcases but ended up buying two unpainted wooden boxes with hardware already attached from Hobby Lobby for about $6 each. I let Lillian choose her colors and we purchased fun, travel themed stickers for decorating. Then we painted them, let them dry and applied the stickers. I didn't realize how much of a hit these little boxes would be but, each kid carries them around all day. Arthur even wanted to sleep with his! Once we landed, I stamped their passports (You can find the document for your own passport and stamps here.) and we discussed the journey by looking at a map. Then, we explored our new surroundings. I hung green streamers from the light fixture, added a plant, tropical themed stuffed animals and some green pillows on the floor, and hung a raffia door curtain with green streamers in the doorway. Then I placed safari hats, the books for the week about Brazil and binoculars on the table along with some fake Brazilian Reales, and the items from the Raiforest Toob. I also placed lizards around the room and placed Lilly's bug jar and plastic bugs on the table. It was a pretty fun day and a great way to kick off our 2nd Annual Summer Mommy Camp. As always there were several things we didn't get to but, I'm sure I can work them in on a different day in the future. You can see my lesson plan including all of the things I didn't get to here. Have fun and thanks for visiting!
I had a busy and fun-filled spring break visiting with friends and family, participating in some free events, celebrating Easter and, of course, doing a little Mommy Camp - Easter Edition. However, we were having so much fun doing other things that we only managed to finish two of the four days I planned for Mommy Camp. I'm not worried as I'll have it for next year or if we get bored over the next few weeks. We kicked off Spring Break by visiting some family out of town. Derek wanted to go hiking with some friends and I wasn't interested in taking the kids on an all day hike so we went to the Museum of Discovery with my Brother, his wife and my Mom. We had a really fun time and topped it off with some pizza and local ice-cream. MondayWhen we got home from our mini-trip we spent Monday focused on Mommy Camp. The theme was jelly beans and we did a ton of things including a jelly bean taste test (You can find the worksheet I made here.), learning how they're made, jelly bean math, science and art! Arthur wasn't as in to participating as Lilly except for eating the jelly beans. Above you can see Arthur doing the "eat every jelly bean regardless of flavor" style of taste test. Then you can see Lillian analyzing each one. We judged them on their flavor, texture, smell, taste and color. She did not like the sweet tart jelly beans and like the jelly belly the best. I did kind of test Arthur and gave him a buttered popcorn and a cinnamon. He was not a fan of either. After the taste test we did some jelly bean math and graphing. For the graphing we dumped out a random amount and then analyzed how many we had of each color as well as how many when certain colors were added to each other and an over all total. We also discussed which we had the most and the least of.
This was a quick and fun art activity where you place jelly beans on paper and then squirt them with water. Then you can let it sit and dry or dump them off to create lines. It was a little messy but messy is fun! Arthur, of course, enjoyed eating the jelly beans more than the project. This jelly bean art project was also very easy. Arthur was, again, more interested in eating them. After we finished I went to wash my hands and heard a cascade of beans hitting the floor. Arthur had attempted to pick his up but, not being dry, they all slid off of the paper. The kids cleaned it up and Arthur ended up with some interesting art. TuesdayOn Tuesday, my Mom and Step-Dad decided to drive up to spend the day visiting and we went to the spring break activities at the nature center in town. The kids got to pet a tiny owl, learn about native animals, go on a short walk and do some art. I have to admit that I haven't taken the kids there very often in the past but neither was ready to leave and Lilly was somewhat upset that I didn't bring a picnic lunch like a few other families. I genuinely thought we would be lucky to be entertained for an hour but I was so very wrong. We actually went to the center two more times this week for other craft and animal activity events and each time the kids were not ready to leave! WednesdayWednesday we spent the morning at the library for both of the kids story times and the afternoon just playing. We always attend the summer story times because I'm off for the summer but we don't go during the school year. So, this was the first time since summer that we've attended and it was a world of difference now that Arthur is two. He was engaged and participated in all of the activities and basically did everything Lilly did. It was adorable. ThursdayThursday we did our second day of Mommy Camp which was egg focused. We decorated pancakes to look like eggs for breakfast, dyed eggs, did "eggcercises" (They can be found here.), had egg spoon races, made egg prints, conducted egg "science" with baking soda and vinegar and made a cardboard egg ramp. Egg shaped decorate yourself pancakes was a hit with Lillian. Arthur was less of a fan until I doused his pancake with whipped cream and strawberries for him. Egg "science" was a big hit that kept them happy and playing for at least 40 minutes! Even after most of the baking soda had been covered with vinegar Lillian experimented with color mixing. It was an easy project to set up too! All you need is a muffin pan, plastic eggs, baking soda, vinegar and food coloring. Prep by putting the baking soda, eggs and food coloring in the muffin tin (I set it inside of a sheet pan to eliminate extra mess.) and give the kids eye droppers and cups of vinegar. Such fun! Using plastic egg halves to create egg prints was a big success and yielded some pretty nice art! I also tried potato prints to make egg art but it didn't work out nearly as well. The potato was hard to grasp as well as pull away from the paper and the prints weren't very pretty. I think a sponge would work better for that. Not long after these pictures were taken, Arthur was pretty paint covered so, I ran a bath and carefully guided him through the house to get in. When I returned 2 minutes later to get Lilly for the bath I found her creating splatter art and a big mess! I told her that I appreciated her creativity but that we can only do splatter painting outside. Once they were clean it only took me about 10 minutes to clean up what I perceived as an enormous mess so, no harm done. The cardboard egg ramp was really fun for both of the kids. They pretended they were working in a factory. I also gave Arthur a bowl filled with eggs and a large spoon for playing. After they got bored with the ramp we did "eggsercises" and had a spoon race. For the "eggsercises" you just put different activities inside each egg and draw eggs one at a time. Then they do them. Lilly had a lot of fun with this one. FridayFriday morning was spent doing a little spring cleaning. We rearranged Lilly's room a little bit to make it more conductive to play and also cleaned out some of the toys she didn't play with to donate. In the afternoon, we visited the nature center again to participate in some snake themed fun. They provided us with gourds to paint to look like snakes and also had small wooden toy snakes for painting. Arthur got to pet a snake and spent a good majority of the time looking at them. We also met with some friends and enjoyed the other offerings at the center together. SaturdaySaturday morning we tried a new local restaurant for breakfast and did a few errands. In the afternoon we went to a friends house for dinner and egg hunting. We also played beanboozled which was so much fun! If you haven't played I definitely recommend it! Even Arthur and Lilly played for over an hour! I'll warn you though, vomit flavor is as bad as you imagine and is definitely the worst! That night we planted some jelly beans for the Easter Bunny to magically turn to lollipops for Easter morning. It's a simple activity that is really magical for the kids. SundaySunday morning, the children awoke to find eggs hidden all over the house and their Easter baskets. Each got a book, a cape (Lilly had recently asked for one so it was perfect!) and a few cheap toys. As a side note, I found some bubble blowers at the dollar store that looked similar to the ones that gymboree sells and they are amazing! They make a ton of tiny bubbles and entertained both kids for at least 30 minutes. For breakfast I made bunny butt pancakes and we spent the morning playing before heading to Derek's parents house for lunch, family time, bubble blowing and a few egg hunts.
|
meet rachelRachel is a mother of three, elementary Spanish teacher and part-time blogger who loves crafting, creating fun and engaging activities for her children and students and hanging with her friends and family. She blogs about what she's doing and her interests at any given time which vary. She's a little OCD and always looking for her next project. Her husband calls it, "focusing her crazy", but she just calls it fun. Archives
June 2023
Categories
All
|