Paint Covered Kids
  • Blog
  • About
  • Contact
  • The Gallery
  • DIY
  • Mommy Camp
  • Freebies
  • Subscribe!
  • Blog
  • About
  • Contact
  • The Gallery
  • DIY
  • Mommy Camp
  • Freebies
  • Subscribe!
Paint Covered Kids

​

planning for cloth

9/28/2016

0 Comments

 
Picture
Now that I'm a month away from having a new baby I have finally gotten around to doing a little preparation. With selling our house, moving, starting back to work after summer break and planning for my daughter's birthday party I have just now found the time! A little late, I know. I'm usually an over-preparer but in this case I think my motivation has been somewhat thwarted by not finding out the sex of the baby. It makes it hard to have everything perfectly prepared seeing as how I don't know what clothing I'll need and don't really feel like decorating a nursery in gender neutralness. So, a lot of things are going to happen after the baby arrives to make it more personal. However, I am planning on tackling the cloth diaper monster again this time around. 

With my first child (who is now 6) we used cloth and it was really great. We saved a ton of money and she never had diaper rash. With my second we didn't and I fully regret that decision. The cost has been insane! So, I'm going back to cloth this time around. I've already purchased a starting set of diapers but want to wait to purchase the rest until I know the gender so I can get some adorable prints and more fun colors. The majority I've purchased are white with the exception of a few blue. I did a ton of research and tried out several types with my daughter and our favorite by far was Rumparooz. This time I did more research just to make sure it was still my best bet and have decided to only purchase those this time around. They still get some of the highest ratings on various websites and my past experience made it an easy decision.

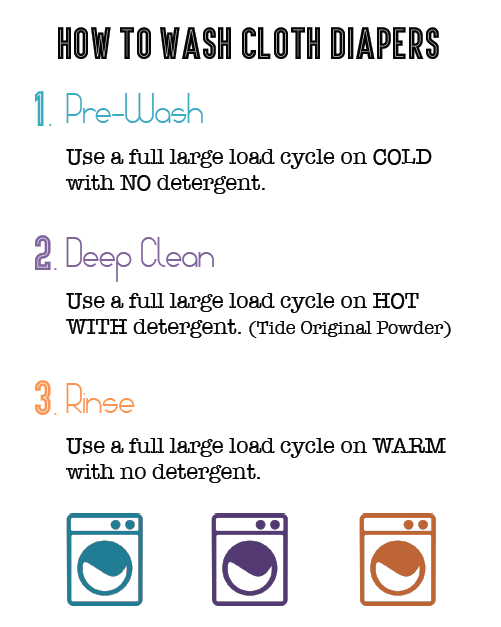
Washing cloth diapers isn't too difficult but a sleep deprived mom who hasn't done it in 6 years could always use a little help and I need to prep these diapers so they are ready to go! So, I did a bit of research to refresh my memory and created a printable to hang in my laundry room to remind not only myself but also my husband and anyone else who decides to help out from time to time. You can get my free printable below if you are also tackling the cloth diaper beast. Enjoy!
Picture
washing_cloth_diapers.pdf
File Size: 91 kb
File Type: pdf
Download File

0 Comments

a Mermaid & Shark 6th Birthday Party

9/19/2016

3 Comments

 
We had a fun but busy weekend filled with birthday celebration! We held Lillian's 6th birthday party at our house and I think it was a great success! Check out all of the adorableness and visit the other blog posts to see how some of the items were made and to find some free printables!
Picture
We planned for an outside party but the weather was very iffy all week long. On Friday evening the forecast predicted an 80% chance of thunderstorms at 10am, the time the party was to begin. So, we cleaned up the garage (Remember, we just moved into our new house a month ago.) which was no small task and set up tables, chairs and activity areas inside it. We set up the food table, gifts and party favor areas inside in the dining room and entryway of the house. But, by 9:00 am the next day it was clear that the weather would cooperate and we enjoyed blue skies and not too hot temperatures! So, we moved the tables and activity areas outside and set up the water sprinkler for extra watery fun.
As far as other activities, I left the photo area in the garage and we set up a water table filled with soapy blue and green bubbles and a sign stating "Sea Foam Sensory Play". I also hid a bunch of seashells under the bubbles for kids to find and collect. It was a big hit and rather entertaining to see the kids with their handfuls of shells. We also had a face painting table where kids could get mermaid scales or sharks, an arts and crafts table where they could make a paper bag mermaid or shark puppet as well as color mermaid crowns and I had several games planned. But, we only managed one because the kids were so happy with the other activities and just playing with each other.
Picture
Picture
Picture
Picture
Picture
Picture
Picture
Picture
I created labels (You can download the labels at the end of the post.) for the food but went with easy and quick to prepare items to keep my sanity. I ordered cupcakes from my favorite local bakery in strawberry, s'mores and lemon blackberry flavors with blue icing and fondant mermaid tails, shark fins, clam shells and life preservers. They turned out really cute and were delicious. The riskiest food I went with was a watermelon shark. I hacked away at a watermelon to make a shark and then stuck some googly eyes on it. I had directions but they were way too time intensive and with only 20 minutes before guests were to arrive and still unshowered, I decided to wing it. We also had shells and cheese, skewered grapes or "seaweed", pretzel sticks or "driftwood", baby carrots or "crab legs", a knock-off sonic ocean water, sunbutter and jelly sandwiches shaped like stars for "starfish" and turkey and cheese croissant crabs with googly eyes. It was all completely devoured and looked pretty adorable. For the backdrop I taped a blue tablecloth to the wall and then taped green cellophane cut into wiggly strips on top to create the illusion of seaweed. I topped it off with some clear and pale turquoise balloons and a birthday banner I made with my silhouette machine. I sprinkled the table with some golden confetti strips and seashells. The table was covered with three different colors of blue table cloth to create an ombre that I quickly cut scallops out of the base of each cloth. I did that at a very late hour the night before and wasn't too particular about making it perfect. I didn't even get on my knees but simply bent over and hoped for the best and it turned out fine so don't stress about perfect scallops. It isn't worth the worry.
Picture
Picture
Picture
Picture
Picture
Picture
Picture
Picture
Picture
For party favors, kids got a shark fin or mermaid tail handmade by moi and on their way out grabbed a bopper balloon toy. The tails and fins were big hits and I had several moms tell me that their kids refused to take them off long after the party had ended. You can see how I made them in this post.
Picture
Picture
I had a few other small decorations including seaweed and fish taped to the base of the walls inside and I made wreath for the front door using only cardboard, tissue paper and craft paper that turned out really cute and was basically $1! It was made around 11:30 the night before and I completely forgot to take pictures of the process but I can lay it out for you pretty simply.
1. Take some cardboard and cut a donut shape out of it in the size of a wreath. My circle was by no means perfect but it doesn't matter as long as it is close.
2. Make some tissue paper flowers in the colors of your choosing. You can use this tutorial from Pinterest. I went with varying colors of blue.
3. Hot glue the flowers to the cardboard donut shape.
4. I created a few embellishments using glitter card stock and my silhouette machine and simply hot glued them on top of a few of the flowers.
5. Hang and admire! 
Picture
Picture
The final touch to the party was the photo area. I always like to have a photo area and I was especially proud of this one because I free-handed the shark and was really impressed with myself. To create the photo area I taped a blue table cloth to the wall and then added a few fish leftover from the seaweed/fish wall decor. Then I grabbed a big piece of cardboard and drew and painted the shark after cutting out his mouth. To create the clam shells I drew two clam shells onto two pieces of poster board and then painted them and added sharpie for the detail. Since I set it up in the garage I realized the floor was somewhat dirty and grabbed a blue rug we had in the playroom and layed it down in front. I also created a few fun signs and hung them above the photo area. (You can download my signs at the bottom of this post.)
Picture
Picture
Picture
Picture
Picture
Picture
For my final act of craftiness I made iron-on cut outs with my silhouette machine to create custom t-shirts for me and Lillian. I was going to create ones for all four of us and then I found the "jawsome" shirt for $3 on Amazon for Arthur and the cool button up shark one for Derek so I didn't make theirs. I also managed to reuse Lillians fish scale leggings from last year's Ariel halloween costume. If you're curious about how I made our awesome Ariel and Ursula costumes from last year check them out here and here!
Picture
Picture
I hope my party ideas spark some inspiration for you and that you enjoyed reading about our adventure under the sea. If you want to download the printables I created for the party you can find them below! Thanks for visiting!
Picture
Picture
Picture
Picture
Picture
Picture
Download the pdf of the signs shown above by clicking the pdf file below.
mermaid_shark_party_signs.pdf
File Size: 609 kb
File Type: pdf
Download File

Picture
Picture
Picture
Picture
Download the pdf below to get the food labels, mermaid crowns and gift tags.
mermaid_shark_party_food_labels_and_crowns.pdf
File Size: 1136 kb
File Type: pdf
Download File

3 Comments

Diy mermaid tails and shark fins

9/18/2016

1 Comment

 
Picture
I know kids love to play dress-up so, I always incorporate an element of that when I throw a birthday party. For my daughter's mermaid/shark themed party this year I created mermaid tails and shark fins for each party guest to take home and wear for the party. They were a big hit with everyone, including the adults and only took about 2 hours and $20 to make!
DIY Shark Fin
You will need:
- gray craft foam (I was able to fit three shark fins on one piece for .88 and I made 12 just to be safe.)
- hot glue and glue gun
- free template (courtesy of itsthelife.typepad.com)
​- large safety pins
Picture
I found the tutorial for felt shark fins at It's the Life but their design required multiple steps and sewing! I avoid sewing at all costs so I quickly begin brainstorming ways to make it without sewing. I figured craft foam was stiff enough and super cheap so it was worth a go and it worked beautifully! To make the foam shark fin:
​Simply cut out the template, dividing the fin from the base and draw an outline onto your craft foam. Once you've made your outlines, cut them out and then glue one fin to the top of one base. Be sure to hold it there until it dries or it will fall over and/or not stand up straight. 
Picture
DIY Mermaid Tails
You will need:
- about 4 yards cheap, stiff material (I cannot remember what this stuff is called but it is only $4 per yard and has a stiffness to it. I believe it is used for putting under things and at hobby lobby they have it displayed being used to make a pretend cape.)
- about 3 yards iridescent sheer material (This stuff is a bit more at $6 per yard but it is important.)
- 1 30ft. spool of ribbon (I chose a sheer turquoise.)
Picture
Picture
Picture
Picture
Picture
Admittedly, the mermaid tails take more time and have more steps but, they are sooooo worth it! They look adorable! To make the mermaid tails you will need to:
1. Cut out a mermaid tail shape. I freehanded a tail while looking at a picture and then used that one as my stencil for the others. The material was the perfect length for kids as is so I didn't have to worry about the tail length. But, you might want to measure your kid to be sure.
2. Cut out about a million semi-circles from the sheer material. I used every available inch of my material and just barely had enough. I didn't use a stencil so the "scales" varied in size and shape but, I think that adds to the look and is waaaaay easier.

I hope you find this helpful and that your little monsters enjoy these crafts as much as mine did! Good luck!
Oh, and if you'd like to see the whole mermaid shark party you can check it out here!
1 Comment

Quick Washi Tape Wall

9/12/2016

0 Comments

 
I've been feeling like I was going to lose my mind with all of our blank walls in the new house. So, after finishing my gallery wall project I used some of the leftover washi tape to create a quick, graphic pattern on my living room wall. We plan on painting the whole space gray at some point soon but, until then this will keep me happy and from feeling depressed. Using a pinterest image as inspiration I just started sticking it up there and ended up with something that I think looks pretty darn cool!
Picture
My inspiration
Picture
Picture
Not the greatest photos ever but, you get the idea.
So, grab a roll of washi tape for a buck or two and get creative. It won't damage your walls and you can peel and re-stick until you're happy! It's pretty much the best.
0 Comments

DIY Easy Change Gallery Wall

9/12/2016

1 Comment

 
Picture
I don't know about you guys but, I get bored with the same decor and often feel the urge to change accessories, pillows, art and even re-arrange furniture much to my husband's chagrin. So, now that we're in a new house everything is fair game and I have the opportunity to think about my propensity to change decor often. With that in mind, I decided that I wanted an easier way to rotate out my art without having to take down, open and re-hang frames. I began researching and found plenty of great ideas for hanging art without frames.
Picture
Inspiration #1 - washi tape frames
Picture
Inspiration #2 - binder clips
Picture
Inspiration #3 - DIY Wooden Hanger
Picture
Inspiration #4 - Clipboards
After getting some ideas, I headed to Target, Hobby Lobby and Home Depot with a shopping list in hand. The goal was to create my own magnetic wooden hangers, utilize washi tape for creating faux frames and round it out with some clipboards, binder clips and nails. I managed to find a cute turquoise clipboard for $8, a container of varying sizes of blue and gold binder clips for $5 and  a two-pack of gold patterned washi tape for $3 all at Target! At Hobby Lobby I found another clipboard, this one was black and clear stripes with gold hardware for $4 and grabbed the magnets I would need for my frame project for $3. At Home Depot, I found something called hobby boards in the wood section for a little under $2 made out of oak. But, they were too long for my purposes and asked a very HD employee to cut them for me. I also grabbed a roll of twine for hanging. I was so ecstatic to find everything on my list without having to compromise! That almost never happens. 
Picture
The HD guy cutting my boards.
Picture
My hanging board in the making. Click the link above for directions.
My other chore was to decide what exactly I wanted to put on the wall! I scoured my own images as well as free printables from the internet. I chose a few that were food/eating related because it was going on my breakfast nook wall but, I also kept color and pattern in mind and chose a few colorful and graphic art prints. There are literally hundreds of free printables for gallery walls and you can peruse them all at your leisure. Just give Pinterest a search. Once I made my selections, I ordered prints from Walgreens and picked them up. I could have printed them at home but wanted a little higher quality look. I only spent about $20 bucks and now I have prints that are a bit more sturdy. When I change them out I'll just keep a folder of the ones I'm tired of and can always reintroduce them if I want.

Once I had everything I needed I headed home and started by laying out all of my prints to form a plan before I made any holes in the wall. I also grabbed a few other pieces of art that I already had including a painting by my lovely sister-in-law, a print we purchased from a street artist in Spain and a painting of "Starry Night" done by my daughter. 
Picture
Once I laid it all out I got to work. First, I hung the only framed piece that acted as the anchor for the whole wall and made sure it was centered. After that I simply worked my way out and eyeballed it. Measuring tapes have their place and time but for me, this was not it. If you're uncomfortable with that idea you're welcome to use a measuring tape. I guess I was a bit lazy about it honestly. I would just make sure I thought it looked "about right" and use crude measurement with my hand and fingers. I did use a pencil to mark where I wanted a nail before going at it though. :) I also varied the use of my binder clips in regards to color and size but tried to keep it symmetrical from one side to the other. To enhance certain image groups and add more character I "framed" pictures or groups with washi tape. This was actually the most time consuming part. After about an hour I had this! 
Picture
I love it and am so glad I took the chance and made it happen!
Picture
Picture
Picture
I hope I've inspired you to get creative and create your own!
1 Comment

Update: diy house bed for a child

9/12/2016

0 Comments

 
With the help of my father-in-law and husband (not really, they did almost all of the work), we have completed my daughters new bed. Her room is still far from completion but she is no longer sleeping on a mattress on the floor so, I can feel like a decent mom for the time being. The project took a bit longer than I anticipated but, was still completed in a weekend. I think it looks fantastic and really makes her room look special.
Picture
I found the diy instructions here.
Picture
Arthur wanted to help the menfolk put it together. It was stupid adorable.
Picture

Picture
Picture
As stated in my post "New House, New Decor", We plan on painting her room a light purple (almost white) and I intend to make her a unicorn head for the wall along with a bunch of paper flowers. But, those things are going to have to wait for now. I've got about a month and a half before the new baby arrives and still have to work on her 6th birthday, celebrate my own birthday (it's the day after hers) and wrangle together our Halloween costumes. (We're going as Aladdin characters btw! More info on that in a later post.) So, I'm a bit busy. But, Her room looks plenty cute enough for now and she absolutely loves it!
0 Comments
    Picture

    RSS Feed

    meet rachel

    Rachel is a mother of three, elementary Spanish teacher and part-time blogger who loves crafting, creating fun and engaging activities for her children and students and hanging with her friends and family. She blogs about what she's doing and her interests at any given time which vary. She's a little OCD and always looking for her next project. Her husband calls it, "focusing her crazy", but she just calls it fun. 

    Archives

    February 2022
    December 2021
    November 2021
    October 2021
    September 2021
    August 2021
    July 2021
    May 2021
    April 2021
    March 2021
    February 2021
    January 2021
    November 2020
    October 2020
    August 2020
    July 2020
    June 2020
    March 2020
    February 2020
    December 2019
    November 2019
    October 2019
    August 2019
    July 2019
    May 2019
    March 2019
    February 2019
    January 2019
    December 2018
    November 2018
    October 2018
    September 2018
    July 2018
    June 2018
    April 2018
    March 2018
    February 2018
    December 2017
    October 2017
    September 2017
    July 2017
    June 2017
    May 2017
    April 2017
    March 2017
    February 2017
    January 2017
    December 2016
    November 2016
    October 2016
    September 2016
    August 2016
    July 2016
    June 2016
    May 2016
    April 2016
    March 2016
    February 2016
    January 2016
    December 2015
    November 2015
    October 2015
    September 2015
    August 2015
    July 2015
    June 2015
    May 2015
    April 2015
    February 2015
    September 2014
    August 2014
    February 2013
    January 2013
    December 2012
    November 2012
    October 2012
    September 2012

    Categories

    All
    Baby
    Beauty
    Clothing
    Crafts
    Decor
    DIY
    DIY Gifts
    Dramatic Play
    Freebies
    Free Wallpapers
    Fun With Paint
    Holiday
    Inspire
    Kids
    Kid Snacks
    Mommy Camp
    My Thoughts
    Organize
    Parenting
    Party Time
    Photography
    Science Stuff
    Sensory Play
    Silhouette
    Toddlers
    Whole 30

    Picture
    Picture
    Mom Buzz Media
Proudly powered by Weebly