Paint Covered Kids
  • Blog
  • About
  • Contact
  • The Gallery
  • DIY
  • Mommy Camp
  • Freebies
  • Subscribe!
  • Blog
  • About
  • Contact
  • The Gallery
  • DIY
  • Mommy Camp
  • Freebies
  • Subscribe!
Paint Covered Kids

​

3 Ingredient DIY Soap Dough

11/8/2015

0 Comments

 
Picture
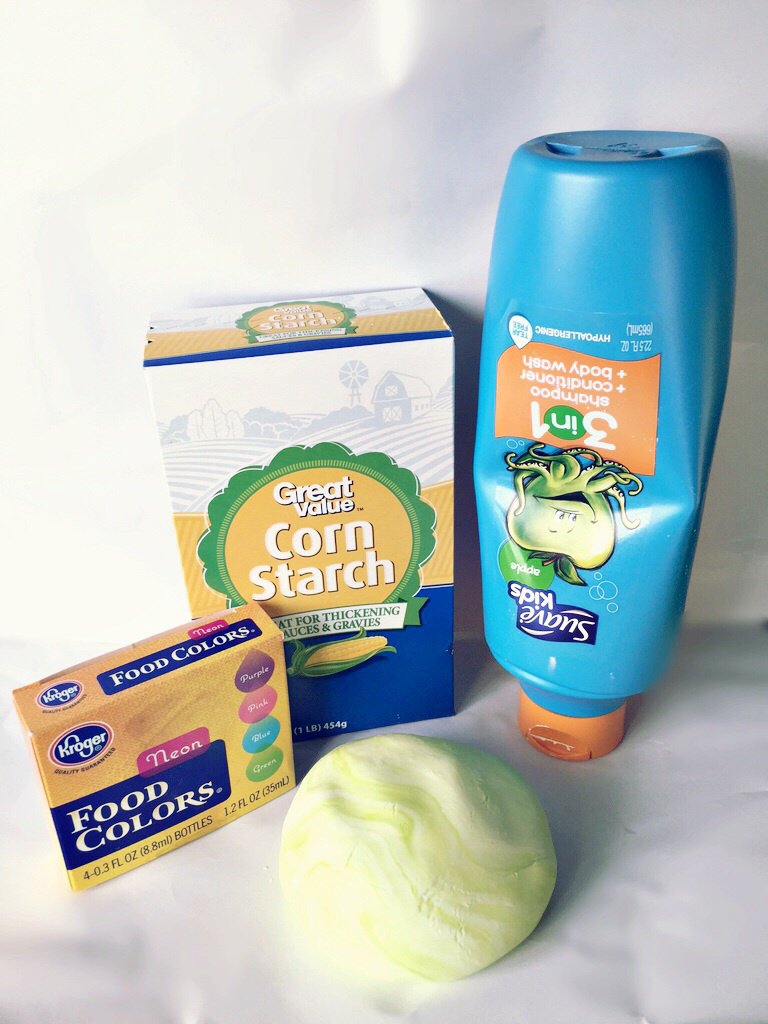
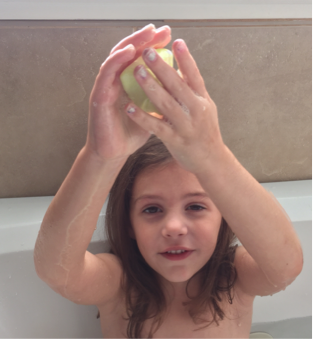
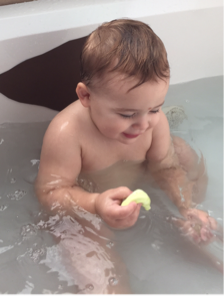
My kids LOVE baths. They will spend so long in a bath that the water gets ice cold and, their hands are merely wrinkly representations of what used to be hands. I'm always thinking of new, fun ways to spice up bath time and, my DIY bath dough was a MAJOR hit! It costs mere pennies and only a few minutes to make too!

Ingredients:
- corn starch
- liquid soap (I used suave for kids)
- food coloring

Directions:
- Mix 2 cups cornstarch with 1/4 cup soap and about 4-8 drops of coloring in a large bowl
- Depending on the soap you may have to add more soap or cornstarch to get a doughy consistency you mix with s spoon for s big but you will need to use your hands towards the end.
- You will know it's the right consistency when it does not stick to your hands and can be manipulated like playdough. It should have a very silly and soft texture.

There you have it! Quick, cheap and easy! My kids played with this forever. They molded it into shapes, stuck it on the side of the tub and created images, enjoyed simply manipulating it and , even washed themselves!

Picture
Picture
0 Comments

One Holiday at a Time: Keeping Thanksgiving Alive

11/4/2015

0 Comments

 
Picture
Photo Credit: "Freedom From Want" by Norman Rockwell via wikipedia
Even before October arrives, we begin to see Christmas decorations in stores. We are bombarded with radio, t.v., and print advertisements promoting sales and ideas for your Christmas decor. Stores are motivated to sell and, therefore, promote their items as soon as they can but, we don't have to buy into all their fluff. Why are we allowing ourselves to be rushed through our lives and events, constantly being pushed towards the next big holiday?

In my family, Halloween has always been a big deal. I grew up with a mom who helped us imagine our ideal costume and, aided our efforts to create the illusion of being something else for one day. We would spend days planning and making costumes by hand with random materials. The time we enjoyed together to brainstorm and craft is what I think of when I remember my childhood Halloweens. I have already started these traditions within my family and, my daughter is excitedly planning next years costumes. I know many people don't celebrate or, enjoy Halloween for various reasons including religion so, skipping it in favor of the next holiday is understandable. Why then does it seem like the next holiday is Christmas? When we went trick-or-treating there was already a house in our neighborhood that was fully lit with Christmas lights! It's as though people view Thanksgiving as a stepping stone to Christmas. One more hurdle to jump before we bring in the fat man, eggnog and presents. 
Picture
photo credit: Jo Naylor via Flickr
Picture
My husband and Son on Halloween
Let's analyze the holiday that is Thanksgiving. Historically you can tear it down and say that the pilgrims were horrible and treated the Native Americans poorly and inhumanely. While this is true, holidays do evolve and change over time. That is what happens as people grow and society evolves. We learn, we grow, we change. Even though Thanksgiving is rooted in some pretty depressing realities the general reason for gathering together is to celebrate the fact that we are here. It also serves as a reminder for how we as a society should treat people by remembering and learning from our past mistakes.

Thanksgiving is a time for gratitude and being with each other without the sparkly distractions of fancy decorations, presents and make believe. It's a time for us as a nation to give thanks for what we have, reflect on who we were and to appreciate what we have become. The fact that Thanksgiving doesn't come wrapped in presents with caroling and bright lights might make some people feel as though it is less important. However, I think it is one of the most important holidays BECAUSE it doesn't come with all of the distractions. 

On a scientific note, Thanksgiving can also be great for your health. There have been numerous studies showing that practicing gratefulness can improve one's happiness, overall health and well-being. According to a Wall Street Journal article, practicing gratitude can change your perspective on life and reduce your tendency towards negativity thereby warding off depression and improving your resilience when dealing with stressful or difficult times. There are even apps for practicing gratitude and reflecting on the good parts of each day.

I do want to make it clear that I am not condemning those who just can't wait to put up their tree. I'm only making a suggestion in regards to how we should live in the moment and take things as they come. You need not suffer the months of October and November without decorations. At my home, we enjoy making fall and Halloween decorations. They can be just as beautiful and fun to use as Christmas baubles. For the month of October you can fill your home with all manner of spooky and beautiful decor. When November rolls around use brightly colored fall leaves, glittery pumpkins and sparkly lights instead of garland, snow globes and tinsel. Pinterest is full of great ideas!

So, let's keep Thanksgiving alive and let it have its day. Christmas will still come, your lights will be just as sparkly and bright the day after Thanksgiving. Your tree with look just as beautiful and the presents will still arrive via sleigh. In fact, it will seem even more magical because it will only last a short time. Christmas will have its day. Let's enjoy the opportunity to just be with one another. At the end of the day your children will remember the fun times spent together more than the flashy parts of any holiday. So let's savor every moment we can have in the present including that nearly forgotten holiday called Thanksgiving.
0 Comments

DIY Hans Solo Costume - SUPER Easy!

11/3/2015

0 Comments

 
Picture
My husband decided he and Arthur would go as Chewbacca and Hans Solo for Halloween this year. I quickly came up with a very easy way of creating a tiny Hans Solo costume for very little money! 

Supplies:
- 1 white long-sleeved shirt (the size your child wears) (I got mine at Wal-Mart for $4)
- 1 black short-sleeved shirt (the size your child wears) (I got mine at Wal-Mart for $4)
- 1 pair blue cotton pants (I got mine on amazon in a pack of two for $8)
- 1 piece of red felt
- red thread and needle (or fabric glue if you want)
- black sharpie
- black boots (I used a pair of rain boots we already had and they were perfect. I got them from Wal-Mart.)
- pretend gun and holster set (also from Wal-Mart for $4.98)

Directions:
- cut a slit at the neck of the white shirt going down the center about 1 inch
- cut the sleeves off of the black shirt and cut a line all the way down the center to create a vest
- cut two thin strips of red felt that is the length of the pant
- add black lines down the lengths of the red felt
- sew (or glue if you don't care to make it permanent) the red felt strip down the side of each pant leg)
- top off the outfit with the gun and holster and a the rain boots
Picture
Picture
Picture
Honestly, he barely wore the gun and holster and the outfit was totally recognizable without it so, you don't really have to have it. :) If you like my Ursula outfit above be sure to check out that tutorial here. Also, Derek's Chewy costume was actually a onesie male pajama set from Target for only $24.99!
0 Comments

Mommy Camp: Halloween Edition

11/3/2015

0 Comments

 
Picture
Lilly requested that we do more Mommy Camp so I made a special Halloween edition! I was a little late on getting it ready so we didn't finish all of the activities before Halloween was over but, I'll share what we did get done. I think we'll probably just squeeze the other activities into random days for fun later on and I'll post when we do.
Skeletons and Bones
We started off with a theme focusing on bones and skeletons. To begin we did a little bone math using this worksheet from education.com. We also pulled out her helping hands from our summer mommy camp to help her count.
Picture
Then we worked on a halloween rebus activity sheet where she filled in the story with the correct images by reading key words. That worksheet is also from education.com and can be found here.
Picture
After the math and reading we discussed the importance and function of bones. We then conducted an experiment with rubber gloves and straws. Take one glove and fill each finger with a bendy straw. Leave the other glove alone and compare them. This demonstrates how bones work to give us the ability to move.
Picture
Then it was time for lunch and I made Lilly a sandwich skeleton!
Picture
Then we made Q-tip skeletons! She drew a skeleton head and cut it out. Then glued it to black paper and glued Q-tips for the bones.
Picture
We finished up our focus on skeletons and bones by making skeleton marshmallows and contact paper + tissue paper sun catchers. For the sun catcher, I drew a skull/calavera on the non-sticky side of the contact paper. Then, I pulled off the back and taped it to the table for them to stick pieces of torn tissue paper onto. I also made a decorate your own calavera felt board activity by cutting out a white skull shape and various shapes for decorating from felt. It took very little time and they enjoyed it!
Picture
Picture
Picture
Picture
Picture
Coincidentally, Derek and I went to a fancy costume party and dressed as calaveras! Here's our fun photo!
Picture
Spiders!
The other theme we managed to get done was spiders! We started off with some spider counting math. I purchased a bag of plastic spiders and printed off a handy worksheet from this site. We also discussed the life cycle of a spider and put together a puzzle using this worksheet and read a spider mini book using this free printable.
Picture
Then we made some fun spider hats with construction paper, glue and staples.
Picture
Picture
After the math and crafting it was time for some action! I created a spider web from painters tape for a fun game of tossing paper wads at the spider web. While I was creating the web I had Lilly creating the paper wads from tissue paper.
Picture
Then we did some spider web watercolors by creating a spider web using painters tape for the children to paint over. They enjoyed it and they turned out really nicely.
Picture
Picture
Picture
We finished up our spider theme by participating in a spider web obstacle course! Even though it only lasted about 10 minutes they really enjoyed it!
Picture
We didn't even get to all of the fun stuff I planned about spiders so you may see another post with the stuff we missed! We also have a monsters theme and a pumpkins theme that we didn't even touch! So, keep an eye out for all of the fun they contain. 

I'm currently finishing up work on my Thanksgiving Mommy Camp and we will begin doing those fun activities soon. The themes will be Thanksgiving History, Giving Thanks, Thanksgiving Food and Fall! I can't wait!
0 Comments

DIY Ursula Sea Witch Costume

11/3/2015

7 Comments

 
Picture
After making the Ariel costume for my daughter I attacked the Ursula costume for myself. It didn't take nearly as long as I expected and I'm pretty happy with the results!

DIY Ursula Costume Supplies:
- 2 black yard trash bags (They need to be quality trash bags that are nice and thick.)
- one roll bubble wrap (I got it at the dollar store.)
- one package of black elastic waist band (I used a thick elastic.)
- one black fitted dress
- one white wig or white hair paint and ALOT of gel
- one piece yellow craft foam
- one strand black ribbon
​- purple spray paint
​- a bunch of plastic disposable shopping bags (like walmart or target)
​- silver and black sharpie markers
- hole punch
​- stapler
- two rolls black tulle (I purchased the 1 ft. rolls at hobby lobby.)

For my costume I decided that purchasing a fitted black dress and adding tentacles to the base. I bought my dress direct from China but, it turned out to be exactly what I expected. You can find it here. Just make sure you get it in the right size based on measurements. Once the dress came in I measured how long to make the tulle on the waist band as well the length of the tentacles. I chose to sew the tentacle/tulle waist band in at the knee slit on the dress since Ursula is very fitted and then her tentacles blossom out of the bottom. 

Picture
Picture
Making the Tentacle/Tulle Elastic Band
Measure how much elastic you need for the location of your band. I chose to start mine at the slit in the dress I'm using so mine will be attached to the dress right about the knee. Cut the elastic to the size you need and hot glue or sew the two ends together.

Step One:
Take the bubble wrap outside and spray paint the bubble side with the purple spray paint. I found a shimmery purple and it looked awesome.
​Step Two:
While the bubble wrap dries begin your tentacles. Get the black trash bag and draw the shape of your tentacle on the black using a silver sharpie marker. Make sure that you draw it with a curve upwards at the end so that it will curve up from the floor when attached to the elastic. You will also need about 2 inches of extra space at the top of each tentacle to attach it to the waist band.

When you cut it you will have two identical sides (you know, 'cause it's a trash bag:), Turn the two sides around so the sharpie you used is not visible on the outside. (if you don't do this it actually looks ok and is not very noticeable, especially if you cut it out perfectly. Then glue the two pieces together along the entire outer edge leaving the top of the tentacle open for stuffing. Repeat 7 more times.

​Once all of your tentacles are cut and glued you can stuff! Begin stuffing your tentacles with the trash bags. Don't over stuff because the tentacles will get heavy. Just fill them enough to make it obvious what they are. You also do not need to stuff all the way to the top. In fact, don't. It'll be easier to attach to the waist band.

When stuffing you may find sections that did not get glued. You can fix them easily before or after stuffing.
Picture
Picture
Picture
​Step Three:
Apply the bubble wrap A.K.A. the suction cups! Cut out pieces of bubble wrap and lay them on the side of each tentacle. (I didn't want to spray another roll of bubble wrap so I only put bubble wrap on one side of each tentacle. If you wanted you could put more but I think it looks good without the extra work.) Hot glue the section of painted bubble wrap on each tentacle.
Picture
​Step Four:
Attach the tentacles to the elastic waistband you made at the beginning. Before attaching, stretch the waistband around the back of a chair like you would for making a tutu. Fold the 2 inches you left at the top of each tentacle over the top of the waist band and then staple. Attach them at even intervals around the entire waist band. 
Picture
​Step Five:
Add the tulle. Cut the tulle in the lengths that you decided were appropriate earlier. Then tie them to the waist band like you do when making a tutu. You can see how that is done here. Fill in between each tentacle evenly making the skirt full. 

You should now have a tentacle waist band! Now you just need to attach it to the bottom of your dress or, if you decided to wear it around your waist simply slide it on! I hand sewed mine to the bottom of my dress.
Picture
Making the Ursula Necklace:
Grab your yellow craft foam, black sharpie, hole punch and black ribbon. Cut out a shell shape. I free-handed it based on the picture of Ursula. Add detail with the sharpie. Punch a hole at the top of the "shell" and thread the ribbon through! Voila!
Finishing the Look:
I did my Ursula makeup following this tutorial. I also purchased purple body paint from here and it is perfect. It is actually made for clowns and does not rub off or flake! I applied it all over before applying the Ursula make-up. 

For my hair I purchased this wig and then hung it vertically while applying liquid spray starch, super strong hold hairspray and gel. Once it dried it worked out pretty well.
Picture
I hope you enjoyed my tutorial! Happy Halloween!
7 Comments
    Picture

    RSS Feed

    meet rachel

    Rachel is a mother of three, elementary Spanish teacher and part-time blogger who loves crafting, creating fun and engaging activities for her children and students and hanging with her friends and family. She blogs about what she's doing and her interests at any given time which vary. She's a little OCD and always looking for her next project. Her husband calls it, "focusing her crazy", but she just calls it fun. 

    Archives

    December 2022
    November 2022
    September 2022
    July 2022
    February 2022
    December 2021
    November 2021
    October 2021
    September 2021
    August 2021
    July 2021
    May 2021
    April 2021
    March 2021
    February 2021
    January 2021
    November 2020
    October 2020
    August 2020
    July 2020
    June 2020
    March 2020
    February 2020
    December 2019
    November 2019
    October 2019
    August 2019
    July 2019
    May 2019
    March 2019
    February 2019
    January 2019
    December 2018
    November 2018
    October 2018
    September 2018
    July 2018
    June 2018
    April 2018
    March 2018
    February 2018
    December 2017
    October 2017
    September 2017
    July 2017
    June 2017
    May 2017
    April 2017
    March 2017
    February 2017
    January 2017
    December 2016
    November 2016
    October 2016
    September 2016
    August 2016
    July 2016
    June 2016
    May 2016
    April 2016
    March 2016
    February 2016
    January 2016
    December 2015
    November 2015
    October 2015
    September 2015
    August 2015
    July 2015
    June 2015
    May 2015
    April 2015
    February 2015
    September 2014
    August 2014
    February 2013
    January 2013
    December 2012
    November 2012
    October 2012
    September 2012

    Categories

    All
    Baby
    Beauty
    Clothing
    Crafts
    Decor
    DIY
    DIY Gifts
    Dramatic Play
    Freebies
    Free Wallpapers
    Fun With Paint
    Holiday
    Inspire
    Kids
    Kid Snacks
    Mommy Camp
    My Thoughts
    Organize
    Parenting
    Party Time
    Photography
    Science Stuff
    Sensory Play
    Silhouette
    Toddlers
    Whole 30

    Picture
    Picture
    Mom Buzz Media
Proudly powered by Weebly