Paint Covered Kids
  • Blog
  • About
  • Contact
  • The Gallery
  • DIY
  • Mommy Camp
  • Freebies
  • Subscribe!
  • Blog
  • About
  • Contact
  • The Gallery
  • DIY
  • Mommy Camp
  • Freebies
  • Subscribe!
Paint Covered Kids

​

DIY Ariel Costume

10/28/2015

0 Comments

 
Picture
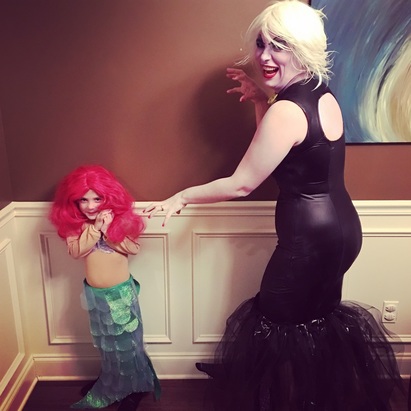
This year Lilly and I will have costumes with a matching theme and Derek and Arthur will too but we won't match as a family. I am going to be Ursula (check out that tutorial here) and Lilly will be Ariel. Derek will be Chewbacca and Arthur will be Hans Solo (check out that tutorial here). I am making everyone's costume but my husbands. He purchased a Chewbacca pajama onesie at Target and is planning on wearing that.

To make the Ariel costume (child sized) you will need:
- 1 yard stiff green broadcloth
- 1 yard iridescent blue-green chiffon
- one package of wide white elastic
- one tan bodysuit
- one piece of purple felt
- one small piece of iridescent  purple chiffon
- hot glue gun and glue
- purple thread and needle

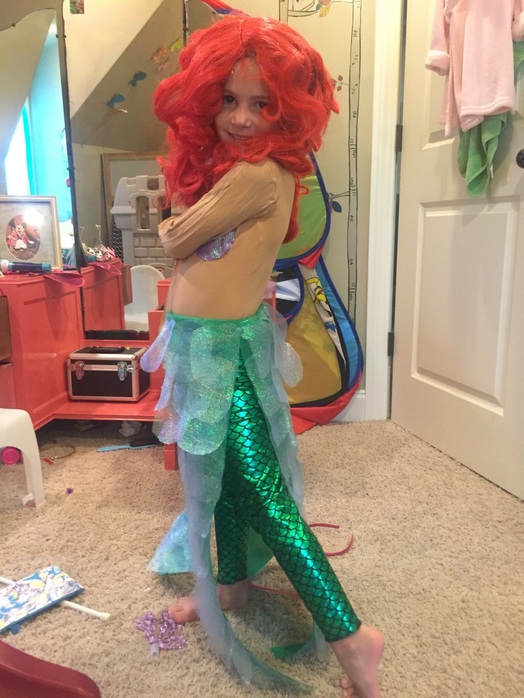
I measured the length that I needed for the tail to touch the floor and then free-handed a mermaid tail on the green broadcloth. I cut out two of these tail shapes. Leave enough room at the top to fold over and place the elastic waist band inside.

After cutting out the tail shape, I cut out about a million fish scale shaped chiffon pieces. Then I hot glued the top portion of the scale to the tail shape. I glued them in horizontal rows until, slightly overlapping each other, I filled the tail. You may also have to trim them when they reach the edge and hang off.

Once I had covered both tails in scales, I folded over the top bit and hot glued it to make a pocket. Then I threaded the elastic through the hole and sewed the ends of the velcro together. This created a tail "skirt".

I ordered green fish scale leggings from Easy. If you're into sewing I'm sure you could find some fish scale fabric and make them yourself. I am not into sewing.

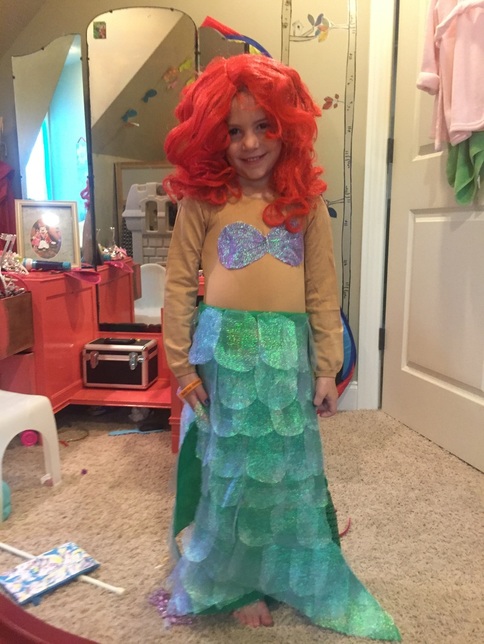
For the top, I purchased a tan bodysuit from Spirit of Halloween. Then I cut out a piece of purple felt in a bra shape, drew accent lines for the "shell" with a sharpie and used fabric glue to glue a piece of purple chiffon to the top. Then, using purple thread, I hand stitched the "bra" to the bodysuit.

To finish off the outfit I purchased a red Ariel wig. As a note, this wig is absolutely horrible! In the photo you can tell it is just terrible quality. Thanks Disney!  So, I'm going to give it the liquid fabric softener treatment to make it look better.

​
Picture
Picture
0 Comments

DIY PVC Pipe Playhouse

10/28/2015

0 Comments

 
Picture
We recently decided to re-arrange and re-assign rooms in our upstairs. The decision meant that our daughter is now in the bonus room which is rather large. It will now be a playroom and her bedroom. Her birthday is also coming in a few weeks and I thought a perfect present would be a playhouse! Since her room is now plenty large to accommodate one. I quickly set to work browsing pinterest for inspiration and the courage to branch out on my own. I'm pretty pleased with what I created and, hopefully, you are too!

Step One: Design
I was working with a room that has slanted ceilings and, therefore, limitations in regards to height. So I measured my space and decided what the footprint of the playhouse would be. You are welcome to use my plan. It would work for any space that is big enough. Keep in mind that the connectors add about 1/2 an inch to the length of any section. So, my playhouse measures a little under 7 ft wide, 4 ft tall and the roof angle and another 2 ft or so tall for the roof so a bit more than 6 ft tall.

I was able to fit a play kitchen, half of a slide (the other half comes out of the side), a child-sized table and chair, a doll crib and a bookcase inside. 

When designing it is important to make a note of how much pvc you will need. In my pinterest searching I found numerous posts that said the store would cut the pvc for you. I did not find this to be true and it caused me some frustration in that I had to add up the amount of pvc I needed in 10ft. increments while standing in the store. My design needs 9, 10ft poles.

Step Two: Purchase Materials

It only took me a second to find the materials I was searching for. You will also need a PVC pipe cutter. I got mine for about $11 and it worked like a charm. I dreaded the fact that I had to cut them myself but it was super simple and took no time at all! Below is my materials list.

PVC Playhouse Cut List/Shopping List
If you find a place that will cut it for you great! If not you'll need to cut it yourself with a PVC pipe cutter. It's actually really easy!

You Cut:
- 9, 10ft long, 1inch pipe
- 6, 3 joint connectors
- 10, t-joint connectors
- 4, 45 degree angle joints


The Cut List:
4 - 1ft
4 - 4 ft
3 - 6ft
8 - 3ft
1 - 5.5 ft
4 - 2ft
4 - 1 inch

Step Three: Make Cuts (If you got them to do it for you then skip this step!)

Cutting the pipe was very easy. I just measured and marked with a  sharpie and then cut each section. I recommend labelling each pipe with it's length so you save time when constructing later. The cut lengths are above. 
*You may need to adjust the cuts a little depending on how perfectly they are cut and how easily they slide into the connectors once constructed. I adjusted mine a bit and had no issues. just pull the pipe out cut a bit and reattach. :)


Step Four: Construct

When I put mine together I found having the measuring tape, sharpie and PVC cutter nearby was helpful for any minor adjustments needed. 

1. Form your base by attaching the front bottom first. You will attach one 3ft pole to two 1 ft poles using t connectors with the 3ft in the middle. Then attach a three joint connector to the end of each 1ft pole. Continue forming the base and attach two 4 ft. pole to each horizontal connector coming from the 1ft poles. Then attach another 3 joint connector to the end of those poles and finish with a 6ft pole in between the two new 3 joint connectors. This should form your rectangular base.
2. Begin adding the vertical poles. Place one 3ft pole in each vertical 3 joint hole as well as one 3ft pole in each of the two t joint holes at the front. Attach a t joint connector to the top of each of the middle poles at the front and attach a 3 joint connector to the top of each corner pole. 
3. Modify your two remaining 1 ft poles by making a cut 1 inch in on both. Attach the 1 inch piece to the front corner joints and attach a t joint connector to that with the t joint connector middle hole facing up. This will connect to the roof.
4. Attach the other top 4 ft pole on either side and the 5.5 ft pole on the back. For the 5.5 ft pole you need to cut 1 inch off of each end and copy the same steps that you followed for the front 1 ft bars in order to form the roof attachment. 
5. Place the 1 inch pieces in the top of each upward facing t connector. Then attach the 45 degree angle joints to each one. 
6. Attach the 2 ft poles to each 45 degree angle joint and attach your remaining two 3 joint connectors between the 2 ft poles from the front and back. This will form the roof angles.
7. Attach the final 6 ft pole between the two 3 joint connectors at the apex of the roof.

Step Five: Creating a Cover
I found colorful sheets that matched the room at Walmart for $4.98 each (in a twin size) and chose to use them as my fabric. To attach I measured each section I wanted to cover and then cut a rectangle/square to fit the area. Then I sewed a piece of velcro to the sheet and hot glued the opposing velcro to the pole where I wanted them to attach. I also decided where to add windows and cut them out before attaching. 

I plan on sprucing it up more with felt accents like shingles and other things to make it look more house like. I'll sew those on by hand so I can wash it if necessary.
Picture
See the finished product with amazingly cute decorations and tutorial here!
0 Comments
    Picture

    RSS Feed

    meet rachel

    Rachel is a mother of three, elementary Spanish teacher and part-time blogger who loves crafting, creating fun and engaging activities for her children and students and hanging with her friends and family. She blogs about what she's doing and her interests at any given time which vary. She's a little OCD and always looking for her next project. Her husband calls it, "focusing her crazy", but she just calls it fun. 

    Archives

    February 2022
    December 2021
    November 2021
    October 2021
    September 2021
    August 2021
    July 2021
    May 2021
    April 2021
    March 2021
    February 2021
    January 2021
    November 2020
    October 2020
    August 2020
    July 2020
    June 2020
    March 2020
    February 2020
    December 2019
    November 2019
    October 2019
    August 2019
    July 2019
    May 2019
    March 2019
    February 2019
    January 2019
    December 2018
    November 2018
    October 2018
    September 2018
    July 2018
    June 2018
    April 2018
    March 2018
    February 2018
    December 2017
    October 2017
    September 2017
    July 2017
    June 2017
    May 2017
    April 2017
    March 2017
    February 2017
    January 2017
    December 2016
    November 2016
    October 2016
    September 2016
    August 2016
    July 2016
    June 2016
    May 2016
    April 2016
    March 2016
    February 2016
    January 2016
    December 2015
    November 2015
    October 2015
    September 2015
    August 2015
    July 2015
    June 2015
    May 2015
    April 2015
    February 2015
    September 2014
    August 2014
    February 2013
    January 2013
    December 2012
    November 2012
    October 2012
    September 2012

    Categories

    All
    Baby
    Beauty
    Clothing
    Crafts
    Decor
    DIY
    DIY Gifts
    Dramatic Play
    Freebies
    Free Wallpapers
    Fun With Paint
    Holiday
    Inspire
    Kids
    Kid Snacks
    Mommy Camp
    My Thoughts
    Organize
    Parenting
    Party Time
    Photography
    Science Stuff
    Sensory Play
    Silhouette
    Toddlers
    Whole 30

    Picture
    Picture
    Mom Buzz Media
Proudly powered by Weebly