Hanging them was done by my husband and was apparently a chore. But, they look pretty fab and I'm in love!
I've been wanting a large scale art piece for my new living room since moving in but was waiting until I found something I loved. When I found this pin on Pinterest I knew it was the winner! 
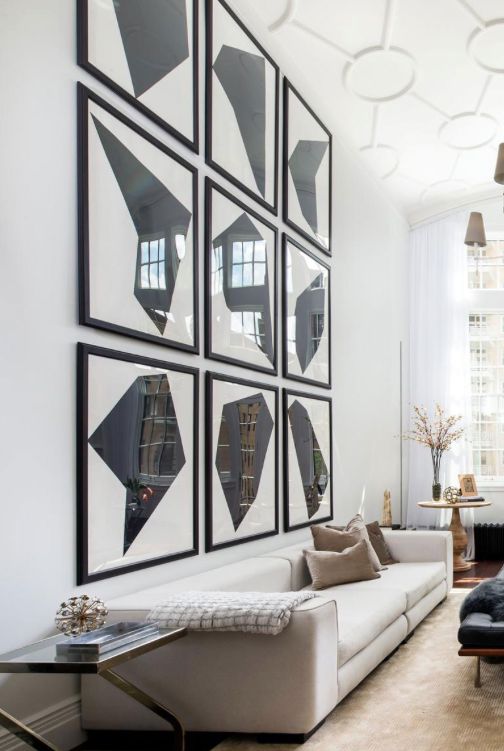
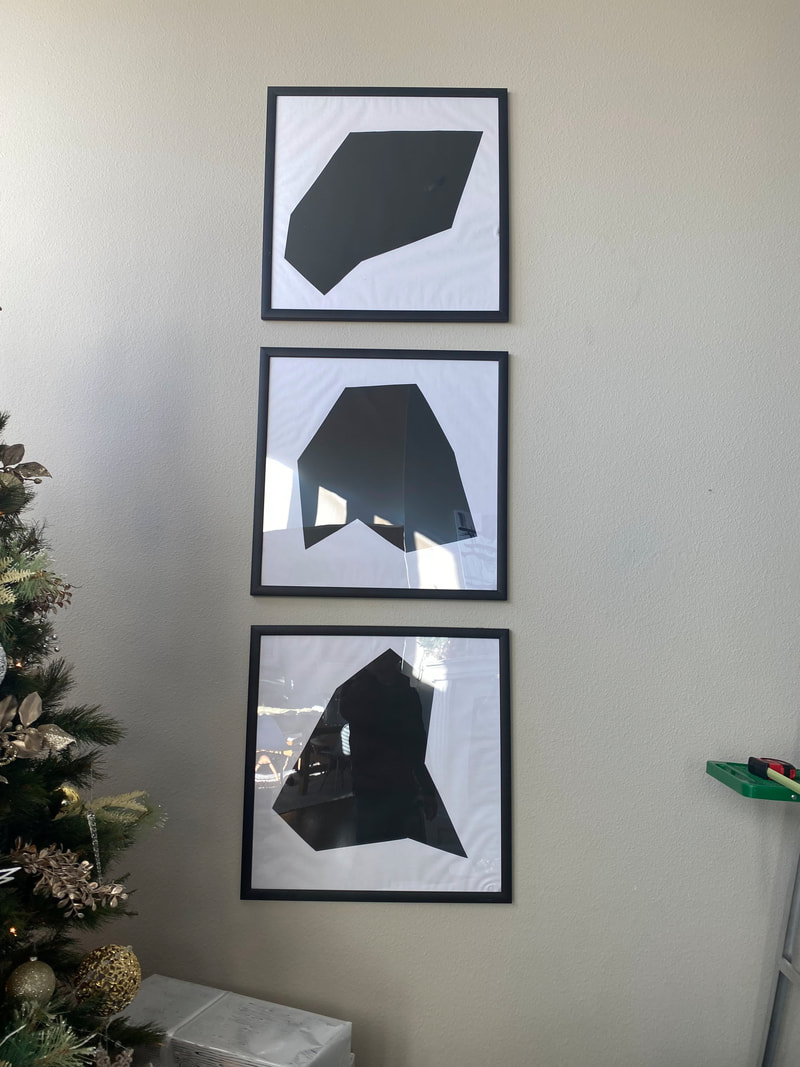
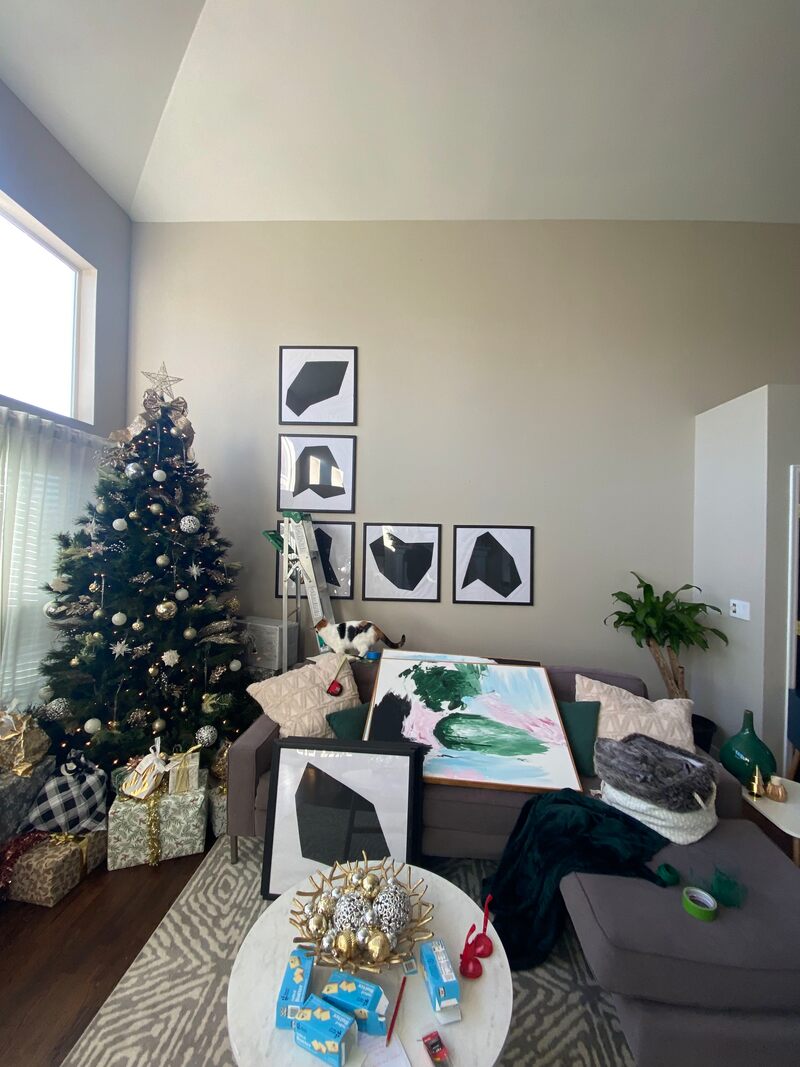
The key to this look in my opinion are the square shaped frames. It's unusual and custom looking. So, I set to work finding the frames first and was successful on Amazon. I purchased two packs of four and one single of these. Once I had the frames it was time to make the art. I bought a bunch of black poster board from the dollar store and a huge roll of white paper from the craft store that is usually used for bulletin boards. Then I wrapped the cardboard backing of each frame with the white paper for my base. Then I used a ruler and pencil to draw lines and make straight cuts into shapes. I ended up just going with whatever shapes I wanted and didn't try to copy the original shapes. The biggest thing was to make sure they weren't too big for the frame. After I cut all of the shapes I used a regular glue stick to glue the black paper cuts onto the white paper and popped them into their frames.
Hanging them was done by my husband and was apparently a chore. But, they look pretty fab and I'm in love!
0 Comments
Since moving to Colorado we have been loving the ability to be outdoors! No mosquitos?! Count me in! So, after acclimating our kids to hiking and general outdoorsiness, we've decided it's time to take them on a legit camping trip! But, I want it to be perfect so they love it and we can do it all the time without whining. (Hiking took a bit before they stopped whining about going.) So, I'm planning everything down to the last detail. I don't know if you've picked up on this yet but I have never been a chill person. I'm very extra in just about everything. After spending hours researching tents, sleeping bags and everything else I could possible need, spending way too much on Amazon. Justifying the amount spent by rationalizing that if the world ends we'll be prepared and scouring the internet for suggestions that I may not have thought of (like cracking eggs before hand and storing them in a container...genius). I think we're ready to go. And, what kind of insane, OCD, extra mom would I be if I didn't make a special binder full of the plans, recipes, lists and kid activities to go along with us?! So, enjoy my Mommy Camp: Camping Guide which you can download by clicking the photo below and be sure to check back to see if all of my planning paid off or if we ended up in a hotel.
I know...being basic is not generally one's goal. However, my friends and I made it just that when we began planning a day of fall fun for ourselves. We decided to cram as many fall activities and alcohol into one day as possible and I think we succeeded. Did I mention that my friends are the bomb?! First, we must have an agenda. I, of course, took care of that. Everyone needs to know how this day is going down right? After it was planned we also made basic babe tshirts (we teach elementary school and everyone wanted to be able to wear them to work), booked sitters and hit the store for food and drink. Take a look at all of our fun and know that we 100% recommend all girlfriends do this. It was so fun! Brunch, Lattés and a Pumpkin Patch Shopping & Candle Smelling Dinner & Drinks in a Teepee Crafting - We did a bleach t-shirt craft for Halloween. It was easy, cheap and had the smallest margin of error for completing while drinking. Charcuterie, Sweets and Fall Cocktails Finished up with PJ's and a movie. We chose "The Craft".
Again, I cannot stress how much fun this was. Also, I got a huge number of compliments on my outfit which made me think I should go for the basic girl aesthetic more often. I literally worked so hard putting the outfit together. I bought some very interesting plaid leggings from Walmart and borrowed a hat from my daughter but I guess it worked! We've decided that next year we'll make an extra shirt and award it to the person we see out that we deem an honorary member of our basic crew if their vibe is what we were striving for. Now that I'm typing it it sounds mean-hearted but honestly, I'm too lazy to make this look work for me everyday. I spent forever putting the outfit together and, that hat may have looked good but it drove me crazy all day long. I don't know how other people do it. This year my daughter decided a sleepover with just a few friends was her idea of a good time for her birthday so I got to work planning the best sleepover I could imagine. Note, she is very anti girlie things like pink and sparkles so that ups the difficulty level here. I started with a vision board as always (click the image below to get the plan and shopping list). She originally mentioned sleeping on the trampoline and making it a big tent but I successfully talked her out of that so we decided to set up a huge tent thing over the basement sofa pull-out. No party of mine would be complete without ample craft activities so we really embodied a classic sleepover and did face masks, nail painting and made our own lipgloss. We also decorated picture frames for an instant photo we took for each girl and made our own flip flop slippers that they named "trash flops". For food we started by making our own mini pizzas. Then we had a popcorn bar stocked with all the sweets for movie time. We also had fizzy juice in fancy cups. For party favors, each girl got a custom sleepover tshirt, sleepover bag and a bunch of beauty goodies like a nail kit, mirror, nail polish, the homemade lip balm, sleep mask, the diy flip flops and the picture frames with photos that we decorated. Making lip balm is super easy. All you need is vaseline and kool aid. You mix them together an put them in cute little containers from the travel section at Walmart. For the flip flops I purchased dollar store flip flops and pre-cut fabric from the quilting section at Walmart. Then you just knot the strips onto the flip flop. Done! We got the frames from the dollar store too and used glitter glue and a ton of decorative items to make them our own. We used my daughters polaroid instamax to take photos of the girls for each of them to put in the frames. To set up the tent I just used white curtains I had in storage (we didn't need them in our new house when we moved) and used push pins to pin them to the ceiling over the sofa. I also added some curtain string lights that I purchased on amazon to light it. Between all of the crafts I planned, a basement full of sweets and a trampoline in the backyard, the girls had a fabulous sleepover. Now I just need to plan one of these for myself and my girlfriends! The pictures of the tent really don't do it justice. It was magical!
Summer was busy! With the kids getting older, our social lives in a really good place and living in a new city with many fun things to do we didn't even come close to finishing all of my Mommy Camp plans this summer. Oh! And Arthur broke his arm at the playground during our first day of mommy camp! So he spent all summer with a cast! Other than the amazing mc plans we visited with tons of family, went to Pike's Peak to see the new visitor center, peeped bugs at the May Natural History Museum, examined plants at the Denver Botanic Gardens, ate turkey legs at a rennaisance fair, visited the ferris wheel in the new Scheel's, panned for gold and gems, hiked at Red Rocks again and spent plenty of time at the pool. But, what we did do was pretty amazing and by including a few friends it was made extra special. As a note, my friend Kate (mom of said friends) says her kids won't take off their robes and carry their hand made familiar animals and wands with them everywhere! So, huge hit! Check out some of the fun we had and how the plans came to life! It started off with an owl delivering their initiations to attend the school of Witchcraft & Wizardry for Whippersnappers. You can find the letter template in the Mommy Camp document. They were given tickets for the MC Express and then "boarded/rode the train" down our diy stair slide that led to the basement where "Diagon Alley" was set-up for them to do their shopping. The days leading up to our start of camp I made familiar animals out of socks and fabric, quills out of electrical tape and feathers, wand boxes from a printable I found (we used chopsticks as the base for our wands which we painted and electrified later), small brooms I bought from Amazon and robes from big black t-shirts. I made signs for the "shops" and they got to collect all of their supplies before heading into the "school". For the "school" I purchased castle decorations and hung them in our table area. I also used fishing wire to hang battery operated candles from the ceiling to add to the fun and to embody a Hogwarts vibe. The first thing they did was to get sorted into their house. I created my own houses and then we picked which house fit their personalities best. I made a note sheet with their houses on it for my husband who was upstairs (he works from home). Then, we called him on my phone and put it on speaker phone. We taped my phone into the top of a sorting hat I bought online and then announced each time we placed the hat on one of the kids heads so he knew who he was sorting. They thought it was magical and my husband did a great job with the voice! For the rest of our first day we electrified our wands using led's, electrical tape, a ton of hot glue, paint and a small battery. They turned out so cool! (find the tutorial in MC Harry Potter) We ended our day with some broom flying photos! To get these we had the kids stand with their broom and jump as high as they could with it between their legs and their knees bent. I had to literally pancake myself to the ground to get the shot but they turned out great. After our first day we had a break for travel and other fun but met back up for more activities. We focused on wand magic by making feathers float with our wands using magnets. Then we practiced a balancing spell by making bridges out of straws to balance some gems. We also threw some broom fun in and made brooms out of pipe cleaners and pony beads. Then we did another broom focused activity and played pong quidditch. We ended our day by making pretzel wands. We only managed one other day of Mommy Camp this summer and that was a day focused on potions! It was definitely one of my favorite MC days ever and everyone had a blast. To start, we created portable potion kitchen kits for them to store their concoctions from the day and make more in the future. I spent weeks collecting various bottles and filled them with all of our ingredients and added labels that matched a recipe book for potions that I made (find it at the original post). Then we made each potion together. Some had a color reaction, some fizzed, others changed consistency but they are all awesome. After we finished each potion they put a sample of it inside of a tiny potion bottle I purchased from Hobby Lobby/Dollar Tree. Honestly, the ability to store their tiny potions in the portable kit was the highlight. Mine carried theirs around for weeks after and showed everyone they could. We ended the day by making bath bombs. They were supposed to be golden snitch's but that didn't really work out. They did smell good and still worked as a bath bomb they just didn't look like snitches. While we didn't even get halfway through all of my plans we most definitely had a good time so I'll call it a win. As a bonus, we can pick up where we left off next summer and I can save myself hours upon hours of planning a new MC! If you are interested in doing any of the activities mentioned be sure to visit the original post containing the FREE Harry Potter Themed Mommy Camp that includes detailed directions, supply lists and daily plans!
It's been one year since the world was turned upside down. During that year everyone has suffered in one form or another and most people have experienced serious life-changes. As you read in my previous post, we had a major life change and moved across the country during this pandemic which was definitely an interesting and stressful experience. So, we decided to recognize the anniversary of the start of the pandemic by doing some activities. We did a few crafts, created a family time capsule, played some games and took our frustrations on a DIY covid piñata. It was a nice way to reflect on this insane year and to have a little bit of fun while still respecting the importance of the day and how it has affected people. We stayed in our pajamas all day and ended our activities by going to the movies covid style and bought the new Disney movie "Raya and the Last Dragon" to watch at home with popcorn and candy. I also created a collage of photos from our year in quarantine to memorialize it and plan on hanging it somewhere in the house. Even though it was scary and difficult, we had many wonderful times all together. We made soap jellies kind of like the lush jellies you can buy. They were super easy and the kids thought the result was amazing. We even put little trinkets inside to find. You can find the recipe I used here. We wrote letters to our future selves and colored "stay at home" coloring pages to put in our time capsule. We also included a trinket that reminded us of this time to look back on later. The plan is not to open the box until at least 10 years from now and I shoved it in the far reaches of our basement storage room. So no one is tempted to peek sooner. We talked about germs and did several germ activities including making germ cookies, germ removal playdough, designing our own germ and a "find the germs" water activity using velcro balls, soap and a sponge. We also did the glitter + milk + soap experiment. We played a few minute to win it style games revolving around toilet paper including a toilet paper toss and balancing tp races. Then they attacked the piñata I made. To make it I found a baseball piñata and just hot glued red paper cups around the edges. It looked pretty good! I look forward to a more normal way of life and am hopeful that we will eventually get there. I've been fully vaccinated and most of my relatives are starting to get the vaccine as well. We'll still have to be cautious because the kids aren't old enough but it is reassuring to know that the adults in my life are safer.
PWith covid still a very real thing we did not have a big party for Arthur's 7th birthday. However, just because we can't have people over doesn't mean we can't have a party! With three kids we basically have a party anyway. So, I planned a day full of activities revolving around pirates, his chosen theme. We had a great day doing all the things and, the best part for my son was that he never had to change out of his pajamas. He's a real home body and if allowed, he would choose to almost never leave the house. I made a party planning sheet and Pinterest board to make sure I didn't forget anything, hit Hobby Lobby hard for supplies and headed home to get it all prepped! He woke up to find a pirate themed basement with a cardboard ship, pirate costumes, treasure, a shark infested "ocean", pin the teeth on the shark and a piñata. After a riddle filled treasure hunt we did a lot of crafts including making a shoulder parrot, coloring pirate accessories for our stuffed animals so they could join in on the fun, decorating swords and making maps. Mixed into all of the fun we had jell-o ocean cups with orange ships, his fav breakfast (apple fritters), gold oreos and birthday cake in his chosen flavor, strawberries and cream. I even made the cake twice because the first time the altitude killed it and I had to start over. But, I made chocolate covered cake balls out of the failed attempt that turned out delicious. We all had a great day of togetherness and celebration and I don't think he missed having a huge group of people over in the least.
You can find links to all of my inspiration ideas on my pinterest board here. Thanks for visiting! I don't know about you but, I conduct most of my Christmas shopping online. With three kids it's just too hard to find the time to get it all done any other way. So, while standing in my craft room surrounded by empty boxes I decided to make use of them! I quickly searched Pinterest for some tips and managed to find an easy tutorial for creating a cardboard box house with just scissors and tape. I whipped together three, one for each kid because otherwise a fight was sure to happen, and plopped them in the entry-way of our home with a container of markers. It is now one week later and the cardboard village has had a few modifications but, the kids have been devoting a TON of their time in creating their own little homes. There have been a few times when I've found the little one with scissors trying to conduct a little home improvement like his older siblings which was a bit scary but, I swear, these kids LOVE these things. It was a fab idea and I don't even mind the mess because they are all so quiet while updating and modifying their spaces with pillows, blankets and books. It's been great!
Back to school is a crazy, busy time! I did manage to pull it together (by staying up until 1am) and craft custom t-shirts for my crew's first day back as well as gifts for my teacher peeps! Check it out! I used my silhouette machine to make stencils for the tshirts. I used the same stencil for all of the shirts but took out the middle and added the different grades. I love making stencils because I can reuse them unlike vinyl which is definitely a time saver. Once the stencil is made you just need the tshirt, (I get mine from Wal-Mart and Target), and acrylic paint in your choice of color. I used the same stencil technique for my teacher bags. One stencil made ALL of the bags! I grabbed the totes at Wal-Mart for 3 for $6. Many of my friends were trying to improve their health and weight so I honored their efforts and made low carb chocolate zucchinni muffins. They were AMAZING and no one could believe they were diet friendly! I paired that with a low calorie frap and voila! Adorable gifts to let my friends know I care! I lucked out and got a huge furniture upgrade for my room this year which called for a total re-do on decor. So, I made a bitmoji door greeting, used my silhouette to create a custom door sign and "hola" greeting, added curtains and many more things to make my room it's best version of itself. I love my new class and am definitely ready to kick-off the greatest school year ever!
Sorry for the delay in posts recently! School started back and I've been busy juggling the myriad things at work along with dealing with the kids and general everyday stuff. So, yeah... Right before school started back, I had a blast on a girls weekend getaway and I just had to shower my girls with some fun swag. So, I made girls trip goody bags full of fun stuff. For the shirts, I found some cute tanks at Old Navy on sale for only $3 each. Then, I made a stencil using my silhouette machine and used white paint to paint the shirts. For the bracelets, I used embroidery thread, seed beads and sterling silver findings along with plastic letter beads in gold and silver and created a trio for each girl with their name, a simple friendship bracelet and a f*** it bracelet. I used my silhouette machine again for the cups, which I found for $2 each on clearance at HomeGoods. I was going to paint them with stencils too but that didn't work and I ended up ruining one of the cups with that adventure.
To finish out the bag I hit the Dollar Tree hard and grabbed snacks as well as the adorable flip sequin bags! Total score! Which worked out great for my friends since several hadn't remembered to bring a clutch for our night out. The bags took a bit of time but not too terribly long and at under $6 each were definitely economical. We all had a great time on a short, nearby trip to Memphis and stayed at the Graceland Guesthouse which, by the way, I totally recommend! It was super swanky and exactly what we needed to get away from it all and chill poolside! It was definitely a fun-filled weekend! Lilly's school has an upcycle fair every year. Last year she made a plastic bag jump rope and won 3rd place in her grade. This year she made what she called "ipod Bears" which are basically mini bean bag chairs that look like chairs to hold your ipod or iphone. She won 1st place in her grade! I'm going to show you how we made them so you can make your own. They are super adorable and easy to do using materials you probably have right now! We did get the idea from youtube and used this video to help us make them. diy: ipod bears You will need: - rice- hot glue and glue gun - yarn - stapler - sock - scissors - ruler
It was a pretty easy and fairly quick project. We ended up making three in total and only spent about 1 and a half hours. It's definitely something interesting to do with all of those socks with missing partners!
Maybe now she won't lose her ipod under her bed. Lol. It's been a busy and kinda rough last few months. My Mother-in-Law has been very ill and passed away on Friday. My grandfather also passed away only two days before on Wednesday. My husband and I both agreed to put our Valentine's Day on hold but, I knew that I wanted my kids to keep some semblance of normalcy and have a bit of fun to take their mind off of the very heavy things that have happened. Plus, I hoped to involve my Father-in-Law and Sister-in-Law as well to give them something to keep them occupied with the tragedy so fresh and it being the day of love as well as my FiL's 55th birthday. So, I perused Pinterest for some ideas and decided on a fancy family dinner and for the morning, the kids had a scavenger hunt to find their gifts. Walmart had some pretty legit stuffed animals for only $15 so they received those in their favorite animals, some Valentine's Day themed socks and a package of edible bubbles. (I know, I was unaware this was a thing too. They seem pretty neat.) For his birthday, my husband had a great idea of gifting his Dad with a giant, ultra, mega Nerf gun and got one for each kid too. This turned out to be the best idea. Even though the joy was brief, there was joy, and his Dad even laughed out loud several times in reaction to my squealing kids running in fear of being pelted with a nerf dart. Everyone enjoyed the dinner and our plan is to have a weekly dinner where they come and have a Nerf battle and an opportunity to be happy for a bit instead of grieving. The family dinner was such a success that I think we'll do it every year. I made it fun with a sequin table cloth, other decorations, a custom menu and fizzy juice for the kids. I also acted as a waiter, complete with a proper silly voice, for them and let them order off of their menus which they thought was fantastic. Oh, and I had no idea that I was supposed to send a Valentine's Day box with my son until I picked him up the day before (Usually my husband drops him off and picks him up so the info fell through the cracks.) So, I ended up making a pretty adorable dino box for him. He is obsessed with dinosaurs. When my husband got him to school the next day, he said that most of the kids literally just had a box. Not a decorated one. Just a box. lol. I'm glad I was over-prepared and stressed to make it the night before.
Last weekend I was invited to attend a fundraiser for Arkansas Children's Hospital that was Kentucky Derby themed. Being the crazy person I am and not knowing anything about the Kentucky Derby (or horse races for that matter), I of course hit the internet hard learning about the event. In my research I discovered that the hats are one of the biggest deals at the derby. Each year women show up with crazier and crazier hats with the goal of begin the most outrageous but in a still attractive and super bourgeois kind of style. It's all about the hat. So, I decided to go all in on my hat and set about deciding what kind I would be wearing. I chose to go with a floral theme in hot pink tones and headed for Hobby Lobby. Still not quite sure about how I would be making the hat, I rolled up and down the isles looking for inspiration. I ended up picking the week that the floral stems were not 50% off so that was pretty unfortunate as all the flowers I liked were a bit on the pricey end. My goal was to spend no more than $25 and hopefully less. I ended up on the wedding aisle and discovered a good bit of it was marked 50% off including some pearl sprays, feather sticks, and fun, hot pink baubles. I also found the floral sprays that are only $1 - $3 each meant for bouquets. I selected my flowers from these. They were the perfect length and there were plenty of varying types and sizes to give my hat some real pizzazz. After leaving the bridal aisle with a much more concrete plan in mind I then grabbed a roll of pink glitter tulle. Still not sure about how to form a base for my hat I hit the craft foam and felt aisle in search of something that might work when I found a blank dolls hat made from the very material that derby hats are made from, sinamay! It would make for a perfect base but, it was a boring tan color. So, I headed to the paint aisle and grabbed a bottle of hot pink acrylic paint. Knowing I already had felt and a pink headband at home I headed to the checkout ready to get started! The best part is I only spent $23!! And, that was without the floral items being on sale! When I arrived home, I first painted the hat. It took a matter of minutes and the boring tan became a vibrant pink. After letting it dry, I began to play around with placement of the items on my hat. I also had to snip the flowers off of the stems to be able to do this. I also made some gathered tulle pieces by cutting a strip of tulle and bunching it in the middle and then stapling it in the center. If you look online there's a much nicer (and more time consuming) way of accomplishing this but, it requires sewing and I try to avoid that all costs. This worked just fine. Once I had a good idea of placement, I began to adhere the largest pieces first as a base to work from. I added the details as I went to make it balanced. To add the wired details I simply poked them through the hat and twisted them together underneath to be sure they didn't budge.
After getting it all glued (I used hot glue) and wired on. I stuffed the hat with pink napkins I happened to already have. You could stuff it with whatever you like. Then I cut a circle of hot pink felt and glued it over the hat base. After that, I glued my headband to the felt circle and cut an identical circle, snipping two slits in it for the headband ends to pass through. Then I slid the second circle over the headband and glued it down as well. Overall, I probably spent about an hour on this project but, it was really worth it! At the party, every woman I spoke with said they loved my hat and several said it was their favorite at the event. I had a great time making and wearing it and I encourage you to get crafty and make your own if you ever attend a party where such a hat is encouraged! As a Spanish teacher, I always spend the week of Cinco de Mayo teaching my students about the holiday and allowing them to make piñatas. This year instead of paper maché we made paper bag piñatas. They were incredibly easy and gave us more time to learn about Mexican culture and make more crafts. We discussed the history of the sarapé (you might also know it as a poncho) and the sombrero. Then we made some for ourselves to wear during our fiesta! My students, who are ages 15-18 loved the activities and left with a better understanding of the holiday. I also brought the crafts and knowledge home for my kids who also loved them! If you are one of those people that likes to throw the term "cultural appropriation" around in regards to Americans wearing sombreros on Cinco de Mayo, I have an opinion I'd like to share with you. Sombreros and sarapés are a part of Mexican history. During the Battle of Puebla (The event that Cinco de Mayo celebrates.) Mexicans actually did wear sombreros and sarapés. Of course they are not part of the general attire now but, we, as Americans don't walk around in Pilgrim garb anymore either. However, we are not offended at Thanksgiving when children dress up like pilgrims. I think that if we teach our children how to respect others culture while learning about it that there is no harm in enjoying that culture. The act of making these items, putting time, effort and care into a project based on the culture of someone else can actually help you understand and appreciate that culture more. Just as with everything, be respectful and develop an understanding of the culture. Don't just steal it and mock it with stereotypical behavior. If we are always worrying about offending someone by even bringing up the items labelled as "stereotypical" in someone's culture then we may never be able to become comfortable with them or understand them. Opening up the conversation and allowing children to explore and investigate is the only way for them to learn. Ok, now, if you don't agree then you can stop reading since you probably think I'm a horrible person for making these crafts. Otherwise, keep on to learn how to make the crafts as well as get links to the information I used to teach my students about the holiday and Mexican culture. Paper Bag Piñata You will need: - paper bag - stapler - string/ribbon - hole punch - glue - tissue paper and/or streamers - candy 1. Fill your bag with candy (not too much!) Then fold down the top and staple. 2. Decorate! Use whatever you like! My students got pretty creative and made things varying from a penguin to an emoji! 3. Punch a hole in the top and string it. 4. Bust it! With my students, we hung it in a tree outside of the school. For my kids I just held it out for them. You can also blind fold and spin the hitter for extra fun and cultural appropriateness. If you want to learn about the art of making piñatas in Mexico you can watch this video. Paper Sarapé You will need: - brown craft paper - tissue paper and/or streamers - glue - crayons - scissors 1. Cut a piece of craft paper that is the appropriate width for your torso. 2. Fold in half and cut a half circle. (This will be the neck hole.) 3. Decorate! Some students made a themed sarapé others simply decorated with streamers and tissue paper. Some even added paper flowers. My children used crayons to draw a pattern and color it in. If you want to learn about the history of the sarapé you can read about it here. Paper Plate Sombrero
You will need: - paper plate (I used white to make it easier to decorate but you can use colored ones too.) - paper cup - hot glue - string/ribbon - hole punch - streamers and/or tissue paper, ribbon etc. 1. Hot glue the cup to the plate. The lip of the cup will be glued to the top, center of the plate. 2. Decorate! Some students had streamers dangling down. Others made paper flowers or covered it in streamers and tissue paper. 3. Punch hole in either side and add a string. If you would like to learn about the history of the sombrero click here. Thanks for visiting! My daughter's school hosted an up-cycle fair and we chose to participate. The goal was to encourage young people to think about recycling and ways to re-use items so they can help keep the Earth happy! It was done similarly to a science fair where you created your item and then made a project board to display with it. Judges then awarded prizes for each grade. My daughter decided to make a jump rope out of plastic bags and even though she needed our help, she did most of the project on her own. It was fairly easy to make and we truly had all of the materials already. In fact, I think we have enough plastic bags to make at least 8 more jump ropes if we really wanted! She ended up winning 3rd place for her grade and was given an adorable trophy. It was a lot of fun and we look forward to participating next year! Want to make your own? Check out the directions below!
We had a lot of fun with this project and she is loving her new jump rope! Winning 3rd place was an added bonus! Hopefully your little one will enjoy the project too! Have fun and thanks for visiting!
|
meet rachelRachel is a mother of three, elementary Spanish teacher and part-time blogger who loves crafting, creating fun and engaging activities for her children and students and hanging with her friends and family. She blogs about what she's doing and her interests at any given time which vary. She's a little OCD and always looking for her next project. Her husband calls it, "focusing her crazy", but she just calls it fun. Archives
June 2023
Categories
All
|