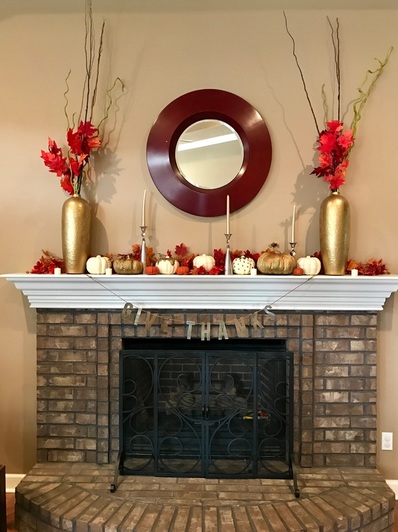
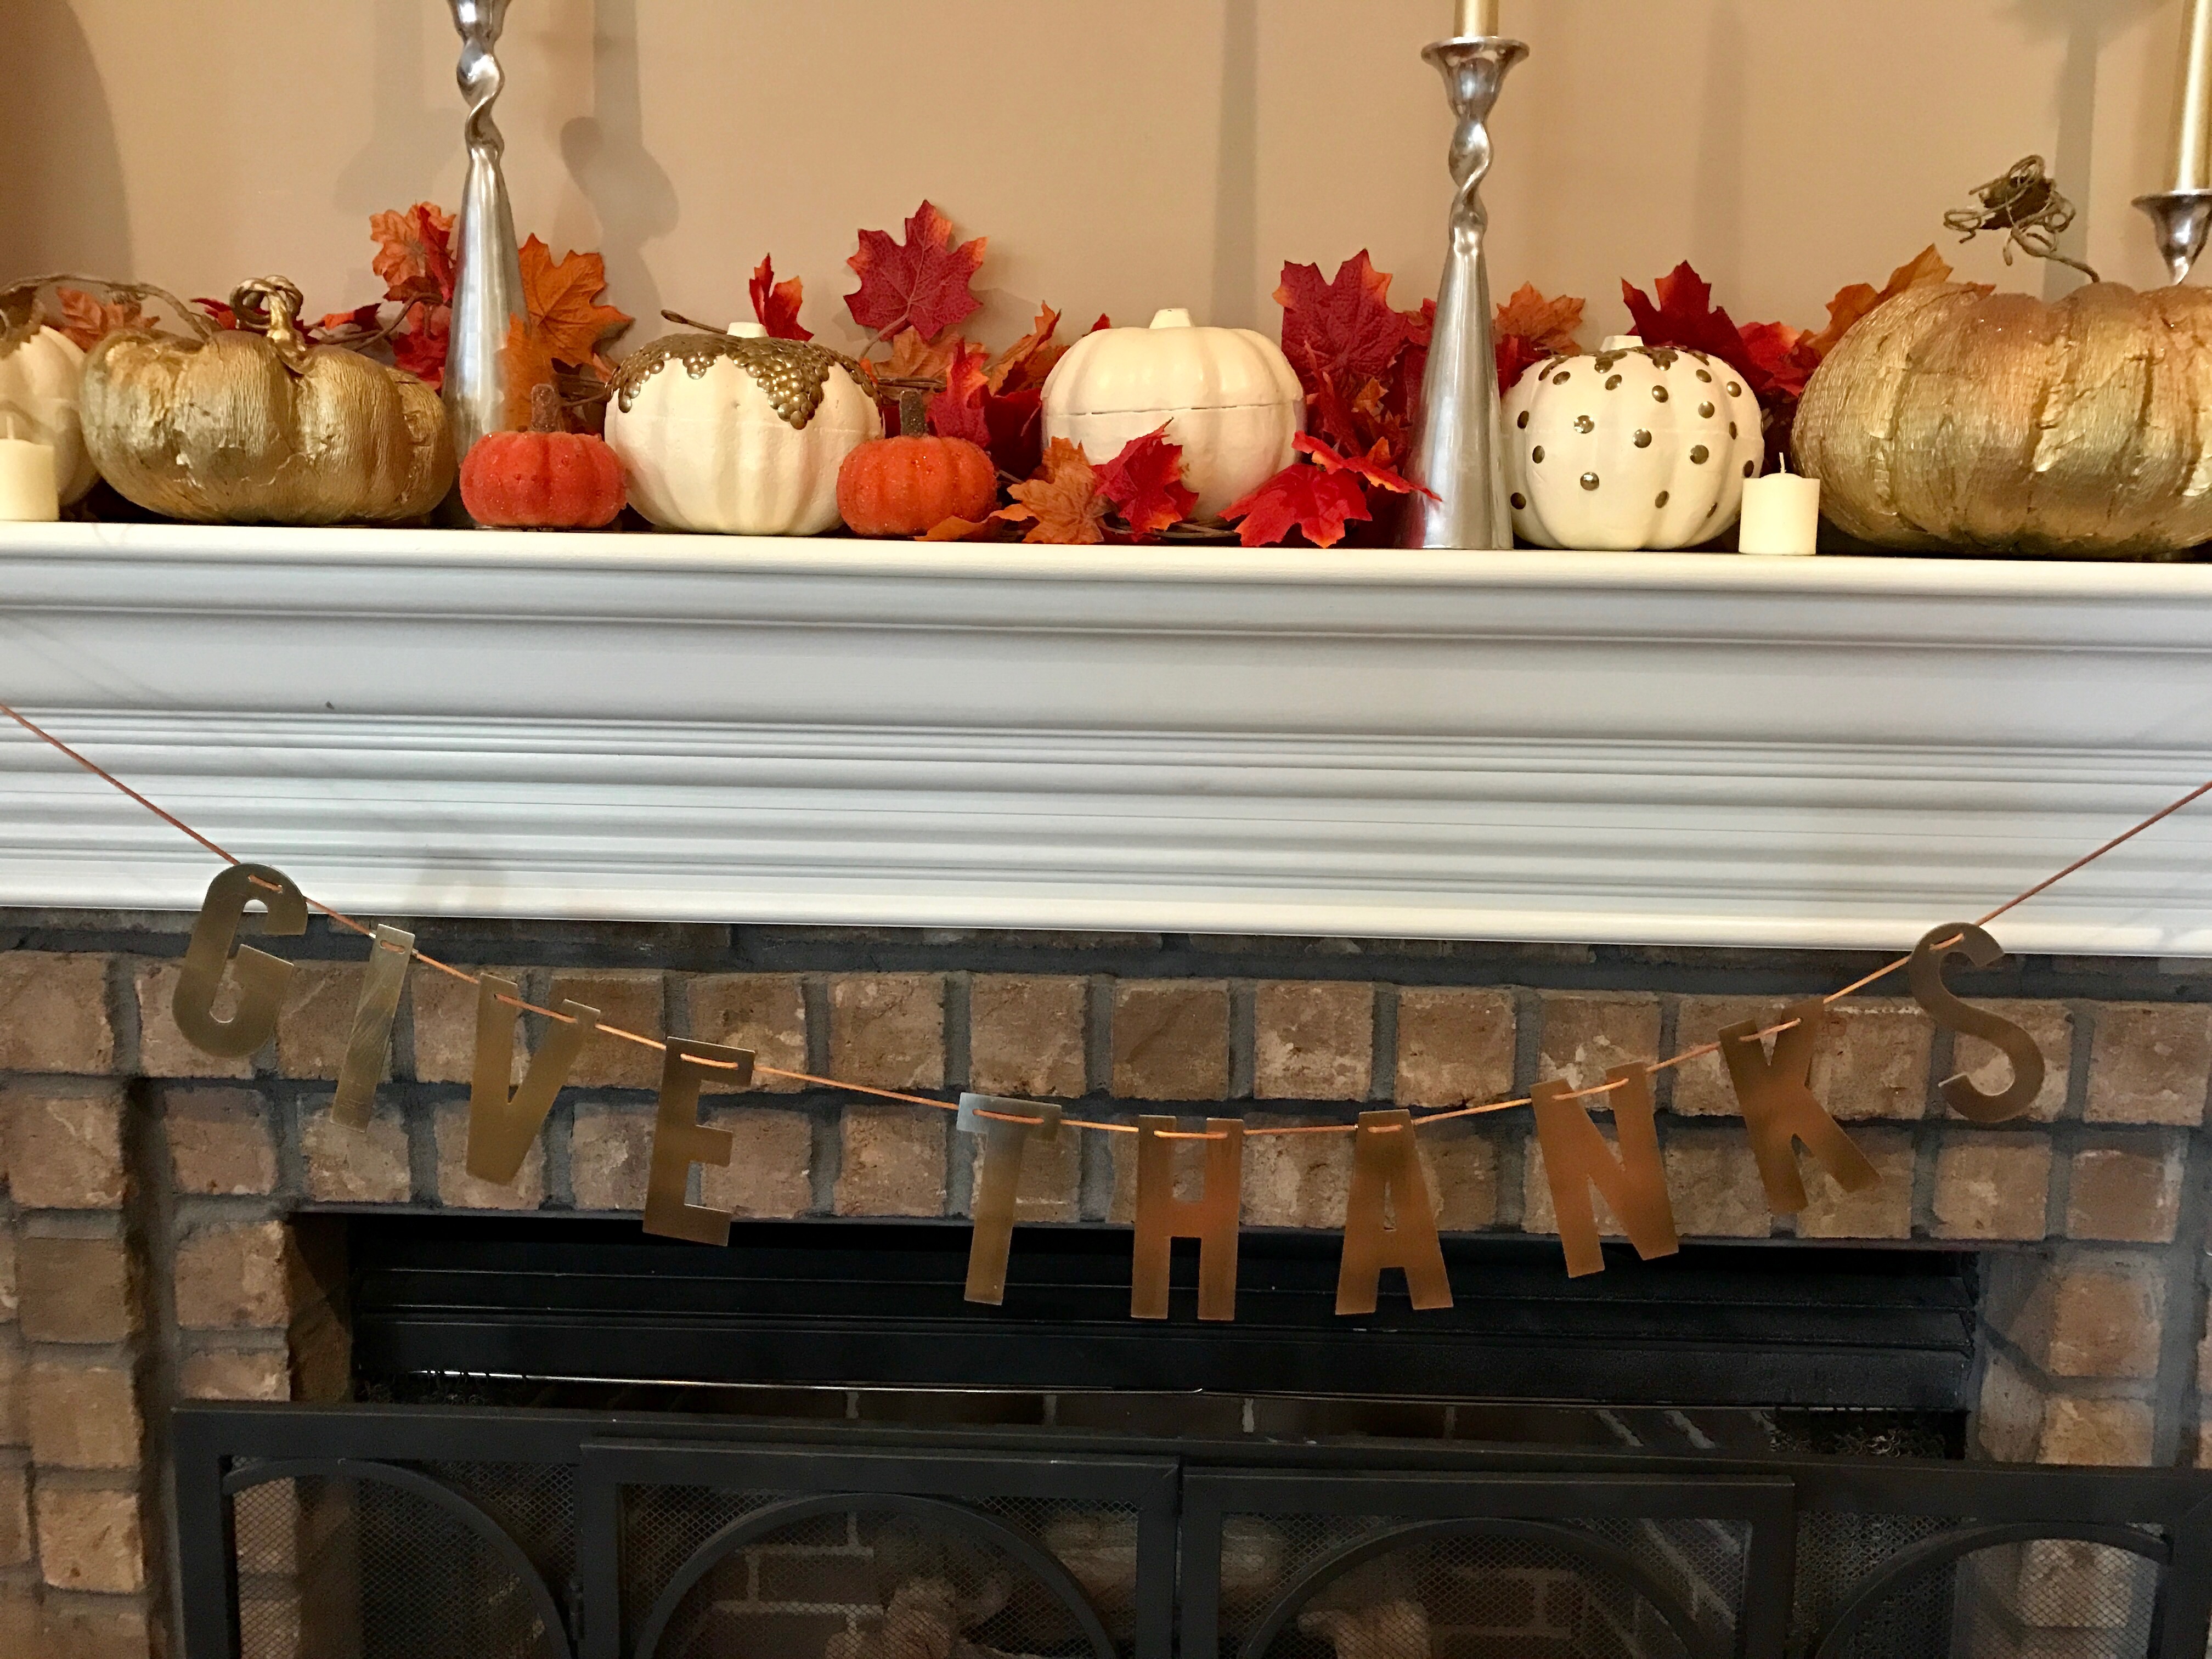
Now that I'm in my new house, decorating for holidays is a whole new adventure! I get to rethink and analyze how I can use my old decor to fit the new space. Over the years I have accrued numerous pumpkins for my fall decorating. Some I purchased on sale at Hobby Lobby and some I made using foam pumpkins from the dollar store, white paint and thumbtacks. (You can see a tutorial I used here.) I also had a garland of fall leaves and some sprigs of fall leaves. So, I began playing around with what I had and ended up creating a pretty nice looking miss mash of my old stuff. The only new thing I purchased was the metal "Give Thanks" banner from Target which I got on sale for only $7! The key is to make sure you have a few different sizes and colors of pumpkins to give the mantle the right look. I'm sure I'll change it up every year but, I'm pretty happy with it this year.
1 Comment
Having just had a baby I decided that I would try my hand at some newborn photography. I headed to Pinterest for some inspiration and formed an idea for my photography attempt. First I hunted down the best natural light in my house which ended up being my daughter's room. Unfortunately, my daughter's room was a disaster! Seeing as how I was only a week out from having major surgery I was not about to clean it. So, I used my foot to shove things around to give myself some space. Then, I gathered a white faux fur blanket, my boppy pillow, an ottoman and some chairs. I had barely enough space to set it up around the mess that was my daughters room but it worked ok. Now it was time to add the baby. While he was normally sleeping at any other point during any other day, he decided to be awake for this momentous occasion so that was less than ideal. He was unhappy with many of the positions I attempted but we finally landed on one he was ok with. I managed to snap a few shots before he peed and attempted a poo. I realized before he managed it though so, crisis averted. After doing my best with the boppy pillow set up I placed the blanket on the floor for an overhead shot. He didn't want to be still and after a few shots he spit-up all over the blanket. That's when I called it quits. Above you can see the blanket on the floor scenario and the best unedited photo that I managed to snap. I didn't think to get a picture of the set up with the ottoman, boppy pillow, blanket and chair set-up and was too exhausted afterwards to re-do it just for a photo but, the example below from It's Always Autumn is basically what I did. And, the two decent photos I captured are beneath the set-up photo. Once I had my three viable photos captured I began to edit them. I generally only use my phone for photo editing and this was no different. I used my favorite photo editing app, Rookie Cam, and ran the photos through a few different filters. After a little editing, I ended up with these! I would love to have captured a few more but, I'm really pleased with what I did capture. Hopefully you'll find my tips and the re-telling of my experience helpful in your own attempt at newborn photography. Just remember that lighting is one of the most important things along with good editing. Finding inspiration for poses is as easy as going on pinterest and that you can create some great photos in the midst of a very messy 6 year olds bedroom. Good luck and let me know if you have any success!
We lucked out and in our new neighborhood there are a bunch of kids our kids ages. We are especially lucky that directly across the street lives one of my daughter's best friends! But, sometimes it can be a struggle when either mine or theirs wants to play when the parents may have other plans. So, my friend/the mom across the street mentioned having door signs so the kids know not to knock/ring the doorbell and cause a meltdown to occur because they can't play. I thought it was a great idea and quickly whipped up these adorable and useful door signs! Their easy to make and will definitely save us some heartache! 1. Download and print the free printable. 2. Glue the two sides together. 3. Cut the sign out. 4. Laminate (if possible) to enhance durability 5. Hole punch on the white dot and tie a ribbon/string through the hole. 6. Hang on your door!
Cute and functional!
So, I've finally nailed down my style aesthetic and that is mid-century modern with a twist. Now that we're in a new house I have about 5 million ideas and things I want to change but that costs money. Plus, I want the house to feel like the decor naturally occurred and not like I bought everything to match at one store. Because of that and the fact that mid-century mod is kind of expensive but can also be found at antique shops, I've been making an occasional stop at a few on my way home from work. My first goal was to find a new table set for our breakfast nook. I scoured the web first to see if I could find anything suitable for an acceptable price but didn't have much luck. Then I found this beauty for only $65 at a local thrift shop! You have to have vision when looking to re-do old pieces and I figured with a new coat of paint and some new fabric this table could be awesome. The top is the part usually in horrible shape and this one had a near perfect top. Lucky! The basket style back of the chairs paired with the skinny, angled legs was classic mid-century and the chairs would be easy to re-upholster by just unscrewing the seat from the chair. My husband was skeptical but my girlfriends encouraged me and even said if I didn't get it that they would. So, I bought it and headed home with my plan. First, have my husband spray paint the metal with a new coat of silver and second, to re-upholster the chairs with a fun but not too quirky fabric. I headed to Home Depot and grabbed about 5 cans of nickel colored spray paint and some supplies to clean the metal of any rust and then visited Hobby Lobby for my fabric. After a brief discussion with a friend to help me decide I settled upon a colorful striped chenille material. But, I started thinking about what we would be using this table for. It is going to be our everyday table and frequented by children. I knew that the fabric would quickly begin to get stained and look atrocious plus be a nightmare to keep clean and at $30 per yard I didn't want to replace it in a year. So, I also purchased some upholstery plastic to cover the chairs with. So, in about 10 years or so we'll be able to enjoy the feel of the fabric. Until then it'll be nice and plasticky. With my supplies purchased I headed home to get to work. Removing the seats was simple and I only needed to tape the edge of the table top for spray painting. So, while my husband painted I began to upholster. It went very quickly. I simply laid the seat on top of the fabric and cut with enough to have some extra for pulling the fabric tight. Then, with a manual staple gun I stapled the fabric and then the plastic to the bottom of each seat. Oh! And I looked up the company that created the table set and they were apparently a pretty big deal and made some very desirable furniture sets for those looking for legit mid-century modern antiques. So, major win! I will definitely be able to make my money back if I ever decide to sell the set. Spray painting went pretty smoothly. After the first attempt to apply the nickel paint with a built in primer wasn't producing the color we wanted we had to apply an actual primer first so, it took quite a bit longer as the primer had to sit for 24 hours to cure too. We used a white kilz primer. But, the end result was great and definitely worth the extra time. After a few days of literally waiting for paint to dry and only a little bit of work we ended up with an adorable table and chairs set for our breakfast nook that fits my mid-mod style perfectly. I placed it next to my DIY Easy-Change gallery wall, purchased a new rug from zulily for only $100 and replaced the froo-froo chandelier with a more fitting sputnik styled one from Amazon. Once we finally get around to re-painting and I pick some new curtains it will be a finished space but, with the new baby about to arrive those things are on-hold for now. But, I love my breakfast nook so far and am super thrilled about the table set transformation! Hopefully you'll be inspired to give those beat-up looking thrift shop finds a second chance too! Thanks for visiting!
Since we have a new house I decided to mix up my Halloween decor this year and I chose a theme. I don't know about you but I have a serious problem with spiders so naturally I think they are super creepy and perfect for Halloween decorations. For my decor this year I found an awesome garland at Hobby Lobby and one at Target as well to hang on my mantel. I also grabbed a spider themed table runner to place on the mantel as the foundation. Then the kids and I added some pipe cleaner spiders to the mantel top as well as a few hanging down from black ribbon. To finish off the mantel I tied black ribbon to my decorative sticks to give the appearance of bats and used sticky tac to adhere some paper bats I made a few years ago to the wall. I also found a great lantern and glass sign for $5 each at Target. It still needed something so I threw in my Dollar Tree black crows as well as three glitter skulls from years past that light up when turned on. I continued the decor throughout the living room by bringing back my lampshade silhouettes that I made many years ago and adding more bats to my gallery wall. I also changed up my gallery wall art with some Halloween themed art as well as family photos from years past. You can see a tutorial on my gallery wall by clicking here! We also did some fun spider themed stuff for the outside of the house but I keep forgetting to snap some photos! I'll definitely add them as soon as I can remember to capture the fun!
I get excited every year when it's time to plan and create our Halloween costumes! This year I'm a little less enthused because I will either be gigantically pregnant and overdue by almost one week or I will have JUST had a baby. So, either way trick-or-treating may not be in the cards for me. But, I can still participate in the costume part...maybe. So, when the time came to make a plan I was at a bit of a loss. How do I prepare for two very different costume sizes without making two costumes? After chatting with my daughter and asking her what she would like to be she said she wanted to be Princess Jasmine. That got me thinking. I could be Raja the tiger! An orange t-shirt, black leggings and some face paint and I can either be super huge Raja or Raja with a baby Raja! Perfect. My husband is going to be Aladdin and my son will be Abu the monkey. It's going to be adorable. But, enough about the thought process. You're here to learn about the Jasmine costume. Usually, I create the entire costume myself but, the Jasmine costumes looked like they would require a bit more sewing than I was interested in and pre-made ones were pretty cheap. So, I purchased this one on Amazon. I opted for a non-navel showing one because, you know, she's six. I also purchased these gold shoes. But, when looking for Jasmine jewelry and accessories I couldn't find any that looked like the actual cartoon. So, I decided I could do it myself. What You'll Need: - clip-on earring backs - 1 sheet blue glitter craft foam - 1 sheet yellow glitter craft foam - 1 yellow glitter craft foam visor - 1 turquoise stretch headband - hot glue gun and glue sticks - scissors I pulled up an image of Princess Jasmine to make sure I knew what I was doing and then free-handed a rounded edge triangle for the earrings. Then I cut it out and used it as a stencil for my other earring and cut it out too. Once I had my earring shapes I simply glued them to the earring backs and I had my earrings! Obviously they're not perfect but who cares! They definitely look like Jasmine's earrings. If I'd wanted to I could have made a stencil and created perfectly shaped earrings. But, I didn't feel like it and she loves them as is.
Now, on to the necklace. For the necklace I used the craft visor and simply cut it down to be the shape of Jasmine's necklace. Again, I eye-balled this and didn't use a stencil or anything. I just looked at the Jasmine image and hoped for the best. Once it was cut she could just slip it on as a necklace instead of a visor. Perfect, cheap and easy! Finally, creating the headband. I cut out a large oval from the yellow glitter foam and then a slightly smaller one from the blue. Then I hot glued them together and glued a safety pin onto the back. Then I pinned the glued ovals onto the headband. Sure, I could have glued it to the headband but, I thought I'd rather have the ability to re-use it. There ya have it! It only took about 20 minutes and I only spent about $6. I also had plenty of craft foam leftover plus an awesomely cute new headband! She's happy, I'm ecstatic and at least one of us is ready for Halloween! Stay-tuned for the tutorials for the rest of the family costume tutorials including Raja the tiger, Abu the monkey and Aladdin! For the first time ever I have a pantry! Now that we've been in our new house for about a month, I finally have time to start doing some more detail oriented organization and decorating. The pantry was in desperate need of organization so I decided to tackle that first. Plus, with the new baby about to be here I want to have spaces where people might try to be helpful by cooking and/or taking care of kid needs be more functional. The pantry was definitely not functional and was more of a "toss it in and quickly shut the door so everything doesn't fall out" kind of situation. See... So, to begin I of course went to Pinterest for some inspiration. There were tons of free printables but not many that had my exact requirements or looked how I wanted them to look. So, I created my own! You can get them for free below! After creating them I laminated them and cut them out. I could have used my silhouette machine and done vinyl but in all honesty, I was feeling lazy and it takes so much longer. For the containers I hit Target and picked some lovely tubs that were very chic but cost $8 each. When I saw some less designer styled tubs for $1.97 in the dish washing supply isle I decided they were the better choice. I mean, the labels will make them look nice, they function exactly the same way and $6 x 7 tubs is a savings of $42. That's money I can definitely put to use somewhere else without effecting the overall outcome of the pantry. It was a no-brainer. So, I grabbed the tubs, a few extra risers and an expandable 3-tier can shelf and headed home. It only took about 30 minutes to re-organize and now I'm happy to say, there's no more "shut the door quickly" game and the kids can easily access snacks when they want. Plus, I'm now aware of the overwhelming amount of pasta and quinoa we have. I know it doesn't look like the dreamy, highly organized and designer container pantry's that I was dreaming about on Pinterest but, I know it is something I can maintain. It's reasonable and down-to-earth like me. Everything has somewhere to go and is easy to access. That's the goal right? Hopefully you find it helpful and the free printable labels can be found below. Enjoy!
We had a fun but busy weekend filled with birthday celebration! We held Lillian's 6th birthday party at our house and I think it was a great success! Check out all of the adorableness and visit the other blog posts to see how some of the items were made and to find some free printables! We planned for an outside party but the weather was very iffy all week long. On Friday evening the forecast predicted an 80% chance of thunderstorms at 10am, the time the party was to begin. So, we cleaned up the garage (Remember, we just moved into our new house a month ago.) which was no small task and set up tables, chairs and activity areas inside it. We set up the food table, gifts and party favor areas inside in the dining room and entryway of the house. But, by 9:00 am the next day it was clear that the weather would cooperate and we enjoyed blue skies and not too hot temperatures! So, we moved the tables and activity areas outside and set up the water sprinkler for extra watery fun. As far as other activities, I left the photo area in the garage and we set up a water table filled with soapy blue and green bubbles and a sign stating "Sea Foam Sensory Play". I also hid a bunch of seashells under the bubbles for kids to find and collect. It was a big hit and rather entertaining to see the kids with their handfuls of shells. We also had a face painting table where kids could get mermaid scales or sharks, an arts and crafts table where they could make a paper bag mermaid or shark puppet as well as color mermaid crowns and I had several games planned. But, we only managed one because the kids were so happy with the other activities and just playing with each other. I created labels (You can download the labels at the end of the post.) for the food but went with easy and quick to prepare items to keep my sanity. I ordered cupcakes from my favorite local bakery in strawberry, s'mores and lemon blackberry flavors with blue icing and fondant mermaid tails, shark fins, clam shells and life preservers. They turned out really cute and were delicious. The riskiest food I went with was a watermelon shark. I hacked away at a watermelon to make a shark and then stuck some googly eyes on it. I had directions but they were way too time intensive and with only 20 minutes before guests were to arrive and still unshowered, I decided to wing it. We also had shells and cheese, skewered grapes or "seaweed", pretzel sticks or "driftwood", baby carrots or "crab legs", a knock-off sonic ocean water, sunbutter and jelly sandwiches shaped like stars for "starfish" and turkey and cheese croissant crabs with googly eyes. It was all completely devoured and looked pretty adorable. For the backdrop I taped a blue tablecloth to the wall and then taped green cellophane cut into wiggly strips on top to create the illusion of seaweed. I topped it off with some clear and pale turquoise balloons and a birthday banner I made with my silhouette machine. I sprinkled the table with some golden confetti strips and seashells. The table was covered with three different colors of blue table cloth to create an ombre that I quickly cut scallops out of the base of each cloth. I did that at a very late hour the night before and wasn't too particular about making it perfect. I didn't even get on my knees but simply bent over and hoped for the best and it turned out fine so don't stress about perfect scallops. It isn't worth the worry. For party favors, kids got a shark fin or mermaid tail handmade by moi and on their way out grabbed a bopper balloon toy. The tails and fins were big hits and I had several moms tell me that their kids refused to take them off long after the party had ended. You can see how I made them in this post. I had a few other small decorations including seaweed and fish taped to the base of the walls inside and I made wreath for the front door using only cardboard, tissue paper and craft paper that turned out really cute and was basically $1! It was made around 11:30 the night before and I completely forgot to take pictures of the process but I can lay it out for you pretty simply. 1. Take some cardboard and cut a donut shape out of it in the size of a wreath. My circle was by no means perfect but it doesn't matter as long as it is close. 2. Make some tissue paper flowers in the colors of your choosing. You can use this tutorial from Pinterest. I went with varying colors of blue. 3. Hot glue the flowers to the cardboard donut shape. 4. I created a few embellishments using glitter card stock and my silhouette machine and simply hot glued them on top of a few of the flowers. 5. Hang and admire! The final touch to the party was the photo area. I always like to have a photo area and I was especially proud of this one because I free-handed the shark and was really impressed with myself. To create the photo area I taped a blue table cloth to the wall and then added a few fish leftover from the seaweed/fish wall decor. Then I grabbed a big piece of cardboard and drew and painted the shark after cutting out his mouth. To create the clam shells I drew two clam shells onto two pieces of poster board and then painted them and added sharpie for the detail. Since I set it up in the garage I realized the floor was somewhat dirty and grabbed a blue rug we had in the playroom and layed it down in front. I also created a few fun signs and hung them above the photo area. (You can download my signs at the bottom of this post.) For my final act of craftiness I made iron-on cut outs with my silhouette machine to create custom t-shirts for me and Lillian. I was going to create ones for all four of us and then I found the "jawsome" shirt for $3 on Amazon for Arthur and the cool button up shark one for Derek so I didn't make theirs. I also managed to reuse Lillians fish scale leggings from last year's Ariel halloween costume. If you're curious about how I made our awesome Ariel and Ursula costumes from last year check them out here and here! I hope my party ideas spark some inspiration for you and that you enjoyed reading about our adventure under the sea. If you want to download the printables I created for the party you can find them below! Thanks for visiting! Download the pdf of the signs shown above by clicking the pdf file below.
Download the pdf below to get the food labels, mermaid crowns and gift tags.
I know kids love to play dress-up so, I always incorporate an element of that when I throw a birthday party. For my daughter's mermaid/shark themed party this year I created mermaid tails and shark fins for each party guest to take home and wear for the party. They were a big hit with everyone, including the adults and only took about 2 hours and $20 to make! DIY Shark Fin You will need: - gray craft foam (I was able to fit three shark fins on one piece for .88 and I made 12 just to be safe.) - hot glue and glue gun - free template (courtesy of itsthelife.typepad.com) - large safety pins
DIY Mermaid Tails You will need: - about 4 yards cheap, stiff material (I cannot remember what this stuff is called but it is only $4 per yard and has a stiffness to it. I believe it is used for putting under things and at hobby lobby they have it displayed being used to make a pretend cape.) - about 3 yards iridescent sheer material (This stuff is a bit more at $6 per yard but it is important.) - 1 30ft. spool of ribbon (I chose a sheer turquoise.)
I've been feeling like I was going to lose my mind with all of our blank walls in the new house. So, after finishing my gallery wall project I used some of the leftover washi tape to create a quick, graphic pattern on my living room wall. We plan on painting the whole space gray at some point soon but, until then this will keep me happy and from feeling depressed. Using a pinterest image as inspiration I just started sticking it up there and ended up with something that I think looks pretty darn cool!
So, grab a roll of washi tape for a buck or two and get creative. It won't damage your walls and you can peel and re-stick until you're happy! It's pretty much the best.
I don't know about you guys but, I get bored with the same decor and often feel the urge to change accessories, pillows, art and even re-arrange furniture much to my husband's chagrin. So, now that we're in a new house everything is fair game and I have the opportunity to think about my propensity to change decor often. With that in mind, I decided that I wanted an easier way to rotate out my art without having to take down, open and re-hang frames. I began researching and found plenty of great ideas for hanging art without frames. After getting some ideas, I headed to Target, Hobby Lobby and Home Depot with a shopping list in hand. The goal was to create my own magnetic wooden hangers, utilize washi tape for creating faux frames and round it out with some clipboards, binder clips and nails. I managed to find a cute turquoise clipboard for $8, a container of varying sizes of blue and gold binder clips for $5 and a two-pack of gold patterned washi tape for $3 all at Target! At Hobby Lobby I found another clipboard, this one was black and clear stripes with gold hardware for $4 and grabbed the magnets I would need for my frame project for $3. At Home Depot, I found something called hobby boards in the wood section for a little under $2 made out of oak. But, they were too long for my purposes and asked a very HD employee to cut them for me. I also grabbed a roll of twine for hanging. I was so ecstatic to find everything on my list without having to compromise! That almost never happens. My other chore was to decide what exactly I wanted to put on the wall! I scoured my own images as well as free printables from the internet. I chose a few that were food/eating related because it was going on my breakfast nook wall but, I also kept color and pattern in mind and chose a few colorful and graphic art prints. There are literally hundreds of free printables for gallery walls and you can peruse them all at your leisure. Just give Pinterest a search. Once I made my selections, I ordered prints from Walgreens and picked them up. I could have printed them at home but wanted a little higher quality look. I only spent about $20 bucks and now I have prints that are a bit more sturdy. When I change them out I'll just keep a folder of the ones I'm tired of and can always reintroduce them if I want. Once I had everything I needed I headed home and started by laying out all of my prints to form a plan before I made any holes in the wall. I also grabbed a few other pieces of art that I already had including a painting by my lovely sister-in-law, a print we purchased from a street artist in Spain and a painting of "Starry Night" done by my daughter. Once I laid it all out I got to work. First, I hung the only framed piece that acted as the anchor for the whole wall and made sure it was centered. After that I simply worked my way out and eyeballed it. Measuring tapes have their place and time but for me, this was not it. If you're uncomfortable with that idea you're welcome to use a measuring tape. I guess I was a bit lazy about it honestly. I would just make sure I thought it looked "about right" and use crude measurement with my hand and fingers. I did use a pencil to mark where I wanted a nail before going at it though. :) I also varied the use of my binder clips in regards to color and size but tried to keep it symmetrical from one side to the other. To enhance certain image groups and add more character I "framed" pictures or groups with washi tape. This was actually the most time consuming part. After about an hour I had this! I love it and am so glad I took the chance and made it happen! I hope I've inspired you to get creative and create your own!
With the help of my father-in-law and husband (not really, they did almost all of the work), we have completed my daughters new bed. Her room is still far from completion but she is no longer sleeping on a mattress on the floor so, I can feel like a decent mom for the time being. The project took a bit longer than I anticipated but, was still completed in a weekend. I think it looks fantastic and really makes her room look special.
As stated in my post "New House, New Decor", We plan on painting her room a light purple (almost white) and I intend to make her a unicorn head for the wall along with a bunch of paper flowers. But, those things are going to have to wait for now. I've got about a month and a half before the new baby arrives and still have to work on her 6th birthday, celebrate my own birthday (it's the day after hers) and wrangle together our Halloween costumes. (We're going as Aladdin characters btw! More info on that in a later post.) So, I'm a bit busy. But, Her room looks plenty cute enough for now and she absolutely loves it!
We've been a bit crazy with moving into a new house while I'm 7months pregnant and my husband has a recently dislocated shoulder. So, when I realized that my daughter's 6th birthday was less than a month away I quickly kicked into planning mode and created some invites. She has been begging for a mermaid themed party for months so that was one decision that I didn't have to make but, I decided to make the theme more inclusive for all genders by making it a mermaid or shark theme. For the invite I created the front using powerpoint and then we had a mini photo session over the weekend and photoshopped a picture of Lilly as a mermaid for the backside of the invite with a few more party details. After creating the invite I got to making my plan. I find that making a planning or inspiration board helps me to better organize my list of to-do's as well as visualize the party as a whole. When I don't make a planning board I often forget something really cool or realize that I didn't do something important at the very last minute and then find myself scrambling to get it done. You can take a look at my board below. Now that the planning is done I have to get busy crafting and creating! I'll try to post updates throughout the crafting process but will definitely make a birthday completion post so check back soon!
Due to all sorts of things including back to school, moving to a new home, my husband dislocating his shoulder and more, this is the final week of Mommy Camp for this summer! I prepared activities and planned on "visiting" China, India, South Africa and Australia but, things don't always go as planned. So, I will try to get to those countries at different points throughout the year when we find time. So, without further ado I present Russia! I didn't really set up a dramatic play area for Russia this week because I couldn't think of anything but, I created a mural for decoration and grabbed both of their winter coats, an old Russian style fur hat, a set of Russian nesting dolls, fake currency and the books for the week. I also cut out some (pretty pitiful looking) snowflakes and stuck them on the wall. The mural turned out to be pretty neat looking and the kids had fun helping me color it. Before we "flew" to Russia, we looked at our map and discussed where it was and their weather. Then we did our normal security check and airplane trip dramatic play. Once we "arrived" we started off by learning about Fabergé eggs and reading a book called "Rechenka's Eggs". Then we made our own versions using egg shaped paper, glue and plastic gems. Both kids really enjoyed this craft and spent a good thirty minutes or more busily glueing their gems. Afterwards we learned about the Russian dance Kalinka and watched a video. For lunch, I cooked pierogi which are one of my all-time favorite foods. But, I cheated and used frozen ones that I sautéed with some butter and herbs. I served it with a mixed greens salad and some pear. Lillian loved them and was a big fan. Arthur refused to even give it a try but, at least one of them liked it! For dessert I made Russian orange cream and it was sooooo good and super simple. You can get the recipe here in my original summer mommy camp post. Our next activity was learning about the Russian artist Kandinsky and creating our own versions of his art. However, neither kid was super into it and the projects never reached completion. You win some, you lose some. I think with all of our crazy things going on they were preoccupied. We read "The Noisy Paintbox" to go along with the Kandinsky lesson because he suffered from synesthesia. It's a great book and the kids really enjoyed it. After the failed Kandinsky projects we learned about dymkovo toys and tried to create our own. I found a tutorial in Russian and we tried our best but they didn't really whistle like they were supposed to. However, they kids had fun making them using air dry clay and paint. For dinner one of the nights I made borscht and piroshki. Borscht is a beet and vegetable soup and piroshki are basically meat buns. They were both really good and I even made the dough for the meat buns from scratch! The kids wanted absolutely nothing to do with it but Derek and I really enjoyed it. We ended the week with chocolate filled Russian pancakes. They weren't my favorite recipe for pancakes because they used ricotta cheese and were a bit wet and dense. The kids didn't like them either. After a somewhat disappointing breakfast we talked about Russian nesting dolls and made our own paper version as well as reading the book, We also talked about the famous Russian ballet, watched a video for a mini dance lesson and read the book "When Stravinsky met Nijinsky" We had a great final week of Mommy Camp! Check back soon to see the weeks we didn't have time for as well as all sorts of other crazy things that I decide to get into like planning my daughter's 6th birthday. She wants a mermaid theme! Oh and here are my silly photoshopped pics of us in Russia!
We had a blast on our "trip" to Italy! We had fun with a dramatic play pizza shop, learned about opera, drew like Michelangelo and made some yummy Italian food! Just like the previous weeks, we had to get to Italy first! This week we discussed train travel and I used a train tent that we already had as our transportation. They were both issued train tickets (you can find your own printable train tickets here), grabbed their suitcases and boarded the train! We also looked at the map and discussed how far away Barcelona, Spain and Venice, Italy are and why we decided to take the train instead of fly. Once we "arrived" in Italy we started with a dramatic play pizza kitchen. I created a pizza oven and pizza using a cardboard box, brown craft paper, paint, a sponge, felt and an electric tea light. To make the oven I folded one side of the box in on itself and cut out the bottom. Then I wrapped it in brown paper and used a sponge and red paint to make faux bricks. For the fire element, I used a piece of the box that I cut out and drew a flame shape and painted it. Then I hot-glued it to a longer strip of cardboard and glued it to the inside on the bottom of the box. Then I placed an electric tea light behind the flame. I think the effect was really great and it only took about 15 minutes to make! For the pizza I took various pieces and colors of felt and cut out shapes to look like different toppings, crust and sauce. I used tan cut into a circle to create the crust and red cut into a circle for the sauce. The toppings I made matched the order form that I found here for free! For the pineapple I cut yellow felt into semi triangles and added a few lines to make it look segmented. For the purple onion I cut crescent shapes out of purple felt. For pepperoni I cut smaller circles out of red and did the same for ham but used pink. I used black circles without centers for black olives, pink with red lines cut into rectangles for bacon and green squiggle circle shapes without centers for green bell pepper. For the cheese I used cream colored yarn cut into 3 inch pieces. I also made spaghetti and sauce using cream yarn for noodles and red for sauce. I grabbed a few containers and quickly drew labels for the lids to store each topping. Then collected a few plates, bowls, utensils, aprons and a chef's hat from the play kitchen, made a quick sign stating "Arthur and Lillian's Pizza Joint" out of craft paper and, Voila! Dramatic play pizza kitchen! This was a major hit! They played for hours off and on throughout the week and the best part is that now it is a permanent addition to their current play kitchen so, they'll get to continue enjoying it! For breakfast one day I made zepoli which are kind of like donuts but actually a little more nutritious as they contain ricotta cheese. It may not seem like a big deal to you but, I actually fried something! I usually avoid it like the plague. However, I decided these sounded so yummy that I would go for it. I thought they were fantastic and actually easy but the kids weren't as enthusiastic. I think they're crazy. Lillian ate one and Arthur just licked the powdered sugar off before declaring they were "ucky". Ugh! Seriously?! Kids! Whatever, more for me! (I actually had a playdate with a friend and let her try them. She thought they were awesome too. So, I'm not crazy, just my kids.) You can find the recipe in the MC recipe book here. To finish out the day we discussed the city of Venice by watching a this video, making a gondola craft using this free printable and reading the book "Olivia Goes to Venice" and "This is Venice". Both were big hits and were read multiple times throughout the week. After learning about Venice, we discussed the city of Pisa and the Leaning Tower of Pisa. We watched this video and then we made a craft version for ourselves using an empty toilet paper roll, white paint, paper, black marker and green crayon. Surprisingly, they really enjoyed this simple craft and were very proud of their creations. To make them lean, I cut an small portion from the bottom of the roll at an angle and taped it to the paper. For lunch we made our own pizza. It was pretty simple using pre-made pillsbury pizza crust, a jar of pizza sauce, fresh and shredded mozzarella, pepperoni and I added basil from our garden and black olives to my portion. Yum! Our next focus was on opera since it's a pretty big deal in Italy. We watched quite a few videos on youtube to get a good idea of what it is including the following: "What is Opera", "Sesame Street: People in Your Neighborhood Opera Singer", "Sesame Street: Marilyn Sings C is for Cookie"and "Zoom: A Soup Opera" Once we had a good idea of what opera was, we watched "Mozart's Magic Flute: An animated plot summary" to learn about a popular opera story line and then watched these segments from a performance of that opera: "Metropolitan Opera: The Magic Flute" and "Erika Miklosa: Queen of the Night". I actually thought I had really worn out the opera thing and that they were both totally over it but, Lilly said she would like to watch a whole opera in real life and at various points throughout the day I caught her singing about her actions in an operatic style. Including a point when she sang, "Arthur has a poopy!" in a very dramatic, Queen of the Night manner. It was pretty hilarious and let me know that she got something out of the whole lesson. After learning about opera we discussed Michelangelo and watched this video about him. Then we practiced creating art like he did when he painted the Sistine Chapel after looking at pictures of the ceiling located there. I taped paper to the underside of our piano bench and gave them a bucket of crayons. At first they weren't really into it but in the end they each created multiple masterpieces and spent about 30 minutes or more drawing. I call that a win! We finished the week by creating laurel crowns using paper plates, glue and green construction paper. I prepped the plates by cutting the center out and cut out leaf shapes from the green paper. We discussed how in ancient Italy, they were often given to scholars upon completion of schooling and, since we finished learning about Italy they got to wear them! I was super impressed with Arthur and his focus on this craft. He spent at least 30 minutes and actually completed the crown. He did insist on looking fabulous with Lillian's sun hat while working which made it even more adorable. It even looked pretty ok for a two year old! I was, however, unable to capture a good photo as the apple sauce was more important at the time. Lilly was into though. We wrapped up the week by making ravioli from scratch. I purchased this handy ravioli press, we made the dough and mixed up the filling and boom! Ravioli! We made a bacon, basil, cream sauce to go with them and boy was it delicious! You can get the recipe from the MC Recipe book here. I also made the Roman Apple Cake recipe found in the book. It was ok, but not my favorite. It may fave been because I ran out of flour and had to use coconut flour instead. Finally, here are my horrible photo shopped pics from our "trip" to Italy. So silly! It was a fun week and I'm ready for our next country, France! See you soon!
|
meet rachelRachel is a mother of three, elementary Spanish teacher and part-time blogger who loves crafting, creating fun and engaging activities for her children and students and hanging with her friends and family. She blogs about what she's doing and her interests at any given time which vary. She's a little OCD and always looking for her next project. Her husband calls it, "focusing her crazy", but she just calls it fun. Archives
December 2022
Categories
All
|