Paint Covered Kids
  • Blog
  • About
  • Contact
  • The Gallery
  • DIY
  • Mommy Camp
  • Freebies
  • Subscribe!
  • Blog
  • About
  • Contact
  • The Gallery
  • DIY
  • Mommy Camp
  • Freebies
  • Subscribe!
Paint Covered Kids

​

DIY easy Frames for Canvas

9/5/2018

0 Comments

 
I enjoy painting and have several paintings throughout my home that are my original work. However, an unframed canvas lacks that expensive, sophisticated look so, I decided to remedy that by creating my own frame of sorts. This is a quick, easy and cheap fix that makes the painted canvas look super expensive.

Materials:
- thin wood boards (used to be called hobby boards at Home Depot)
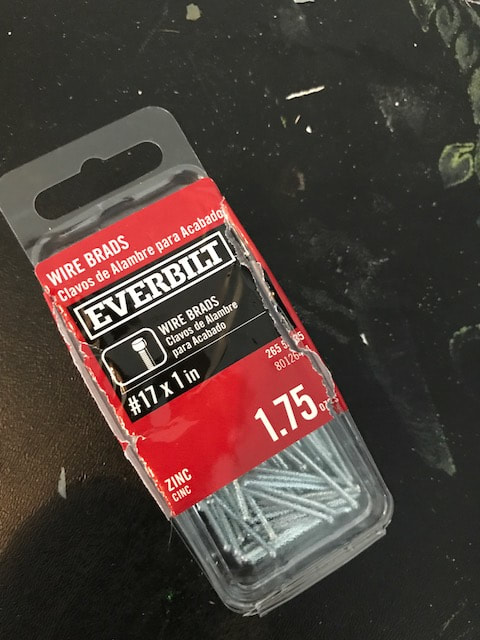
- thin nails
- hammer
- sand paper

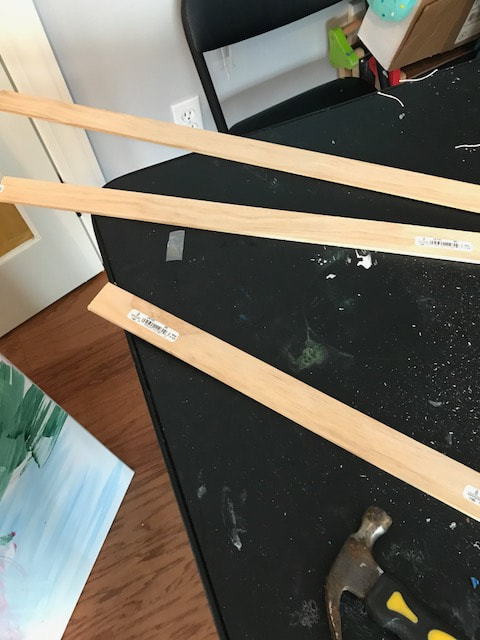
Head over to Home Depot (or another store that carries wood and has helpful employees) with your canvas dimensions. I was creating frames for a 30x40 canvas and wanted to make sure the edges of the wood pieces overlapped each other on the edge so, I ended up getting the 40 inch long boards cut to 41 to accommodate for the overlap. I found a helpful employee and he cut them for me for free!

Once I had 4 of each length (I was framing two canvases.) I headed home with my wood and grabbed a box of small nails on my way out of the store.
Picture
Picture
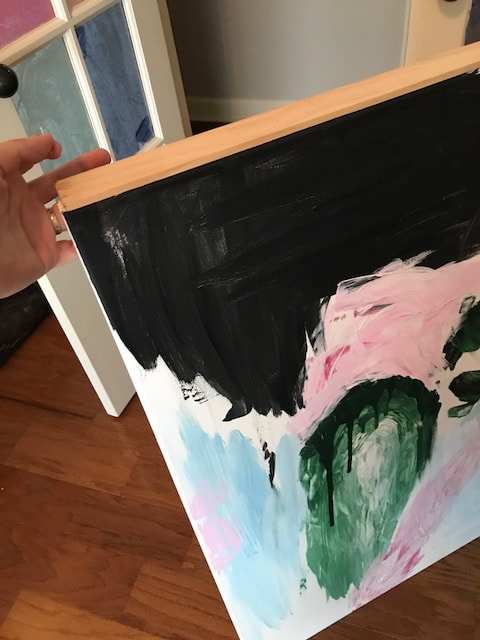
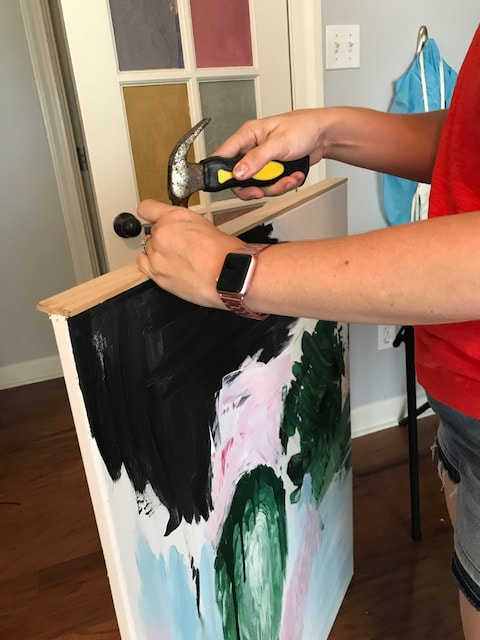
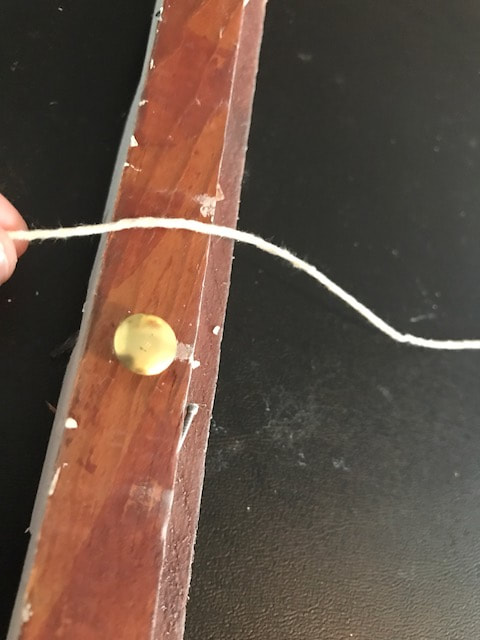
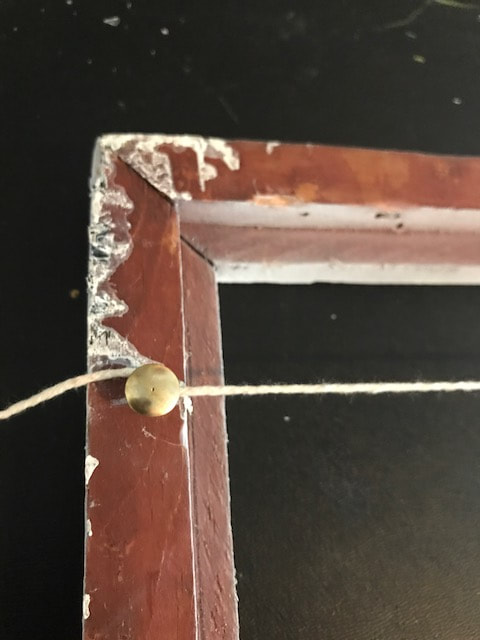
Once home, all I did was sand the edge of the boards where the Home Depot guy cut them, line up the boards to be flush with the front of the canvas and hammered in a few nails down the side. I put about 4 on each side to make sure they were secured properly without any gaps. It took very little time and only cost about $20 to frame both canvases!
Picture
Picture
Picture
0 Comments

New & improved easy-change gallery wall

9/5/2018

0 Comments

 
Picture
A few years ago I made a post about an easy-change gallery wall. Well, I've just updated it to be a more substantial, grown-up project. We finally managed to get the living space walls painted and I was ready to commit to a bigger project. 

For this one, I headed to my local thrift shop and selected a bunch of picture frames of various sizes. I even laid it out on the floor of the shop to make sure it would all work together. I managed to get all of the frames for only $30!
Picture
Once I had my frames, I headed home and took out all of the art and taped the mirrors. Then I spray painted them all white. It took several coats and about 4 cans to make them all even. I just used a white primer spray paint.
Picture
Picture
Once they were dry, I used tacks and twine to create strings for hanging photos. Two of the frames were plastic and I had to hot glue the twine. Then, I used large paper clips for hanging the photos onto each string.
Picture
Picture
I am in love with how this project turned out and hope you like it too!
Picture
0 Comments

Girls Weekend Goody bags

9/5/2018

0 Comments

 
Picture
Sorry for the delay in posts recently! School started back and I've been busy juggling the myriad things at work along with dealing with the kids and general everyday stuff. So, yeah...

Right before school started back, I had a blast on a girls weekend getaway and I just had to shower my girls with some fun swag. So, I made girls trip goody bags full of fun stuff. 
In the bag:
- custom diy t-shirt
- snacks
- lip balm
- custom bracelets
- custom cups
- sequin clutches
Picture
Picture
Picture
For the shirts, I found some cute tanks at Old Navy on sale for only $3 each. Then, I made a stencil using my silhouette machine and used white paint to paint the shirts.

​For the bracelets, I used embroidery thread, seed beads and sterling silver findings along with plastic letter beads in gold and silver and created a trio for each girl with their name, a simple friendship bracelet and a f*** it bracelet.
Picture
Picture
I used my silhouette machine again for the cups, which I found for $2 each on clearance at HomeGoods. I was going to paint them with stencils too but that didn't work and I ended up ruining one of the cups with that adventure.

To finish out the bag I hit the Dollar Tree hard and grabbed snacks as well as the adorable flip sequin bags! Total score! Which worked out great for my friends since several hadn't remembered to bring a clutch for our night out. 

The bags took a bit of time but not too terribly long and at under $6 each were definitely economical. We all had a great time on a short, nearby trip to Memphis and stayed at the Graceland Guesthouse which, by the way, I totally recommend! It was super swanky and exactly what we needed to get away from it all and chill poolside! It was definitely a fun-filled weekend!
Picture
Picture
Picture
0 Comments

DIY MINI BEAN BAG STAND FOR YOUR IPOD/iphone

4/17/2018

0 Comments

 
Lilly's school has an upcycle fair every year. Last year she made a plastic bag jump rope and won 3rd place in her grade. This year she made what she called "ipod Bears" which are basically mini bean bag chairs that look like chairs to hold your ipod or iphone. She won 1st place in her grade!
Picture
I'm going to show you how we made them so you can make your own. They are super adorable and easy to do using materials you probably have right now! We did get the idea from youtube and used this video to help us make them.

diy: ipod bears

You will need:
- rice- hot glue and glue gun
- yarn
- stapler
- sock
- scissors
- ruler
Picture
Step One:
Pull your sock inside out and lay your sock flat and pull the heel up and flatten it out.

Step Two:
Measure 5 inches from the flattened heel to the toe and cut the toe off.
Picture
Step Five:
Seal the end of the sock on the toe end with hot glue and then staple to ensure rice does not escape.
Picture
Step Seven:
Fold the lip of the sock in a bit and hot glue together. Be sure to be neat because you will be able to see this seam. Go back over and staple under the glue line like before to ensure the rice doesn't fall out.
Picture
Picture
Picture
Picture
Step Three:
Repeat the measure and cut on the other end of the sock.
Picture
Step Six:
Flip your sock right side out and fill with rice leaving about 1/2 inch or so at the top empty.
Picture
Step Eight:
Adjust to where the heel becomes the seat for your device. Then, make two pom pom balls and hot glue them to each corner of the bean bag sock.
Picture
Picture
Lilly was pretty tired of wrapping the yarn around her fingers. She had to go to 65 for each pom pom.
It was a pretty easy and fairly quick project. We ended up making three in total and only spent about 1 and a half hours. It's definitely something interesting to do with all of those socks with missing partners!
Maybe now she won't lose her ipod under her bed. Lol.
Picture
0 Comments

A fancy Family dinner for valentine’s Day

2/15/2018

0 Comments

 
It's been a busy and kinda rough last few months. My Mother-in-Law has been very ill and passed away on Friday. My grandfather also passed away only two days before on Wednesday. My husband and I both agreed to put our Valentine's Day on hold but, I knew that I wanted my kids to keep some semblance of normalcy and have a bit of fun to take their mind off of the very heavy things that have happened. Plus, I hoped to involve my Father-in-Law and Sister-in-Law as well to give them something to keep them occupied with the tragedy so fresh and it being the day of love as well as my FiL's 55th birthday.

So, I perused Pinterest for some ideas and decided on a fancy family dinner and for the morning, the kids had a scavenger hunt to find their gifts. Walmart had some pretty legit stuffed animals for only $15 so they received those in their favorite animals, some Valentine's Day themed socks and a package of edible bubbles. (I know, I was unaware this was a thing too. They seem pretty neat.)

For his birthday, my husband had a great idea of gifting his Dad with a giant, ultra, mega Nerf gun and got one for each kid too. This turned out to be the best idea. Even though the joy was brief, there was joy, and his Dad even laughed out loud several times in reaction to my squealing kids running in fear of being pelted with a nerf dart. Everyone enjoyed the dinner and our plan is to have a weekly dinner where they come and have a Nerf battle and an opportunity to be happy for a bit instead of grieving.

The family dinner was  such a success that I think we'll do it every year. I made it fun with a sequin table cloth, other decorations, a custom menu and fizzy juice for the kids. I also acted as a waiter, complete with a proper silly voice, for them and let them order off of their menus which they thought was fantastic.
Picture
Picture
Picture
Picture
Picture
Picture
Oh, and I had no idea that I was supposed to send a Valentine's Day box with my son until I picked him up the day before (Usually my husband drops him off and picks him up so the info fell through the cracks.) So, I ended up making a pretty adorable dino box for him. He is obsessed with dinosaurs. When my husband got him to school the next day, he said that most of the kids literally just had a box. Not a decorated one. Just a box. lol. I'm glad I was over-prepared and stressed to make it the night before.
Picture
Picture
0 Comments

Easy Valentine’s Day photo session

2/14/2018

0 Comments

 
With three kids taking adorable photos can get a bit hard. But, I managed to scrape together a few great ones using my awesome trick of pretty wrapping paper for a background. I dressed the kids in some adorable clothes, bribed them with the promise of candy at the end of the ordeal and quickly captured their adorable little faces with my phone camera before anyone had a meltdown.
I even managed without anyone making silly faces or sounds behind me this time! After selecting my favorites and running them through my favorite photo filter app, Rookie Camera, I ended up with photos that I really like and only cost me some time, a little sanity and $4 for the wrapping paper. Enjoy!
Picture
Picture
Picture
Picture
Picture
Picture
Picture
Made this collage with another iphone app and posted it on social media as our Vday card to friends. :)
Since I was not looking photo ready during our session, I left the wrapping paper up and captured a few more photos the next day too.
Picture
Picture
0 Comments

A Fantastic First Fiesta

12/15/2017

0 Comments

 
Alan had a fantastic fiesta themed first birthday party...two months ago! I'm sorry for the extremely late posting! I have been so busy recently with work and kids and holidays that I haven't had any spare time for hobbies. But, I'm finally getting a minute now that the semester tests are nearing their end and I have mostly prepared my lessons for the next semester. Take a look at all of the fun that was had a few months ago celebrating Alan.
Picture
The party food was a taco bar with all of the fixin's. I made cupcakes (from a box mix) but made them extra cute with swirly icing, sprinkles and Alan heads. We also had corn on the cob and chips with salsa and queso. I also printed out labels in Spanish and English for all of the food. To make the cupcake toppers I took one of the photos from our fiesta themed photo shoot and sent it to Walgreens as wallet sized prints. Then I cut his head out and hot glued it to a toothpick.
Picture
Picture
Picture
Picture
Picture
For fun activities, we had a create a maraca and/or sombrero station and a pin the mustache on Alan. I just printed a photo of Alan into a poster sized print at Walgreens and cut out some mustaches from black construction paper. I also had a fun photo booth for selfies and such.
Picture
Picture
Picture
Picture
Picture
Picture
Picture
Picture
For the rest of the decorations I kept it pretty simple and posted Spanish labels on various items in the house and hung a large sombrero and printed sign on the door.
Picture
Picture
Also, Alan's shirt was made using my silhouette cameo machine. I created the design and cut it into stencil material. Then I used red acrylic paint to paint the design onto the shirt. It is way easier and cheaper than vinyl plus, I think it lasts longer and looks way more legit. For his party hat I used a store bought hat from Target and added the glittery one with craft foam. Easy and cheap!
Guests left with their crafts, some sticky mustaches and mini wooden maracas. It was a fun, colorful and festive party that was a blast to plan.
Picture
Picture
Picture
0 Comments

A flamazing & dinorrific birthday

9/18/2017

0 Comments

 
We celebrated my daughter's 7th birthday this past weekend and it went off without a hitch! I even managed to make a cake that was not an epic fail like previous years! Check out all of the details, activities and fun below!
Picture
The theme was Flamingos and Dinos with a focus on the flamingo. The cake was one hundred percent boxed mixes in both devil's food and confetti and canned icing but, I made it look extra by making it a tier with ombre icing. I made the two paper figures on top by printing out a dino and flamingo image from the internet and backing it with colored paper and then taping it to a skewer. The rest of the food was simple but yummy with dino scales (chips), flamazing ham and cheese sandwiches, flamingled fruit salad, dinorriffic noodles and dinotastic punch.
Picture
Picture
I amped up the easy change art wall with a flamingo themed chalkboard and birthday banner.
Picture
Picture
Picture
Picture
Picture
For activities, we played flamingo ring toss, had a dino and flamingo egg hunt, did a guided flamingo painting, pinned the tail feather on the flamingo and had a competition to see who could stand on one leg the longest. We also had a tropical themed photo wall area.
Picture
I guided them through painting a flamingo scene one step at a time. They all did such a great job!
Picture
Picture
For the art activity, I created cardboard easels by cutting out one side of a small packing box and creating a triangle. Then I used duct tape to tape along the cut edge. Then I taped the canvases onto the sides. You can see how I made them here. I ordered kid aprons online for each kid to wear and bought a pack of big paint brushes as well. The paint was liquid tempera purchased at Hobby Lobby and I put the paint on paper plates. The kids all got to take their aprons, paint brush and art home as party favors.
Picture
The photo booth props were something I planned on making and then I found a pre-made set in the party aisle at Wal-Mart on clearance for .99 cents! So, I just used that. It even had flamingo glasses! Perfect! I also supplemented with some items from our dress-up collection including tutu's, masks, tiaras and feather boas.
Picture
Picture
Picture
 In addition to the art themed favors, kids also took home a flamingo or dino mask. The girls above are wearing them while competing in the one-legged standing competition. In the background you can see the pin the tail feather game I made. Somehow it did not get photographed! I just drew a flamingo on some pink paper and game the kids colored feathers with tape to tape onto the bird. They enjoyed it!

I found free mask printables, backed them with construction paper and then laminated them. Then I hole punched them and added ribbon for tying. They actually took a lot of time but were essentially free and I think they looked awesome!
Picture
Picture
For the ring toss I cut rings out of cardboard and stuck two lawn flamingos in the ground. Easy!
I purchased pre-filled eggs online one set was regular eggs but the other were dino eggs! I had some other adults hide them while I corralled all of the kids inside and handed them paper bags with their names on them. Then we let them loose!
I think the party was a success and all of the guests had fun. I didn't feel too rushed the day of but I'm sure that was mostly due to staying up until one the night before. Now I have to get planning on my son's 1st birthday coming up in October! Thanks for visiting!
0 Comments

Diy cardboard easel

9/18/2017

0 Comments

 
Picture
For my daughter's birthday we decided to have a guided painting activity. I created these cardboard easels in less than 10 minutes and they worked beautifully! Plus they cost less than a dollar a piece! Keep reading to see the full tutorial below.
You will neeed:
- small cardboard box
- duct tape
- scissors/box cutter

1. Remove one of the small sides of the box. I found this pretty easy using just scissors.
Picture
2. Pull the two cut sides together to form a triangle shape and duct tape along the edge.
Picture
3. Attach your canvas or paper using tape. You could also hot glue a clothes pin or clip. I used two pieces of rolled duct tape to adhere the canvases for the kids at the party. They were easy to remove and we had no issues with canvases falling off.
Picture
Picture
Picture
I was super pleased with how quickly this project went and the result was perfect! If you'd like to learn more about the painting activity you can visit this post about the flamingo and dino birthday party!
0 Comments

Let's Flamingle! It'll be Dinomite! - 7th birthday party planning

9/13/2017

0 Comments

 
It's been a busy past few weeks at my new job and it has kept me from posting for awhile. But, I've been getting ready for my daughter's seventh birthday which is coming up this weekend! Eeeek! I hope I'm able to get everything done in time! I'm currently cutting out about a bajillion paper tropical leaves for decor along with 20+ Dino and flamingo masks for tiny people to wear. 

The party is going to be mostly flamingo with a touch of dinosaur to accommodate little boys who might not love the idea of pink birds. We'll have a Dino and Flamingo egg hunt, games revolving around one leg and a guided painting activity for kids to paint their own masterpiece! I'm excited to see how it'll turn out and I hope you are too! You can see my inspiration board below and check back next week for the end result!
Picture
0 Comments

Mommy Camp 2017 - Week six: Construction

7/17/2017

0 Comments

 
Picture
This week was the most popular dramatic play theme of the summer so far and the other activities were pretty popular too. You can download the lessons by clicking the image below and read about all of the fun further down.
Picture

dramatic play

This week they had a construction zone dramatic play area. They had a table with foam blocks next to a square of contact paper that I taped to the wall. They could stick the foam blocks onto the contact paper to build. They freakin' loved it! They also had giant foam blocks to build with and I made them diy wrecking balls using long socks and soft rubber balls. I placed the ball in the bottom of the sock and they simply swing it at their towers. It was also a huge hit. They also had regular blocks to build with. To finish off the area, I provided construction worker hats, caution tape and some signs. This was the most popular dramatic play area so far and they played for a really long time multiple times through the week.
Picture
Picture
Picture
Picture
Picture
Picture

day one: engineering

We talked about what an engineer is and what they do. We read some stories about great women inventors and watched a video. Then we discussed the engineering process. Afterwards, we made lego prints. 
Picture

day two: blueprints

We learned about blue prints and listened to a fun song from Phineas and Ferb. Then Lilly did some measuring using a worksheet and followed a recipe to make mug cake. It's kind of like a blueprint in the overall idea because it is the directions for creating a cake just like the blueprints are directions for building a house.
Picture
Picture

day three: tools

We read a book and discussed different types of tools. Then we did some hammer painting using cotton pads, paint and a rubber mallet. It was a big hit. (get it? lol)
Picture
Picture
Picture

day four: machines

We learned about different kinds of simple machines by watching an episode of Bill Nye and discussed where we have seen and used simple machines in our every day life. Then we made a pendulum using a paper cup, broom stick and string. We used it to create a pendulum painting. We also made a painting using an inclined plane and discussed what that meant.
Picture
Picture
Picture

day five: architecture

We had a lot of options but, as always, we didn't get to much of it and instead simply read a book about the three little pigs from an architectural point of view, watched a few informative videos and created graham cracker houses. Then we tried to blow our housed down. They were sturdy enough to resist. Honestly, we skipped a bunch of the activities this week. I think we're all tired and would rather just have free play. They really loved the dramatic play area and spent a lot of their free time in there this week.
Picture
0 Comments

Sleepover fun!

5/22/2017

0 Comments

 
My daughter had her first girlie sleep over this weekend with her very best friend. So, naturally, I planned a few fun activities for them. We made shower jellies and lip gloss, painted our nails, made brownies and they had tons of fun playing dress-up, doctor, drawing, reading and trying to avoid the little brother. So, check out how we made the shower jellies and lip gloss below!
Picture
DIY Shower Jellies

You will need:
- 1/2 cup bath gel/soap
- 1 package unflavored gelatin
- silicone mold
- small pot
- spoon
- 1 cup water

I followed a recipe I found online here. But, my jellies didn't stay jelly-like once they reached room temperature. I'm not sure what the reason is but, I plan on re-trying this with more gelatin next time. Anyhoo, it was still a fun project and they were pretty cute before they got too gooey.

1. Mix gelatin with one cup water in small pot over medium-high heat until fully dissolved.
2. Remove from heat and mix in shower gel. We used a peach colored shimmery dial soap and did not add coloring but you could add a few drops of food coloring if you like.
3. Pour mixture into mold.
4. Refrigerate 3-4 hours until set.

As I stated above, mine didn't retain their gelatin like shape for long once they reached room temperature. It is possible that we put too much soap in it. I'll retry it later and update this post when I do.

Picture
Picture
Picture
Picture
The only way we could use them was to freeze them. My daughter thought it was thrilling to soap up with what was essentially a deliciously scented ice cube.
Picture
What happened at room temperature.
DIY Lip Balm

You will need:
- vaseline
- kool aid
- container
- spoon

This is a super simple project that both girls were pleased with. All you do is mix some vaseline with some Kool aid powder of your choice. I didn't measure the Kool aid or the vaseline. Just do what feels right. I purchased my containers at Wal-Mart on the travel soap aisle for .98 for two.
Picture
Picture
Picture
Picture
You might notice Arthur's nail polish. He insisted on getting his painted too.
Picture
0 Comments

diy kentucky derby hat

5/9/2017

0 Comments

 
DIY Kentucky Derby Hat
Last weekend I was invited to attend a fundraiser for Arkansas Children's Hospital that was Kentucky Derby themed. Being the crazy person I am and not knowing anything about the Kentucky Derby (or horse races for that matter), I of course hit the internet hard learning about the event. In my research I discovered that the hats are one of the biggest deals at the derby. Each year women show up with crazier and crazier hats with the goal of begin the most outrageous but in a still attractive and super bourgeois kind of style. It's all about the hat.
Picture
So, I decided to go all in on my hat and set about deciding what kind I would be wearing. I chose to go with a floral theme in hot pink tones and headed for Hobby Lobby. Still not quite sure about how I would be making the hat, I rolled up and down the isles looking for inspiration. I ended up picking the week that the floral stems were not 50% off so that was pretty unfortunate as all the flowers I liked were a bit on the pricey end. My goal was to spend no more than $25 and hopefully less.

I ended up on the wedding aisle and discovered a good bit of it was marked 50% off including some pearl sprays, feather sticks, and fun, hot pink baubles.  I also found the floral sprays that are only $1 - $3 each meant for bouquets. I selected my flowers from these. They were the perfect length and there were plenty of varying types and sizes to give my hat some real pizzazz. 
After leaving the bridal aisle with a much more concrete plan in mind I then grabbed a roll of pink glitter tulle. Still not sure about how to form a base for my hat I hit the craft foam and felt aisle in search of something that might work when I found a blank dolls hat made from the very material that derby hats are made from, sinamay! It would make for a perfect base but, it was a boring tan color. So, I headed to the paint aisle and grabbed a bottle of hot pink acrylic paint. Knowing I already had felt and a pink headband at home I headed to the checkout ready to get started! The best part is I only spent $23!! And, that was without the floral items being on sale! 
Picture
Picture
Picture
Picture
Picture
When I arrived home, I first painted the hat. It took a matter of minutes and the boring tan became a vibrant pink. After letting it dry, I began to play around with placement of the items on my hat. I also had to snip the flowers off of the stems to be able to do this. I also made some gathered tulle pieces by cutting a strip of tulle and bunching it in the middle and then stapling it in the center. If you look online there's a much nicer (and more time consuming) way of accomplishing this but, it requires sewing and I try to avoid that all costs. This worked just fine. Once I had a good idea of placement, I began to adhere the largest pieces first as a base to work from. I added the details as I went to make it balanced. To add the wired details I simply poked them through the hat and twisted them together underneath to be sure they didn't budge. 

After getting it all glued (I used hot glue) and wired on. I stuffed the hat with pink napkins I happened to already have. You could stuff it with whatever you like. Then I cut a circle of hot pink felt and glued it over the hat base. After that, I glued my headband to the felt circle and cut an identical circle, snipping two slits in it for the headband ends to pass through. Then I slid the second circle over the headband and glued it down as well. 

Overall, I probably spent about an hour on this project but, it was really worth it! At the party, every woman I spoke with said they loved my hat and several said it was their favorite at the event. I had a great time making and wearing it and I encourage you to get crafty and make your own if you ever attend a party where such a hat is encouraged!
Picture
Picture
Picture
Picture
0 Comments

An up-cycle project for earth day

4/24/2017

3 Comments

 
My daughter's school hosted an up-cycle fair and we chose to participate. The goal was to encourage young people to think about recycling and ways to re-use items so they can help keep the Earth happy! It was done similarly to a science fair where you created your item and then made a project board to display with it. Judges then awarded prizes for each grade.
My daughter decided to make a jump rope out of plastic bags and even though she needed our help, she did most of the project on her own. It was fairly easy to make and we truly had all of the materials already. In fact, I think we have enough plastic bags to make at least 8 more jump ropes if we really wanted! She ended up winning 3rd place for her grade and was given an adorable trophy. It was a lot of fun and we look forward to participating next year! 

Want to make your own? Check out the directions below!
Make use of all of those plastic bags with this fun and easy craft!
DIY PLASTIC BAG JUMPROPE

You will need:
- plastic bags (Number varied depending on the length of your rope. We used 10.)
- scissors
- duct tape

1. Cut the bag open and remove the handles creating a flat rectangle.
2. Cut the rectangle into long strips about 1 inch wide.
3. Knot strips end to end until desired jump rope length is reached. You will need 12 pieces of tied strips.(We tied three strips together for ours. It is perfect for my 6 year old but too short for an adult.)
4. Gather 6 tied lengths of bag and tape to the back of a chair. Then separate into two's and braid the entire length. Repeat with other 6 tied strips.
5. Once both groups of strips are braided, twist them together to create a thicker rope.
6. Fold over ends and tape with duct tape to create the handles.
​7. Jump!
Picture
We had a lot of fun with this project and she is loving her new jump rope! Winning 3rd place was an added bonus! Hopefully your little one will enjoy the project too! Have fun and thanks for visiting!
Picture
Picture
3 Comments

custom tshirts with freezer paper stencils

4/24/2017

0 Comments

 
I've become disillusioned with vinyl t-shirt creating. No matter what I do, they never look as good as I imagine they will. They take a lot of effort and don't end up costing much less than if I'd just purchased it already made. So, when I decided to create some shirts for Earth Day I went with a new method: Freezer Paper Stencils! And, let me tell you, I AM IN LOVE! Why do you ask? Well, it was cheaper, faster and way, way, way easier! Let me tell you all about it!
Learn how to make awesome and professional looking t-shirts using paint and freezer paper!
You will need:
- freezer paper (You cannot sub wax paper. Freezer paper is only waxed on one side unlike wax paper.)
- scissors
- exacto blade and/or cutting machine (I used my silhouette machine but, technically you could get extra artsy and use a cutting tool and free hand it. I would never dedicate that time but, to each his own.)
- acrylic paint colors of your choice
- paint brush
- iron
- pre-washed t-shirt

1. Design your stencil. I used my silhouette machine and designed the shirts using it's software. You could design it on a piece of paper or in powerpoint, print it out, and then trace over your design on the wax paper to cut it out.
2. Send your design through the machine. Place the freezer paper shiny side down on your cutting mat. The settings will depend on how detailed your design is and how sharp your blade is but for me, the settings that worked best were: 
         blade: 1
         thickness: 4
         speed: 3
            I did modify for different designs by changing the thickness or speed one or two depending. But, the blade remained at 1.
3. Weed your design and make adjustments if necessary. There were a few times where it didn't cut quite right and I ended up modifying it with scissors. You couldn't even tell when it was all done so don't stress if it's not perfect. 
4. Position your paper on your shirt and apply heat with the iron. This creates a seal on the shirt with the waxy side of the paper but is easily removed with no damage making it great for painting!
5. Paint with desired colors using a paint dobber brush. I really liked the weathered look that was created by using just enough paint and not applying it evenly to all letters. I think it made the shirts look more professionally created. So, imperfection is rewarded here. Don't overdo the paint and don't stress that some letters get more than others. Yay!
6. Allow to dry.
7. Remove freezer paper stencil.
Picture
Picture
Picture
Picture
Picture
Picture
Picture
I couldn't be more pleased with how my shirts turned out and after washing they look as good or even better! I'm excited to make a ton more and am so glad that I don't have to mess with the frustration or cost of vinyl anymore! I hope you're inspired by this post and if you like my shirts you can download the silhouette files below! 
bees.studio3
File Size: 162 kb
File Type: studio3
Download File

magicscience.studio3
File Size: 172 kb
File Type: studio3
Download File

respectearth.studio3
File Size: 104 kb
File Type: studio3
Download File

yallneedscience.studio3
File Size: 115 kb
File Type: studio3
Download File

zygote.studio3
File Size: 220 kb
File Type: studio3
Download File

0 Comments
<<Previous
Forward>>
    Picture

    RSS Feed

    meet rachel

    Rachel is a mother of three, elementary Spanish teacher and part-time blogger who loves crafting, creating fun and engaging activities for her children and students and hanging with her friends and family. She blogs about what she's doing and her interests at any given time which vary. She's a little OCD and always looking for her next project. Her husband calls it, "focusing her crazy", but she just calls it fun. 

    Archives

    February 2022
    December 2021
    November 2021
    October 2021
    September 2021
    August 2021
    July 2021
    May 2021
    April 2021
    March 2021
    February 2021
    January 2021
    November 2020
    October 2020
    August 2020
    July 2020
    June 2020
    March 2020
    February 2020
    December 2019
    November 2019
    October 2019
    August 2019
    July 2019
    May 2019
    March 2019
    February 2019
    January 2019
    December 2018
    November 2018
    October 2018
    September 2018
    July 2018
    June 2018
    April 2018
    March 2018
    February 2018
    December 2017
    October 2017
    September 2017
    July 2017
    June 2017
    May 2017
    April 2017
    March 2017
    February 2017
    January 2017
    December 2016
    November 2016
    October 2016
    September 2016
    August 2016
    July 2016
    June 2016
    May 2016
    April 2016
    March 2016
    February 2016
    January 2016
    December 2015
    November 2015
    October 2015
    September 2015
    August 2015
    July 2015
    June 2015
    May 2015
    April 2015
    February 2015
    September 2014
    August 2014
    February 2013
    January 2013
    December 2012
    November 2012
    October 2012
    September 2012

    Categories

    All
    Baby
    Beauty
    Clothing
    Crafts
    Decor
    DIY
    DIY Gifts
    Dramatic Play
    Freebies
    Free Wallpapers
    Fun With Paint
    Holiday
    Inspire
    Kids
    Kid Snacks
    Mommy Camp
    My Thoughts
    Organize
    Parenting
    Party Time
    Photography
    Science Stuff
    Sensory Play
    Silhouette
    Toddlers
    Whole 30

    Picture
    Picture
    Mom Buzz Media
Proudly powered by Weebly