Paint Covered Kids
  • Blog
  • About
  • Contact
  • The Gallery
  • DIY
  • Mommy Camp
  • Freebies
  • Subscribe!
  • Blog
  • About
  • Contact
  • The Gallery
  • DIY
  • Mommy Camp
  • Freebies
  • Subscribe!
Paint Covered Kids

​

DIY Princess Jasmine Costume Jewelry

10/3/2016

0 Comments

 
Picture
I get excited every year when it's time to plan and create our Halloween costumes! This year I'm a little less enthused because I will either be gigantically pregnant and overdue by almost one week or I will have JUST had a baby. So, either way trick-or-treating may not be in the cards for me. But, I can still participate in the costume part...maybe. So, when the time came to make a plan I was at a bit of a loss. How do I prepare for two very different costume sizes without making two costumes? After chatting with my daughter and asking her what she would like to be she said she wanted to be Princess Jasmine. That got me thinking. I could be Raja the tiger! An orange t-shirt, black leggings and some face paint and I can either be super huge Raja or Raja with a baby Raja! Perfect. My husband is going to be Aladdin and my son will be Abu the monkey. It's going to be adorable. But, enough about the thought process. You're here to learn about the Jasmine costume. 

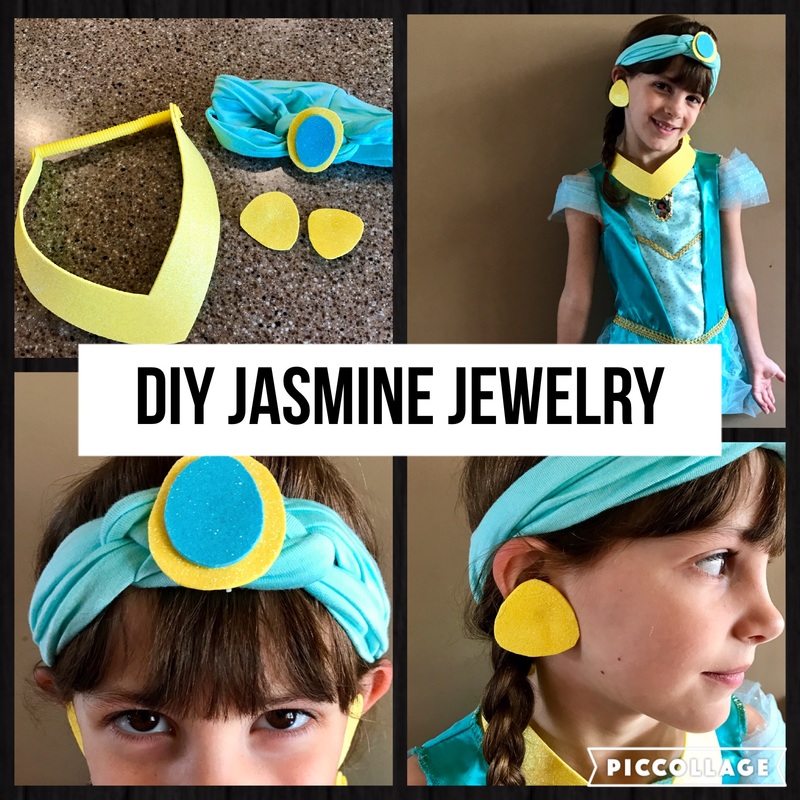
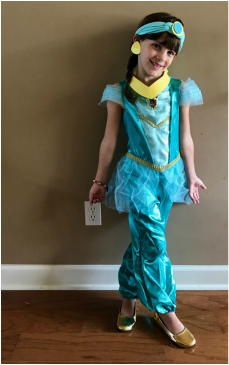
Usually, I create the entire costume myself but, the Jasmine costumes looked like they would require a bit more sewing than I was interested in and pre-made ones were pretty cheap. So, I purchased this one on Amazon. I opted for a non-navel showing one because, you know, she's six. I also purchased these gold shoes. But, when looking for Jasmine jewelry and accessories I couldn't find any that looked like the actual cartoon. So, I decided I could do it myself.

What You'll Need:
- clip-on earring backs
- 1 sheet blue glitter craft foam
- 1 sheet yellow glitter craft foam
- 1 yellow glitter craft foam visor
- 1 turquoise stretch headband
- hot glue gun and glue sticks
- scissors

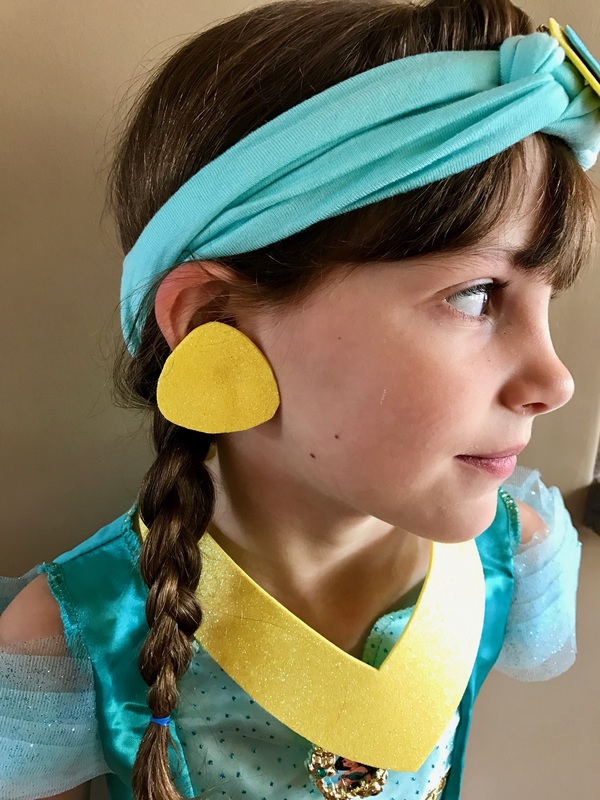
I pulled up an image of Princess Jasmine to make sure I knew what I was doing and then free-handed a rounded edge triangle for the earrings. Then I cut it out and used it as a stencil for my other earring and cut it out too. Once I had my earring shapes I simply glued them to the earring backs and I had my earrings!
Picture
Picture
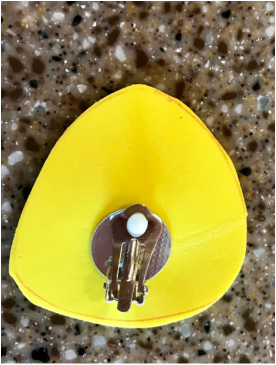
Obviously they're not perfect but who cares! They definitely look like Jasmine's earrings. If I'd wanted to I could have made a stencil and created perfectly shaped earrings. But, I didn't feel like it and she loves them as is.

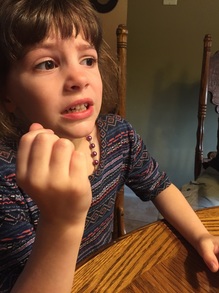
Now, on to the necklace. For the necklace I used the craft visor and simply cut it down to be the shape of Jasmine's necklace. Again, I eye-balled this and didn't use a stencil or anything. I just looked at the Jasmine image and hoped for the best. Once it was cut she could just slip it on as a necklace instead of a visor. Perfect, cheap and easy!

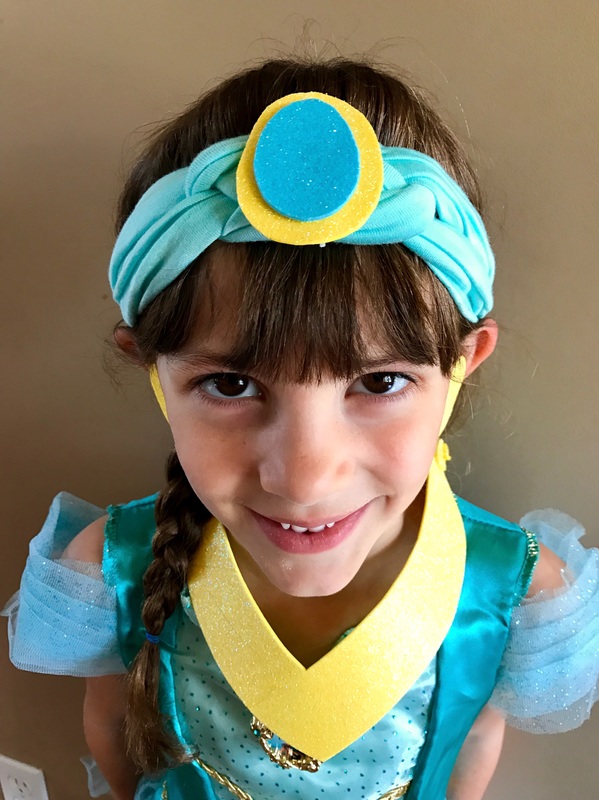
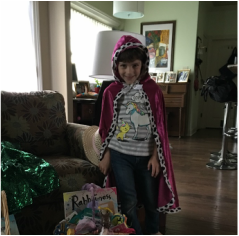
Finally, creating the headband. I cut out a large oval from the yellow glitter foam and then a slightly smaller one from the blue. Then I hot glued them together and glued a safety pin onto the back. Then I pinned the glued ovals onto the headband. Sure, I could have glued it to the headband but, I thought I'd rather have the ability to re-use it.

There ya have it! It only took about 20 minutes and I only spent about $6. I also had plenty of craft foam leftover plus an awesomely cute new headband! She's happy, I'm ecstatic and at least one of us is ready for Halloween!

Stay-tuned for the tutorials for the rest of the family costume tutorials including Raja the tiger, Abu the monkey and Aladdin!
Picture
Picture
0 Comments

Easter Mommy Camp & My Spring Break

3/28/2016

0 Comments

 
I had a busy and fun-filled spring break visiting with friends and family, participating in some free events, celebrating Easter and, of course, doing a little Mommy Camp - Easter Edition. However, we were having so much fun doing other things that we only managed to finish two of the four days I planned for Mommy Camp. I'm not worried as I'll have it for next year or if we get bored over the next few weeks.
We kicked off Spring Break by visiting some family out of town. Derek wanted to go hiking with some friends and I wasn't interested in taking the kids on an all day hike so we went to the Museum of Discovery with my Brother, his wife and my Mom. We had a really fun time and topped it off with some pizza and local ice-cream.
Picture
Picture
Picture

Monday

When we got home from our mini-trip we spent Monday focused on Mommy Camp. The theme was jelly beans and we did a ton of things including a jelly bean taste test (You can find the worksheet I made here.), learning how they're made, jelly bean math, science and art! Arthur wasn't as in to participating as Lilly except for eating the jelly beans.
Picture
Picture
Picture
Picture
Above you can see Arthur doing the "eat every jelly bean regardless of flavor" style of taste test. Then you can see Lillian analyzing each one. We judged them on their flavor, texture, smell, taste and color. She did not like the sweet tart jelly beans and like the jelly belly the best. I did kind of test Arthur and gave him a buttered popcorn and a cinnamon. He was not a fan of either.
Picture
Picture
After the taste test we did some jelly bean math and graphing. For the graphing we dumped out a random amount and then analyzed how many we had of each color as well as how many when certain colors were added to each other and an over all total. We also discussed which we had the most and the least of.
Picture
Picture
The science was pretty neat! We put beans in four different types of liquid: water, milk, vinegar and sparkling water. Before placing them in each bowl we hypothesized as to what we thought would happen to them in each different liquid. Then we dropped them in and watched. The reactions didn't take very long and it was interesting to see that the pink began to dissolve first and that the sparkling water caused them to dissolve the fastest.
Picture
Picture
Picture
Picture
This was a quick and fun art activity where you place jelly beans on paper and then squirt them with water. Then you can let it sit and dry or dump them off to create lines. It was a little messy but messy is fun! Arthur, of course, enjoyed eating the jelly beans more than the project.
Picture
Picture
Picture
Picture
This jelly bean art project was also very easy. Arthur was, again, more interested in eating them. After we finished I went to wash my hands and heard a cascade of beans hitting the floor. Arthur had attempted to pick his up but, not being dry, they all slid off of the paper. The kids cleaned it up and Arthur ended up with some interesting art.

Tuesday

On Tuesday, my Mom and Step-Dad decided to drive up to spend the day visiting and we went to the spring break activities at the nature center in town. The kids got to pet a tiny owl, learn about native animals, go on a short walk and do some art. I have to admit that I haven't taken the kids there very often in the past but neither was ready to leave and Lilly was somewhat upset that I didn't bring a picnic lunch like a few other families. I genuinely thought we would be lucky to be entertained for an hour but I was so very wrong. We actually went to the center two more times this week for other craft and animal activity events and each time the kids were not ready to leave!
Picture
Picture
Picture
Picture

Wednesday

Wednesday we spent the morning at the library for both of the kids story times and the afternoon just playing. We always attend the summer story times because I'm off for the summer but we don't go during the school year. So, this was the first time since summer that we've attended and it was a world of difference now that Arthur is two. He was engaged and participated in all of the activities and basically did everything Lilly did. It was adorable. 
Picture
Picture

Thursday

Thursday we did our second day of Mommy Camp which was egg focused. We decorated pancakes to look like eggs for breakfast, dyed eggs, did "eggcercises" (They can be found here.), had egg spoon races, made egg prints, conducted egg "science" with baking soda and vinegar and made a cardboard egg ramp.
Picture
Picture
Picture
Picture
Egg shaped decorate yourself pancakes was a hit with Lillian. Arthur was less of a fan until I doused his pancake with whipped cream and strawberries for him.
Picture
Picture
Picture
Egg "science" was a big hit that kept them happy and playing for at least 40 minutes! Even after most of the baking soda had been covered with vinegar Lillian experimented with color mixing. It was an easy project to set up too! All you need is a muffin pan, plastic eggs, baking soda, vinegar and food coloring. Prep by putting the baking soda, eggs and food coloring in the muffin tin (I set it inside of a sheet pan to eliminate extra mess.) and give the kids eye droppers and cups of vinegar. Such fun!
Picture
Picture
Using plastic egg halves to create egg prints was a big success and yielded some pretty nice art! I also tried potato prints to make egg art but it didn't work out nearly as well. The potato was hard to grasp as well as pull away from the paper and the prints weren't very pretty. I think a sponge would work better for that. Not long after these pictures were taken, Arthur was pretty paint covered so, I ran a bath and carefully guided him through the house to get in. When I returned 2 minutes later to get Lilly for the bath I found her creating splatter art and a big mess! I told her that I appreciated her creativity but that we can only do splatter painting outside. Once they were clean it only took me about 10 minutes to clean up what I perceived as an enormous mess so, no harm done.
Picture
Picture
Picture
The cardboard egg ramp was really fun for both of the kids. They pretended they were working in a factory. I also gave Arthur a bowl filled with eggs and a large spoon for playing.
Picture
Picture
Picture
After they got bored with the ramp we did "eggsercises" and had a spoon race. For the "eggsercises" you just put different activities inside each egg and draw eggs one at a time. Then they do them. Lilly had a lot of fun with this one.
Picture
Picture
Picture
Picture

Friday

Friday morning was spent doing a little spring cleaning. We rearranged Lilly's room a little bit to make it more conductive to play and also cleaned out some of the toys she didn't play with to donate. In the afternoon, we visited the nature center again to participate in some snake themed fun. They provided us with gourds to paint to look like snakes and also had small wooden toy snakes for painting. Arthur got to pet a snake and spent a good majority of the time looking at them. We also met with some friends and enjoyed the other offerings at the center together. 
Picture
Picture
Picture
Picture

Saturday

Saturday morning we tried a new local restaurant for breakfast and did a few errands. In the afternoon we went to a friends house for dinner and egg hunting. We also played beanboozled which was so much fun! If you haven't played I definitely recommend it! Even Arthur and Lilly played for over an hour! I'll warn you though, vomit flavor is as bad as you imagine and is definitely the worst! That night we planted some jelly beans for the Easter Bunny to magically turn to lollipops for Easter morning. It's a simple activity that is really magical for the kids.
Picture
BACON!
Picture
planting jelly beans
Picture
egg hunting with friends
Picture
playing beanboozled

Sunday

Sunday morning, the children awoke to find eggs hidden all over the house and their Easter baskets. Each got a book, a cape (Lilly had recently asked for one so it was perfect!) and a few cheap toys. As a side note, I found some bubble blowers at the dollar store that looked similar to the ones that gymboree sells and they are amazing! They make a ton of tiny bubbles and entertained both kids for at least 30 minutes.
Picture
Picture
Picture
For breakfast I made bunny butt pancakes and we spent the morning playing before heading to Derek's parents house for lunch, family time, bubble blowing and a few egg hunts. 
Picture
Picture
Picture
Picture
0 Comments

Fun with Nail Polish

3/14/2016

0 Comments

 
Easy Easter manicure for kids and adults
I recently purchased a Sally Hansen nail design tool kit like this one at Target and my daughter and I have been having a blast creating fun nail designs. Apparently we've had so much fun that I have forgotten to snap pictures of the last few which included ladybugs, flowers, hearts and snowflakes. But, we decided to get into the easter spirit this week and went with bunnies! All I do is find a few inspiration images and give it a go using my handy tools. The inspiration for this week was this sparkly design.
Picture
I happened to have some sparkly pink that was almost identical so, that worked out perfectly! Lilly decided that she wanted more bunnies so we did every other nail instead of only one.
1. First, I trimmed and buffed her nails. (By buffing them well, we've made each fancy manicure I've created last two weeks on Lilly! I also put a no-light gel topcoat on which increases the durability.) After prepping her nails I put on an Essie base coat.
2. Then, I applied the sparkly pink to every other nail and a shimmery pale pink to the others.
3. Once the shimmery pink was dry, I applied one dab of white on the edge of each nail. (It doesn't have to be perfect, she's a child.)
4. Then I grabbed my tiny paintbrush tool and painted two white lines coming from the round blob.
5. Once those were dry, I used the dotting tool and added two black dots in the center of each white blob to create the eyes. 6. To finish, I cleaned my dotting tool and used the shimmery pink to make a dot for the nose then I applied my secret for long lasting manicures, Sally Hansen Miracle Gel.
This stuff is seriously amazing and you don't have to use it with their colors. I apply it on top of everything and it generally keeps my manicure looking great for a whole week! I thought it was so adorable that I gave myself the same manicure but with only two bunnies like the picture. I mean...I am an adult. I also painted Lillian's toes but only did bunnies on her big toe. ​
If you and you're daughter (or just you) love playing with nail polish then the $6 investment is totally worth it! Pinterest is full of inspiration for nail art designs or you can come up with your own ideas. You can also follow my Pinterest nail art board. Good luck and keep in mind that it should be fun and nothing is permanent so, don't stress if you mess up. Just keep some remover nearby! Enjoy!
Picture
0 Comments

10 easy kid crafts & Activities for St. Patrick's Day

3/9/2016

2 Comments

 
10 easy kid crafts and activities for St. Patrick's Day
Here are some of my favorite ideas for getting crafty on St. Patty's Day! All of them take very little prep and will definitely be fun for any age!

1. Leprechaun Paper plate mask

All you need is construction paper, paint, a paper plate and a popsicle stick to give your kids a great dramatic play prop. Visit ABC Creative Learning to get the full tutorial.
Picture

2. painted shamrock

Picture
In only a few moments your kids can create an adorable shamrock using paint, a pencil and paper. See the details at Embracing
Creativity
.

3. St. Patrick's Day Slime

Kids love to play with anything texturally interesting. This themed slime recipe will keep them entertained and mesmerized! Head over to Little Bins for Little Hands for the recipe.
Picture

4. St. Patrick's Day Scavenger Hunt

Picture
This adorable idea will be a ton of fun and takes very little time to set up. Plus, it can be re-used over and over again! Read about how to set it up at Moonfrye.

5. erupting Rainbow

When you mix baking soda and vinegar it's always fun! Check out this twist on a fun chemical reaction at She Knows.
Picture

6. Pinch Proof Onesie

Picture
Ensure that your child survives the day pinch free with this adorable idea! Head over to Food Fun Family for the full tutorial.

7. Popsicle Stick Bracelets

Your kids can create any design they like on these cheap and easy bracelets made using simple popsicle sticks! Find out how at Momtastic.
Picture

8. Lucky Rainbow necklace

Picture
Colorful cereal, a chocolate coin, thread or twine and glue are all you'll need to make this adorable and edible necklace. See the full tutorial at HelloBee.

9.Fingerprint rainbow pot of Gold

Fingerprinting and gold glitter help make this craft extra fun for the little ones. Head over to Crafty Morning to see the how-to.
Picture

10. Handprint Clover

Picture
Any opportunity for kids to cover themselves with paint is always fun! Read about how to make these adorable clovers at Fun Home Things.
I hope you have as much fun with these crafts as my kiddos and I did! Enjoy!
2 Comments

Mommy Camp - Easter edition

3/1/2016

0 Comments

 
mommy camp easter theme - a week of lessons focusing on easter for kids with free printables!
Spring break is only a few weeks away! That means it's time for another Mommy Camp! Since the break this year falls right before Easter I've made it Easter themed! You can read about a few of the specific activities we'll be doing and download some printables I created, including the lesson plan below.

Theme One: Jelly Beans
The first focus is on jelly beans. We'll be conducting experiments, participating in a taste test, learning how they are made, making necklaces and more! (A list and links to all of the activities can be found in the lesson plan download.)
Picture
Conduct jelly bean experiments at Frogs and Snails and Puppy Dog Tail.
Picture
Make jelly bean necklaces at Two Sisters Crafting.
Picture
See the inspiration for my jelly bean taste test printable at Childhood 101.
Theme Two: Eggs
This is a very fun-filled theme that includes egg science, growing "egg heads", paint-filled egg bomb painting, a glowing egg hunt and "egg-ing" the neighbors. Plus a ton of other fantastic activities focusing on math, reading and sensory experiences. (A list and links to all of the activities can be found in the lesson plan download.)
Picture
Learn how to grow "Egg Heads" at Nurture Store.
Picture
Go on a glow hunt at Indulgy.
Picture
"Egg" the neighbors at The Dating Divas.
Theme Three: Bunnies
In the bunnies focus we will learn about rabbits, do the bunny pokey, learn how to draw a bunny, dig for sight word carrots and make bunny handprint art along with some fun math, reading and cooking. (A list and links to all of the activities can be found in the lesson plan download.)
Picture
Learn how to draw a bunny at Cakespy.
Picture
See the inspiration for my printable at The Imagination Tree.
Picture
Make an adorable bunny handprint at Crafty Morning.
 Theme Four: Peeps
Everyone loves peeps! Delicious, sugary marshmallows!  In this section we will conduct some peep experiments, learn how they are made, create puffy paint peeps and make peep play dough  along with doing some reading and math. (A list and links to all of the activities can be found in the lesson plan download.)
Picture
Learn how to make puffy paint peeps at Crafty Morning.
Picture
Conduct some peep-speriments at Schooling Monkey.
Picture
Make peep play dough at Growing a Jeweled Rose.
Click the link below each image to download the printables that I've created as well as the lesson plan. Enjoy!

Mommy camp lesson plan

Picture
mommy_camp_-_easter.pdf
File Size: 51 kb
File Type: pdf
Download File

digging for sight words

jelly bean taste test

Picture
jelly_bean_taste_test.pdf
File Size: 517 kb
File Type: pdf
Download File

egg matching

Picture
digging_for_sight_words.pdf
File Size: 791 kb
File Type: pdf
Download File

egg-cersices

Picture
eggsercise.pdf
File Size: 113 kb
File Type: pdf
Download File

Picture
plastic_egg_matching.pdf
File Size: 491 kb
File Type: pdf
Download File

0 Comments

A Galentine's Day BEAUTY BRUNCH

2/16/2016

0 Comments

 
Galentine's Day brunch
We had a lovely time at the Galentine's day party even though several people had to miss it for last minute reasons (sick kid, no babysitter etc.) my friend Kila and I still had a blast hanging out and enjoying yummy food! I followed through with the plan I created in my first post and made whole30 approved recipes including bacon wrapped egg cups, fruit salad and chocolate mousse with the optional mimosa (I used sparkling water to stay whole30). It was all really good and my friend couldn't believe that it was all whole30 compliant! Let me tell you, those egg cups are amaze-balls! I actually ate four! 

I spent very little time creating the decorations but I think they definitely set the mood and were pretty. I copied the idea for a xoxo table cloth but used a $1 plastic table cloth and a sharpie instead of white fabric and paint. It was very thin so I laid it on top of a glittery cream colored fabric tablecloth I already own. I used my white dishes and simple champagne flutes and placed a fork on top of a red paper napkin at each setting. In the center of each plate a placed a nail polish with a cute tag that I created tied on with pink ribbon. In the center of the table I placed a bouquet of grocery store flowers in a clear vase and a sprinkling of pink and red glitter heart stickers from the dollar store as well as the remaining pink ribbon. I think it turned out very pretty and elegant. And it cost a grand total of $12 for decorations (the flowers were $10).
Picture
Picture
Picture
Picture
I also set up a photo area with the same wrapping paper I used for the Valentine's photo shoot with my kids. It's is just so versatile! I taped it to the wall width wise at waist height. Then I raided my daughter's room for feather boas and tiaras as well as her art easel for the sign. We took selfies with my hand dandy selfie stick! You can get them at most stores for about $5.
Picture
Picture
After eating, we did a foot bath and painted our nails. It was really nice to just relax and visit. We used my current favorite nail polish, Sally Hansen Miracle Gel, if you buff your nails and polish them well I've been able to get a full week with almost no chips out of one paint session. That includes doing dishes and actually functioning like a real person! (BTW, they aren't paying me to say this. I just really like it.) 
Picture
Picture
I also made this super cute shirt with my silhouette machine! Even though I didn't officially drink a mimosa, it had the right vibe. I bought the black shirt and sequin jacket at Forever21. (The "jacket" is actually a crop top with a zipper in the back. I just put it on backwards and voila! sequin jacket!) The "jacket" was on sale for less than $10! How could I turn that down?! You can download the free cut file for my shirt below!
Picture
brunchsohard.studio3
File Size: 235 kb
File Type: studio3
Download File

It was a very fun, very girly time and left both of us feeling refreshed and slightly pampered before heading back to the real world of dirty diapers, screaming kids, dirty laundry and sticky kisses.
0 Comments

Planning a Whole 30 galentine's party

2/10/2016

0 Comments

 
Valentine's Day is less than a week away but I've decided I need a little one-on-one with my favorite gals so I'm hosting a Galentine's Brunch! I've sent out the invites to my best ladies and have made my plan. You can see what I plan on doing as well as access my invite on canva to create your own Galentine's Day Brunch! 
galentine's day party brunch invitation
I'm planning on a small party with just a few close friends. This way I can make it extra special! I'm going to make a few simple decorations for the table including some tissue paper poofs, a table cloth, some sparkly items like confetti or glitter cardstock cut into xoxo or hearts and a photo area. I'm going for something like this party found on pop sugar.
Picture
I also plan on placing a small gift at each place setting similar to the one below found at the tom kat studio. I even created my own version of their tag and you can print it here.
Picture
Since I am currently doing the Whole 30 diet, I selected recipes that are whole 30 compliant but still feel luxurious and taste amazing. I'm planning on serving:
​
- bacon and egg cups with asparagus
- chocolate mousse
- sunshine fruit salad
- coffee & tea
- mimosas (I'm just going to add sparkling water to mine.)
Picture
Picture
Picture
I'm pretty excited about the party and will update with a new post as soon as it's over!
0 Comments

i've got my eye on you - diy valentine's

2/9/2016

0 Comments

 
DIY Valentine with FREE printable
I don't know about you but, I loathe when my child comes home with gigantic amounts of candy/sweets. I don't need that! I'm trying NOT to be a fatty and my kids definitely don't need it either. So, I generally try to go with a non-sweet valentine. This year I found some adorable heart shaped plastic play glasses at Target and set about designing an adorable Valentine to go with them. 

I created my printable valentine using canva.com. Then I had to create a cut file to back the printed paper because I printed on regular paper and it was too floppy. Once I cut out the printed papers, I sent my cut file to my silhouette using brightly colored craft paper. Then I glued the printed copy paper to the colorful craft paper and adhered a pair of glasses to each one using washi tape.

I think they're super cute! And you can make them too! I've included the printable and cut file below! Have fun!
Picture
Picture
Picture
eyes_on_you_diy_valentine.pdf
File Size: 199 kb
File Type: pdf
Download File

eyesborder.studio3
File Size: 66 kb
File Type: studio3
Download File

0 Comments

diy valentine's day photo shoot

2/8/2016

0 Comments

 
Tutorial for a quick, cute and cheap Valentine's Day photo shoot with kids!
On Saturday I decided that I would like to take some Valentine's Day themed photos of the kids. I had not planned for this and realized that if I didn't do it then that it wouldn't be done in time. (I know myself and a photo shoot with cranky kids after a full day of work does not sound like fun.) So, cursing my lack of preparation I analyzed my craft closet for something I could use as a backdrop and maybe even a few props. Luckily, I had a roll of black and white houndstooth wrapping paper that would look great as a backdrop. (It's actually Christmas wrapping paper I picked up on clearance. I doubt that it will make it to Christmas next year though. I've already wrapped two presents and used a large portion for this project.) Then, I took a frame I already own that is gold and took out the photo, replacing it with a sheet of red paper. I decided to augment the photos with a text on photo app that I'll detail in a bit so, the paper could be blank. Then, I simply unrolled the wrapping paper at about 5 ft. up on the wall to the floor. I created two connected panels that looked like one wide panel when photographed by matching the prints to each other. I did all of this in my dining room and had to move my table to the side to give myself room for photographing. I also set up a lamp without its shade to add additional light.
Picture
Picture
Once I got my "studio" set up. I ransacked the kids closets for cute outfits. Luckily, I managed to find some things that would look cute together and that were clean! I got the kids dressed, bribed them with candy and went to work capturing the perfect shots. Most weren't so great and, inevitably, when one was cooperating the other most definitely was not. 
Picture
Picture
Picture
Picture
Picture
Picture
But, after about 15 minutes and a sucker later, I ended up with  a few I thought I could work with. Once I had my best photos selected and favorited on my phone. I did a few quick edits using the phone's built-in camera editor. I cropped, enhanced and adjusted the light on each photo to get these results.
Picture
Picture
Picture
Picture
After using the built-in editor to it's fullest, I opened my favorite photo editing app, Rookie Cam, it's free and amaze-balls! Anyway, I applied two different filters to each photo. First I applied "baby skin" from the "clean portrait" section. Then I applied "delight" from "clean portrait" as well but, adjusted the intensity to about half. 
Picture
Picture
Picture
Picture
Once I was happy with the images I was ready to add text to each photo. I used Phonto to achieve this. It is also free and is super easy to use. I chose cute phrases for the frame that went with each picture. For the photo of my daughter by herself, I decided to make individualized valentine photos for our favorite people. Once I created the text layout on the photo, I just saved each individualized version and then edited the text for the next person. It didn't take very long and will make everyone feel extra special. Plus, Lilly got to help me by telling me why she loved each person. I just made one version of Arthur. He can't tell me his reasons for loving people yet. Maybe I can make individualized ones for him next year.
Picture
Picture
Picture
Picture
I am really happy with my results and it only took me about an hour (probably less) to create this magic! I hope I've inspired you to pull out some wrapping paper and grab a few adorable pics! Have fun and Happy Valentine's Day!
0 Comments

Christmas Mommy Camp - The Results

1/6/2016

0 Comments

 
It's the new year and I'm back in the swing of things at work. I realized that I hadn't shared some of the activities that we managed to do during Christmas from my Mommy Camp: Holiday Edition. So, here ya go!

One of the first things we did was to play with candy canes. We did a little candy cane science by experimenting with how the candy cane behaved in bowls of water and vinegar and analyzed the results. We also heated some in the oven to make them malleable and had a good time making shapes with them while they were still warm. 
Picture
Picture
Picture
Picture
We ended our candy cane fun by baking some peppermint crunch brownies. Lilly had a blast smashing the candy canes and the results were delicious!
Peppermint Crunch Brownies
- 1 box dark chocolate brownie mix
- peppermint oil (food grade)
- 5 candy canes
- hammer
- ziploc bag
1. Make the brownies using the box directions. Add one teaspoon peppermint oil to batter.
2. Place unwrapped candy canes in ziploc bag and place on ground (we did it in the garage so as not to damage the hard wood floor). Then hammer the candy canes until they are very small pieces.
3. Pour batter into pan and sprinkle candy cane pieces on top of batter. Bake according to box directions.
Picture
Picture
On a different day we made salt dough and created our very own pretend cookies for Lilly's tea parties and play kitchen. When I was a little girl my mother would help us make salt dough ornaments every year and I honestly forgot how very easy it is to make. 
Easy Salt Dough
- salt
- water
- flour
1. Mix 1 cup salt, 1 cup flour and 1/2 cup water together in bowl untiil dough forms. 
2. Create ornaments, shapes etc.
3. Place on parchment paper on baking sheet for 1 hour at 200 degrees. (They may need to cure overnight after baking to fully harden.)
4. Paint with acrylic paint if desired.
Picture
Picture
Picture
They have been very enjoyed since we made them and really do look like cookies!
Picture
Picture
The final activity I have to share today was something our elf, Elfie, left for the kids, watercolor tape resist art and new sparkly watercolor paints. Lilly did a really great job and hers turned out to be cute. Arthur didn't quite grasp the idea of watercolor and was more into the idea of water so, his is less colorful.
Picture
Picture
Picture
0 Comments

Mommy Camp - Christmas Style!

12/7/2015

0 Comments

 
Picture
I modified my normal method for Mommy Camp this time to accommodate the busy-ness that accompanies this time of year. Instead of picking themes and having focused lessons on a specific topic, I simply created a list of 24 activities that relate to Christmas. This way, if I am really on top of it and we manage to do something every day, we can. Otherwise, I will have plenty of activities to fill the season. 

The activities I chose range from science, to art, to math. Some are messy. Some are not. But, they are all fun, easy and cheap! You can download my Christmas Mommy Camp below. The file includes lists of materials for each activity, a photo of the activity, a link to the original inspiration and step-by-step directions. Enjoy!
advent_calendar_–_mommy_camp_christmas_edition.pdf
File Size: 3893 kb
File Type: pdf
Download File

0 Comments

The Cutest Christmas Photo Idea

12/7/2015

0 Comments

 
Picture
If you search on pinterest, you'll see all sorts of adorable family photo ideas for the holidays. Last year I tried my hand at one like this:
Picture
I found it here.
Mine turned out pretty cute but also slightly different. 
Picture
This year I tried it again but was more prepared. I purchased matching pajamas for both kids. (Major planning. I know.)
I think it turned out really cute and it really only took a few minutes. You can read my tips for a great mini photo session below.
Picture
Picture
I didn't use a fancy camera. I just used my iPhone 6. I did, however, use a great photo app along with the photo editing capabilities in photos on my phone.
My Tips:
#1 You want to take the picture in a dimly lit room to create the shadows that make it great.
#2 You don't have to actually wrap the kids up or have any rhyme or reason to it. Just throw some lights on them. If your kids are like mine, you don't have much time to make this work.
#3 Don't make them do it. If they are in a bad mood you should just wait. You'll get genuine smiles and wonder if you are patient.
#4 Once you take the photo, edit it in the iPhone photo editor and adjust the light and color until you are happy. My original pictures looked like this:
Picture
Picture
By adjusting the light in the photo you can make a big difference. 
#5 Download the free photo app called "Rookie Cam". It has some really unique and awesome filters. I used "delight" first and then applied a tiny amount of "ruby". I've used this app a bunch and it is free so it can't hurt to give it a whirl. 

I hope my tips help you take some great pics! If you get a few good ones comment with them below so I can give you a virtual high five!
0 Comments

DIY Advent Calendar Printable

12/7/2015

0 Comments

 
I wanted to create an advent calendar this year for Lilly and found a great one here. I loved the idea of jokes for each day instead of activities. Sometimes we don't have time or don't feel like doing the activity given. So, I decided to use the joke idea but, I got rid of all of my red christmas decorations and wanted to keep it that way so, I created my own advent calendar and kept the jokes from my inspiration.
​
I just printed it out on card stock and then cut them out. I hung them by punching holes in the top of each ornament and stringing them with ribbon. I attached it to the wall with washi tape and made a washi tape star for the top.

The photo really doesn't do it justice. I used glittery backgrounds and patterns. It's super cute! You can print mine out by downloading below and you can find the jokes I used at the link given above. Enjoy!
Picture
adventornaments.pdf
File Size: 9671 kb
File Type: pdf
Download File

0 Comments

It's Christmas Time!

12/7/2015

0 Comments

 
I decided to change my Christmas decor this year. I wanted to make it light and crisp so I got rid of all of the red and opted for white, cream and metallics instead. I 'm really happy with how it turned out. 
Picture
Picture
I even made some art prints for my walls this year. The first one, the car, I simply found and had printed at Walgreens. The second I made. I used canva.com to create the image and had it printed at walgreens. Then I glittered the words and glued it to a gold poster board before framing. I am really excited about them. You can get your own print of "feliz navidad" here!
Picture
Picture
For Lilly's room I placed a tree decked with colorful lights and tinsel next to her play house. I also found some battery operated lights and strung them on her house. So cute!
Picture
Picture
0 Comments

Thanksgiving with Friends

12/7/2015

0 Comments

 
Hosting a Thanksgiving with friends has become this big, new thing that lots of people are doing. We started doing it 9 years ago for our foreign friends who had nowhere to go for Thanksgiving. We called it Thanksgiving with Friends and even though it is referred to as Friendsgiving for many others. We're sticking with what we have always done. So, here is how it went this year.
We use Alton Brown's roasted turkey recipe and have used it for nine years. It is the bomb! You end up with a super juicy and flavorful turkey because you soak it in a brine solution overnight. Seriously, it's amazing.
Picture
Picture
I always make sure we have places for everyone to sit that are not on the sofa so, we moved our desk into the dining room and made it a buffet and then placed folding tables in our breakfast nook  for our guests. I covered the tables with brown butcher paper and then drew place settings at each seat. I topped the tables off with some evergreen branches and cream candles. It looked pretty and was easy as well. 

For the kids table I did something similar but also wrote their names on the "plates", added some cute turkey masks that I made and some "corn" which was simply a ziplock baggie filled with Kix cereal and wrapped with green tissue paper and twine to look like corn on the cob. I also placed a bucket of crayons in the center and a dancing turkey.
Picture
Picture
For silverware and plates I decided after our fourth Thanksgiving with Friends that I couldn't handle that many dishes so, we use paper now. This year I took it up a notch and created these utensil holders. I found a template for the holder and created my own logo. Then I simply cut them out folded, glued and stuffed! It was great. I also bought microwaveable take home containers and made stickers for the top of each one so guests could make a meal for later. It was really handy, especially when I wanted a little of everything the next day but didn't want to open up 7 different containers of leftovers. I made the logos at www.canva.com. It's a free graphic design creation site and it is Ah-May-Zing!
Picture
thanksgivingwfriends.pptx
File Size: 543 kb
File Type: pptx
Download File

Picture
Picture
The turkey masks were both easy and adorable!
DIY Felt Turkey Mask:
- brown, yellow and red felt
- mask template (I found mine on google images)
- elastic string
- hot glue and glue gun
1. Using your template, cut out the mask from the brown felt.
2. Cut out beaks (I just drew some triangle shapes on the yellow felt and them cut them out.)
3. Cut out the waddles. (I again, drew it on the felt and cut it out.)
4. Hot glue waddles and beaks to mask.
5. Cut a small slit on either side of the mask and thread the elastic through, finishing it with a knot.
Picture
Picture
Everyone had a great time and can't wait until the next party!
Picture
Picture
Picture
Picture
0 Comments
<<Previous
Forward>>
    Picture

    RSS Feed

    meet rachel

    Rachel is a mother of three, elementary Spanish teacher and part-time blogger who loves crafting, creating fun and engaging activities for her children and students and hanging with her friends and family. She blogs about what she's doing and her interests at any given time which vary. She's a little OCD and always looking for her next project. Her husband calls it, "focusing her crazy", but she just calls it fun. 

    Archives

    December 2022
    November 2022
    September 2022
    July 2022
    February 2022
    December 2021
    November 2021
    October 2021
    September 2021
    August 2021
    July 2021
    May 2021
    April 2021
    March 2021
    February 2021
    January 2021
    November 2020
    October 2020
    August 2020
    July 2020
    June 2020
    March 2020
    February 2020
    December 2019
    November 2019
    October 2019
    August 2019
    July 2019
    May 2019
    March 2019
    February 2019
    January 2019
    December 2018
    November 2018
    October 2018
    September 2018
    July 2018
    June 2018
    April 2018
    March 2018
    February 2018
    December 2017
    October 2017
    September 2017
    July 2017
    June 2017
    May 2017
    April 2017
    March 2017
    February 2017
    January 2017
    December 2016
    November 2016
    October 2016
    September 2016
    August 2016
    July 2016
    June 2016
    May 2016
    April 2016
    March 2016
    February 2016
    January 2016
    December 2015
    November 2015
    October 2015
    September 2015
    August 2015
    July 2015
    June 2015
    May 2015
    April 2015
    February 2015
    September 2014
    August 2014
    February 2013
    January 2013
    December 2012
    November 2012
    October 2012
    September 2012

    Categories

    All
    Baby
    Beauty
    Clothing
    Crafts
    Decor
    DIY
    DIY Gifts
    Dramatic Play
    Freebies
    Free Wallpapers
    Fun With Paint
    Holiday
    Inspire
    Kids
    Kid Snacks
    Mommy Camp
    My Thoughts
    Organize
    Parenting
    Party Time
    Photography
    Science Stuff
    Sensory Play
    Silhouette
    Toddlers
    Whole 30

    Picture
    Picture
    Mom Buzz Media
Proudly powered by Weebly