Paint Covered Kids
  • Blog
  • About
  • Contact
  • The Gallery
  • DIY
  • Mommy Camp
  • Freebies
  • Subscribe!
  • Blog
  • About
  • Contact
  • The Gallery
  • DIY
  • Mommy Camp
  • Freebies
  • Subscribe!
Paint Covered Kids

​

10 easy kid crafts & Activities for St. Patrick's Day

3/9/2016

2 Comments

 
10 easy kid crafts and activities for St. Patrick's Day
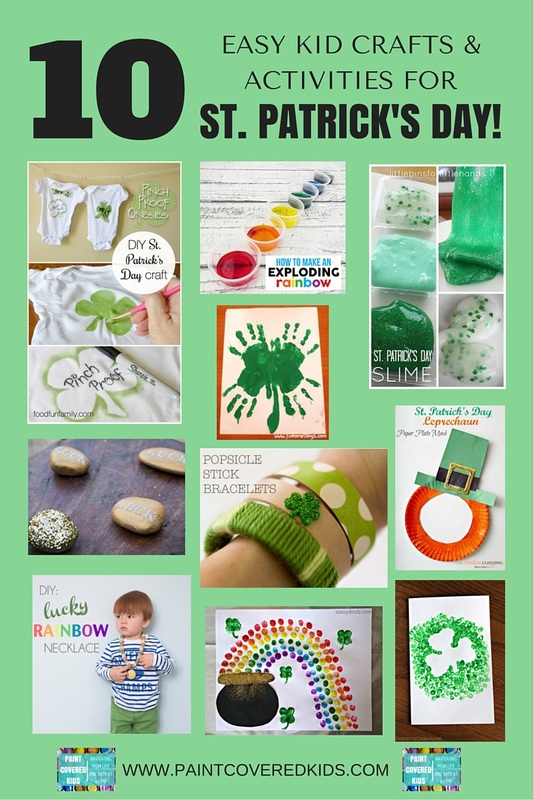
Here are some of my favorite ideas for getting crafty on St. Patty's Day! All of them take very little prep and will definitely be fun for any age!

1. Leprechaun Paper plate mask

All you need is construction paper, paint, a paper plate and a popsicle stick to give your kids a great dramatic play prop. Visit ABC Creative Learning to get the full tutorial.
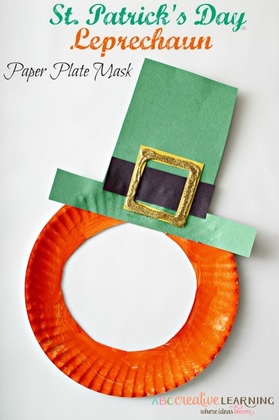
Picture

2. painted shamrock

Picture
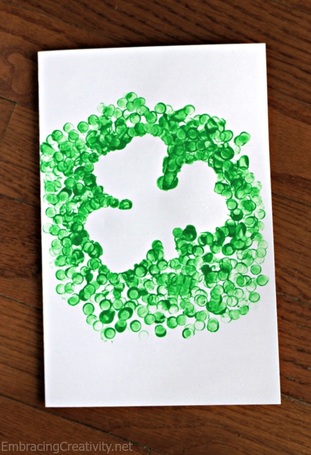
In only a few moments your kids can create an adorable shamrock using paint, a pencil and paper. See the details at Embracing
Creativity
.

3. St. Patrick's Day Slime

Kids love to play with anything texturally interesting. This themed slime recipe will keep them entertained and mesmerized! Head over to Little Bins for Little Hands for the recipe.
Picture

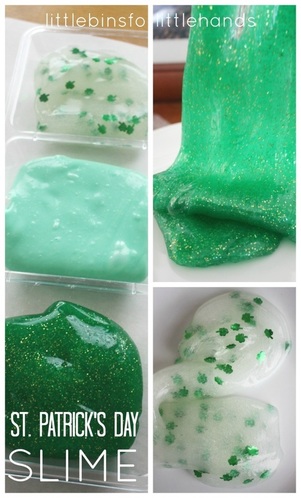
4. St. Patrick's Day Scavenger Hunt

Picture
This adorable idea will be a ton of fun and takes very little time to set up. Plus, it can be re-used over and over again! Read about how to set it up at Moonfrye.
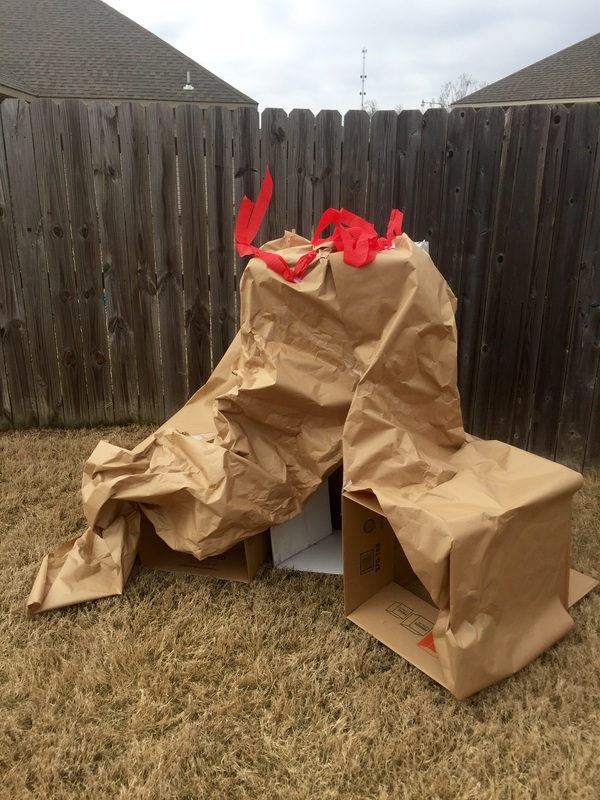
5. erupting Rainbow

When you mix baking soda and vinegar it's always fun! Check out this twist on a fun chemical reaction at She Knows.
Picture

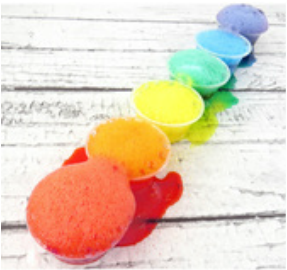
6. Pinch Proof Onesie

Picture
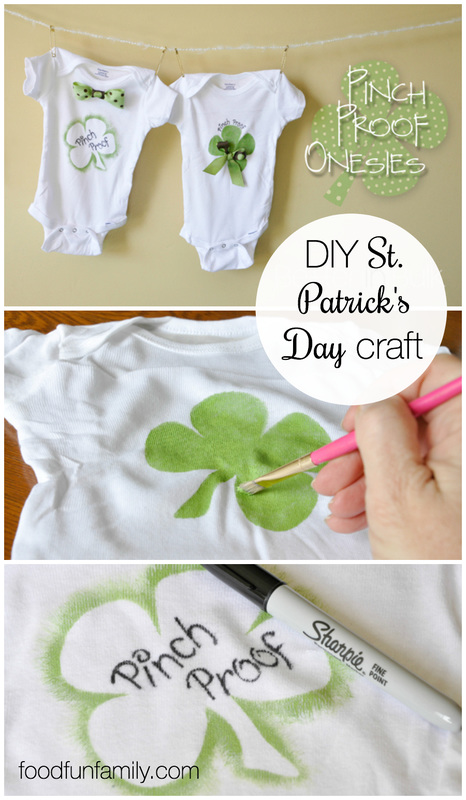
Ensure that your child survives the day pinch free with this adorable idea! Head over to Food Fun Family for the full tutorial.

7. Popsicle Stick Bracelets

Your kids can create any design they like on these cheap and easy bracelets made using simple popsicle sticks! Find out how at Momtastic.
Picture

8. Lucky Rainbow necklace

Picture
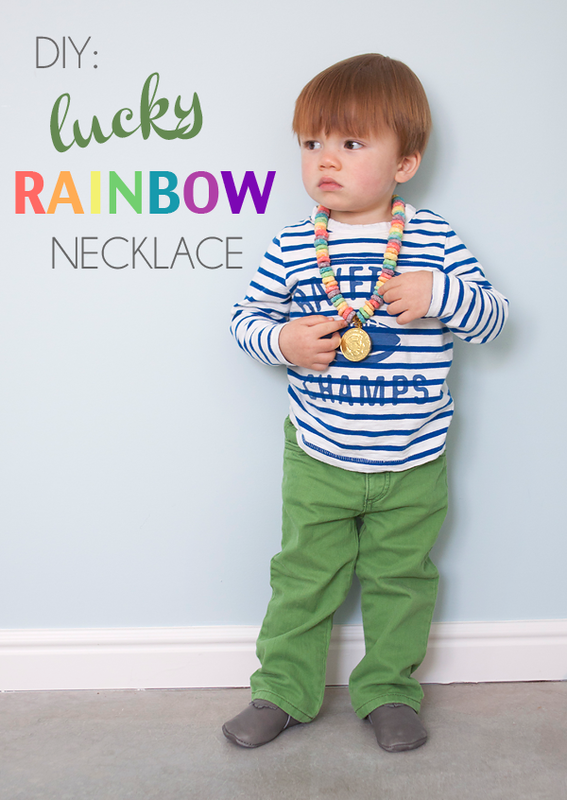
Colorful cereal, a chocolate coin, thread or twine and glue are all you'll need to make this adorable and edible necklace. See the full tutorial at HelloBee.

9.Fingerprint rainbow pot of Gold

Fingerprinting and gold glitter help make this craft extra fun for the little ones. Head over to Crafty Morning to see the how-to.
Picture

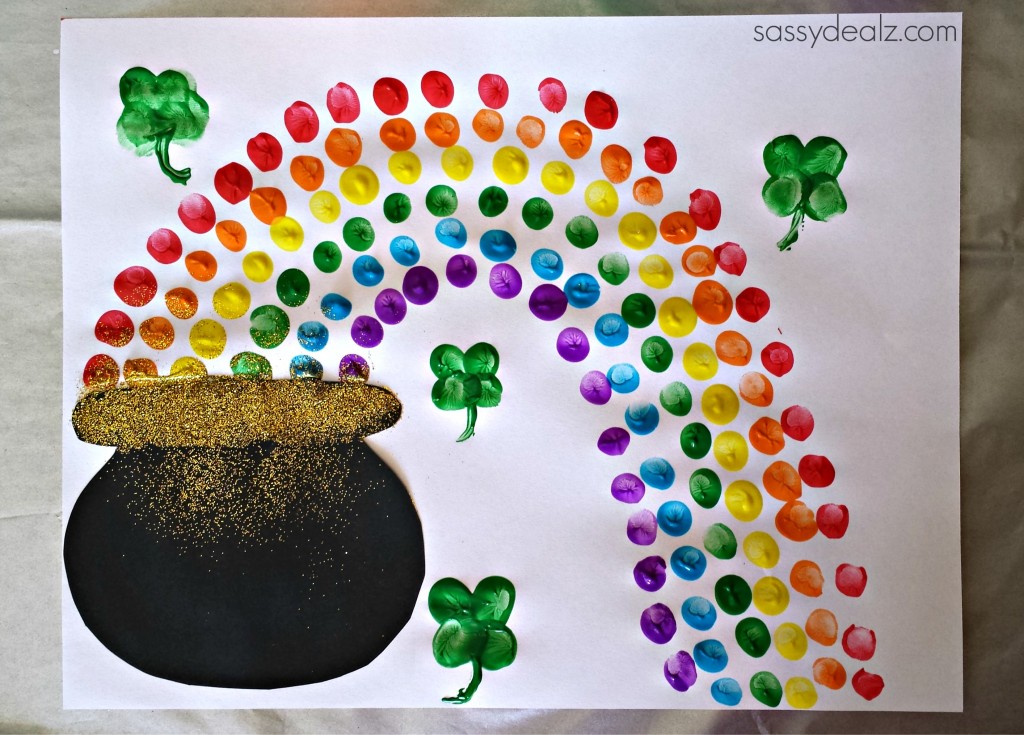
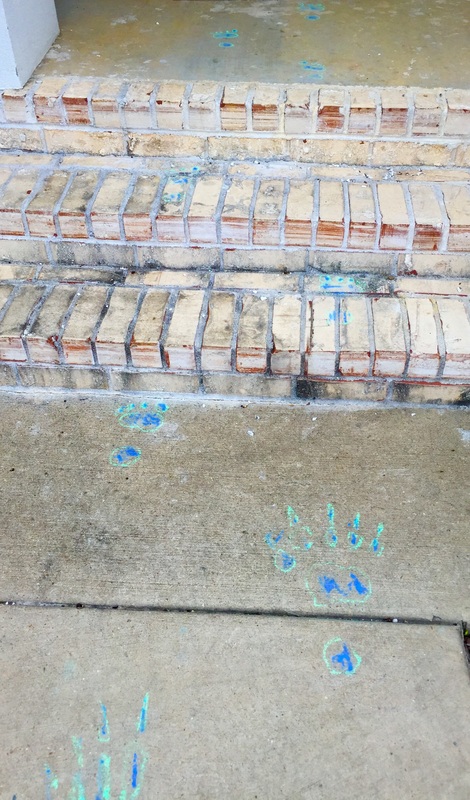
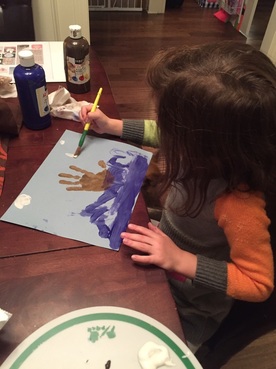
10. Handprint Clover

Picture
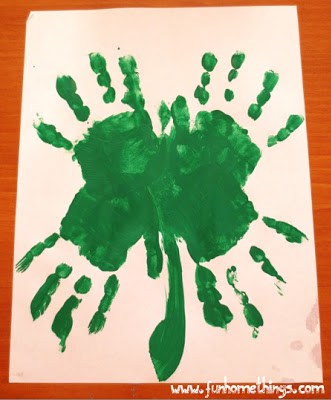
Any opportunity for kids to cover themselves with paint is always fun! Read about how to make these adorable clovers at Fun Home Things.
I hope you have as much fun with these crafts as my kiddos and I did! Enjoy!
2 Comments

Mommy Camp - Easter edition

3/1/2016

0 Comments

 
mommy camp easter theme - a week of lessons focusing on easter for kids with free printables!
Spring break is only a few weeks away! That means it's time for another Mommy Camp! Since the break this year falls right before Easter I've made it Easter themed! You can read about a few of the specific activities we'll be doing and download some printables I created, including the lesson plan below.

Theme One: Jelly Beans
The first focus is on jelly beans. We'll be conducting experiments, participating in a taste test, learning how they are made, making necklaces and more! (A list and links to all of the activities can be found in the lesson plan download.)
Picture
Conduct jelly bean experiments at Frogs and Snails and Puppy Dog Tail.
Picture
Make jelly bean necklaces at Two Sisters Crafting.
Picture
See the inspiration for my jelly bean taste test printable at Childhood 101.
Theme Two: Eggs
This is a very fun-filled theme that includes egg science, growing "egg heads", paint-filled egg bomb painting, a glowing egg hunt and "egg-ing" the neighbors. Plus a ton of other fantastic activities focusing on math, reading and sensory experiences. (A list and links to all of the activities can be found in the lesson plan download.)
Picture
Learn how to grow "Egg Heads" at Nurture Store.
Picture
Go on a glow hunt at Indulgy.
Picture
"Egg" the neighbors at The Dating Divas.
Theme Three: Bunnies
In the bunnies focus we will learn about rabbits, do the bunny pokey, learn how to draw a bunny, dig for sight word carrots and make bunny handprint art along with some fun math, reading and cooking. (A list and links to all of the activities can be found in the lesson plan download.)
Picture
Learn how to draw a bunny at Cakespy.
Picture
See the inspiration for my printable at The Imagination Tree.
Picture
Make an adorable bunny handprint at Crafty Morning.
 Theme Four: Peeps
Everyone loves peeps! Delicious, sugary marshmallows!  In this section we will conduct some peep experiments, learn how they are made, create puffy paint peeps and make peep play dough  along with doing some reading and math. (A list and links to all of the activities can be found in the lesson plan download.)
Picture
Learn how to make puffy paint peeps at Crafty Morning.
Picture
Conduct some peep-speriments at Schooling Monkey.
Picture
Make peep play dough at Growing a Jeweled Rose.
Click the link below each image to download the printables that I've created as well as the lesson plan. Enjoy!

Mommy camp lesson plan

Picture
mommy_camp_-_easter.pdf
File Size: 51 kb
File Type: pdf
Download File

digging for sight words

jelly bean taste test

Picture
jelly_bean_taste_test.pdf
File Size: 517 kb
File Type: pdf
Download File

egg matching

Picture
digging_for_sight_words.pdf
File Size: 791 kb
File Type: pdf
Download File

egg-cersices

Picture
eggsercise.pdf
File Size: 113 kb
File Type: pdf
Download File

Picture
plastic_egg_matching.pdf
File Size: 491 kb
File Type: pdf
Download File

0 Comments

Roar! - it's a dino party!

2/22/2016

0 Comments

 
Picture
My son just turned two and while he doesn't say much, one thing he loves to say is "ROAR"! So, it was only fitting that he have a dinosaur themed birthday party this year. I had a lot of fun preparing for this party and I hope you find some inspiration!
When guests arrived they saw gigantic dino footprints down our front sidewalk to our door. I had my brother draw them because he's a graphic designer and I figured he'd have fun with it. He did. He decided that he wanted to morph the dinosaur prints into tiny Arthur prints as they got closer to the door. It was stinking adorable.
Picture
Picture
I used my silhouette to create the Arthur banner (it slipped and went a little crooked in this photo. Oops) as well as the 3D pterodactyls. I used plastic dinosaurs to make the food items fun and created a cute menu using canva.com. The "dinosaur eggs" were supposed to look super cute and have colored outsides but, the peeling process was a disaster and many looked slightly ragged. They tasted good though.
Picture
Picture
Picture
Picture
Picture
Picture
Picture
Picture
I made the cake using this paleo coconut cake recipe. It was soooooo good! Everyone enjoyed it! i added toasted coconut to the top and slivered almonds around the sides to make it a little prettier. Then I added a dinosaur and a speech bubble that said "RAWR" for the dino. I think it turned out pretty great!
Picture
For fun, the kids had a dino fossil dig area and a cardboard "volcano" for pretend play. We were really lucky to have 60 degree weather in February so we had all of the fun in the backyard. The kids also had the opportunity to jump on the trampoline, swing and play in the playhouse. Once gifts were opened, they also had fun with some really cool chalk stencil sets that were gifted (My mother-in-law said she got them at Wal-Mart.).
Picture
Picture
Picture
Picture
I made the volcano with three cardboard boxes, brown craft paper, red streamers, a knife and some tape. I cut a big opening at the bottom of the biggest, center box and then folded the sides in on the smaller boxes but left them open on both ends to create tunnels. Then I taped all three boxes together and covered them with crinkled paper and streamers at the top. I taped the sign to the swing set which was in front of the volcano. The kids actually played quite a bit with it and it only cost about three dollars!
Picture
Picture
Picture
Picture
The dig site was a water table we already had filled with play sand and plaster of paris dino bones. I bought the molds from amazon and made the bones the night before. They popped out pretty easily and looked really great! Then I threw in a few sand tools like a shovel and a bucket and a few chunky paint brushes for dusting the fossils and taped a sign to the side. This was a big hit with everyone! 
Picture
Picture
Picture
I made all four of us adorable dino themed shirts too. Lilly had a girl walking a pet dinosaur in glitter, Arthur had a t-rex holding the number two and wearing a party hat, I had a shirt that said "RAWR" and Derek had a dinosir, a t-rex with a top hat, bow tie and monocle. I didn't manage to snap a pic of Derek with his shirt and Arthur was NOT into photos so these are the best I could do. I created all of them using my silhouette and iron-on vinyl.
Picture
Picture
Picture
Picture
We also had a photo booth area set up. I hung a plastic table cloth on the wall and provided a few props and a selfie-stick to encourage guests to take a pic. We got some pretty cute ones. I made the signs with my silhouette and craft. Threw in some feather boas, dino masks and a safari hat for good measure. The kids all got to take home goodie bags with mini dinosaurs, masks and a craft activity from amazon that was dinosaur themed.
Picture
Picture
Picture
Picture
Picture
Arthur had a good time and really enjoyed the watermelon and cake. The adults were able to visit because the kids were having so much fun and no one got hurt or threw up. I call it a success!
Picture
Picture
Oh, and when Arthur went to blow out the candle, he started as soon as it was lit...across the room. It was adorable to watch him blowing at the candle for the entirety of the Happy Birthday Song.
0 Comments

A Galentine's Day BEAUTY BRUNCH

2/16/2016

0 Comments

 
Galentine's Day brunch
We had a lovely time at the Galentine's day party even though several people had to miss it for last minute reasons (sick kid, no babysitter etc.) my friend Kila and I still had a blast hanging out and enjoying yummy food! I followed through with the plan I created in my first post and made whole30 approved recipes including bacon wrapped egg cups, fruit salad and chocolate mousse with the optional mimosa (I used sparkling water to stay whole30). It was all really good and my friend couldn't believe that it was all whole30 compliant! Let me tell you, those egg cups are amaze-balls! I actually ate four! 

I spent very little time creating the decorations but I think they definitely set the mood and were pretty. I copied the idea for a xoxo table cloth but used a $1 plastic table cloth and a sharpie instead of white fabric and paint. It was very thin so I laid it on top of a glittery cream colored fabric tablecloth I already own. I used my white dishes and simple champagne flutes and placed a fork on top of a red paper napkin at each setting. In the center of each plate a placed a nail polish with a cute tag that I created tied on with pink ribbon. In the center of the table I placed a bouquet of grocery store flowers in a clear vase and a sprinkling of pink and red glitter heart stickers from the dollar store as well as the remaining pink ribbon. I think it turned out very pretty and elegant. And it cost a grand total of $12 for decorations (the flowers were $10).
Picture
Picture
Picture
Picture
I also set up a photo area with the same wrapping paper I used for the Valentine's photo shoot with my kids. It's is just so versatile! I taped it to the wall width wise at waist height. Then I raided my daughter's room for feather boas and tiaras as well as her art easel for the sign. We took selfies with my hand dandy selfie stick! You can get them at most stores for about $5.
Picture
Picture
After eating, we did a foot bath and painted our nails. It was really nice to just relax and visit. We used my current favorite nail polish, Sally Hansen Miracle Gel, if you buff your nails and polish them well I've been able to get a full week with almost no chips out of one paint session. That includes doing dishes and actually functioning like a real person! (BTW, they aren't paying me to say this. I just really like it.) 
Picture
Picture
I also made this super cute shirt with my silhouette machine! Even though I didn't officially drink a mimosa, it had the right vibe. I bought the black shirt and sequin jacket at Forever21. (The "jacket" is actually a crop top with a zipper in the back. I just put it on backwards and voila! sequin jacket!) The "jacket" was on sale for less than $10! How could I turn that down?! You can download the free cut file for my shirt below!
Picture
brunchsohard.studio3
File Size: 235 kb
File Type: studio3
Download File

It was a very fun, very girly time and left both of us feeling refreshed and slightly pampered before heading back to the real world of dirty diapers, screaming kids, dirty laundry and sticky kisses.
0 Comments

i've got my eye on you - diy valentine's

2/9/2016

0 Comments

 
DIY Valentine with FREE printable
I don't know about you but, I loathe when my child comes home with gigantic amounts of candy/sweets. I don't need that! I'm trying NOT to be a fatty and my kids definitely don't need it either. So, I generally try to go with a non-sweet valentine. This year I found some adorable heart shaped plastic play glasses at Target and set about designing an adorable Valentine to go with them. 

I created my printable valentine using canva.com. Then I had to create a cut file to back the printed paper because I printed on regular paper and it was too floppy. Once I cut out the printed papers, I sent my cut file to my silhouette using brightly colored craft paper. Then I glued the printed copy paper to the colorful craft paper and adhered a pair of glasses to each one using washi tape.

I think they're super cute! And you can make them too! I've included the printable and cut file below! Have fun!
Picture
Picture
Picture
eyes_on_you_diy_valentine.pdf
File Size: 199 kb
File Type: pdf
Download File

eyesborder.studio3
File Size: 66 kb
File Type: studio3
Download File

0 Comments

Valentine's Day Shirts DIY

2/1/2016

0 Comments

 
Lilly and I got a little crafty this weekend and created some ADORABLE V-Day shirts! And, I'm giving you a FREE cut file so you can make one just like hers!
free valentine's day shirt cut file
I simply designed her shirt in Silhouette Studio using their text files and some free images from the web. Then I sent it to cut. I used black iron-on transfer material. After I cut the black, I copied the heart from "love" and pasted it into a new file. Then I sent it through the machine in gold iron-on transfer material. Once both were cut, I weeded the text and removed the black heart. Then I replaced it with the gold one. It was really easy because I could see the outline of the original one on the plastic. Then I ironed it onto the pink shirt I picked up at Wal-Mart! She had fun hitting the "load" and "unload" button as well as designing it with me so it was a win/win, cute shirt + time together!
vday shirt silhouette cut file
vday shirt cut file
vday shirt cut file
I made the other shirts for a friend and they took a little more manipulating. I created a file with x's and a separate file with o's. I sent the hearts through on the gold material and the hearts on the leopard material. Then I weeded them and cut the plastic material down to the edges of the transfer material. Then I laid them onto the shirt in the correct order and evenly centered them on the shirt. Pretty easy and a great result!
Picture
Grab the free cut file for the "L is for Love" shirt below. Happy crafting!
lisforlove.studio3
File Size: 131 kb
File Type: studio3
Download File

0 Comments

My First Silhouette Cameo 2 Projects!!

1/26/2016

3 Comments

 
​My awesome husband got me a Silhouette Cameo 2 for Christmas this year! It was a major surprise and I am super excited. I've used it a few times to practice and make sure I have some idea as to how to use it and I would like to share the first few projects I have accomplished.
For my first attempt I decided to make my daughter some paper butterflies to stick on her walls. The cut file was free and I had scrap paper so it didn't matter if I messed up. I used the free butterfly cut file and made two different sizes of butterflies on my silhouette studio page. Then I placed paper on my cutting mat and loaded it into the cameo. After checking to make sure the settings were correct, I sent it to the machine. They turned out great! I repeated the process using a different paper and then layered the smaller butterflies on top of the larger butterflies and used stick tac to adhere them to the walls. It was super easy and my daughter thinks they are great! Success!
Picture
Picture
For my second project I chose to make a gift for a good friend who was about to have a birthday. He runs his own marketing business and is very energetic and positive with a good sense of humor. I found a really great art print and decided to make my own version using gold poster board and black craft paper. I saved the image and then used it to create a cut file within silhouette studio by importing the image. Once I had my cut lines correct I loaded the poster board and sent the cut to the machine. After it was cut I glued it in the center of a piece of black card stock and framed it! It went very quickly and he loved it! Success again! I think I'm getting the hang of this. (I will say that I thought the paper setting should have been on card stock for the poster board. However, I was very wrong which resulted in the machine freaking out and cutting the edge of my mat! For future reference, you should set it at glitter card stock if you want to cut poster board.) I was in such a hurry to get it made before the party that I completely forgot to snap a picture! It looked really awesome though. :(
Picture
For my final projects I ventured into he land of vinyl. (I had to wait until my order arrived.) I purchased my vinyl from amazon and I think I got a pretty good deal. I started my making a monogram for my friend. She plans on putting it on a tumbler. I used this site to generate a free monogram. Then I placed the monogram into powerpoint, added a thick dark circle around the edge and saved both parts as one image. Then I dropped into silhouette studio and added my cut lines. It was very quick and she loves the result. My other vinyl project is still in the works but, I plan on making some organization labels for my children's rooms. I'll let you know how that goes in my next post! 
Picture
3 Comments

Mommy Camp - Christmas Style!

12/7/2015

0 Comments

 
Picture
I modified my normal method for Mommy Camp this time to accommodate the busy-ness that accompanies this time of year. Instead of picking themes and having focused lessons on a specific topic, I simply created a list of 24 activities that relate to Christmas. This way, if I am really on top of it and we manage to do something every day, we can. Otherwise, I will have plenty of activities to fill the season. 

The activities I chose range from science, to art, to math. Some are messy. Some are not. But, they are all fun, easy and cheap! You can download my Christmas Mommy Camp below. The file includes lists of materials for each activity, a photo of the activity, a link to the original inspiration and step-by-step directions. Enjoy!
advent_calendar_–_mommy_camp_christmas_edition.pdf
File Size: 3893 kb
File Type: pdf
Download File

0 Comments

DIY Advent Calendar Printable

12/7/2015

0 Comments

 
I wanted to create an advent calendar this year for Lilly and found a great one here. I loved the idea of jokes for each day instead of activities. Sometimes we don't have time or don't feel like doing the activity given. So, I decided to use the joke idea but, I got rid of all of my red christmas decorations and wanted to keep it that way so, I created my own advent calendar and kept the jokes from my inspiration.
​
I just printed it out on card stock and then cut them out. I hung them by punching holes in the top of each ornament and stringing them with ribbon. I attached it to the wall with washi tape and made a washi tape star for the top.

The photo really doesn't do it justice. I used glittery backgrounds and patterns. It's super cute! You can print mine out by downloading below and you can find the jokes I used at the link given above. Enjoy!
Picture
adventornaments.pdf
File Size: 9671 kb
File Type: pdf
Download File

0 Comments

Mommy Camp - Thanksgiving

12/7/2015

1 Comment

 
So....This is a little late but, we had a ton of fun with mommy camp for Thanksgiving! We did some experiments with corn, conducted an apple taste test, made a mini mayflower and did some painting! Check it out!
​
First we learned about the pilgrims and how they came to America. Then we made Mayflower handprint art and mini Mayflowers out of apple sauce cups inspired by this blog. However, our boats did not float. It was disappointing.
Picture
Picture
Picture
Picture
After we discussed the Mayflower and the pilgrims arrival, we learned about how they lived once they arrived and talked about the differences in how they lived then versus how we live today. I showed her this video about life as a pilgrim and she really enjoyed it even though it is a little long. I even had time to give her brother a bath while she watched it! Once she finished the video we made butter! I used the directions and printable labels found here. It was really easy and super delicious. We have made it many times since.

DIY Butter:
- heavy whipping cream
- lidded glass jar
- 1 marble
- sugar, salt, cinnamon, sugar (optional)
1. Fill jar 2/3 full with heavy whipping cream.
2. Add desired seasonings. (We added a little of each listed above to make cinnamon sugar butter. Yum!)
3. Add marble to jar.
4. Shake!
5. It only takes a few minutes and you will end up with a whipped cream consistency. Once you refrigerate it the consistency firms a little and is more like spreadable butter. Great for toast!
​
Picture
Picture
After learning about the Pilgrims and the reason for Thanksgiving we needed to make an apple pie, a classic dish for the holiday. So we first conducted an apple taste test. I found the free printables here. Lilly really enjoyed this activity and it was great for her to practice writing. Plus, I know which apples she will be most happy with.
Picture
Picture
Popcorn was our next science activity! First we analyzed the unpeopled kernels and the popped ones and formed hypotheses on why they looked so different and also the reasons for their differences. Then we watched a super cool slow-mo video of a kernel popping and applied the information to our understanding of the differences between popped vs. un-popped. 
Picture
Picture
After that we formed a sink or float hypothesis about both versions and conducted our experiment. Lilly was upset that she was incorrect about which would float and which would sink as seen in the below photos. We finished up by simply playing with the kernels. I gave them funnels and cups and mini shovel toys and both of them had a blast. We did this part outside btw. Arthur cannot be trusted with anything that could potentially make a disastrous mess. 
Picture
Picture
We, of course, did a few math and reading worksheets that had a Thanksgiving theme. I found both at education.com. They have great worksheets for free!
Picture
Picture
We learned about corn and apples so we HAD to learn about cranberries! We started out by talking about cranberries and if we liked them. We looked at one and cut it open. I even got her to try a raw one. She wasn't a fan. Then we watched a video about how cranberries are grown. After that, I made her a mini cranberry bog in a dish pan inspired by this blog and let her manipulate the cranberries for a bit. Finally, we made cranberry muffins and she helped by grating the orange and counting the cranberries for each muffin. We decided 6 was a good number.
Picture
Picture
Picture
I also made a quick felt turkey for our felt board. They had fun with it and it only took a few minutes to cut out a bunch of different colored feathers, a round body, head and top hat. I did hot glue the beak, hat and feet on so they wouldn't get lost.
Picture
Picture
I had a few other activities that we just didn't get to but I'll save them for next year! Now it's time for Mommy Camp - Christmas!
1 Comment

Mommy Camp: Halloween Edition

11/3/2015

0 Comments

 
Picture
Lilly requested that we do more Mommy Camp so I made a special Halloween edition! I was a little late on getting it ready so we didn't finish all of the activities before Halloween was over but, I'll share what we did get done. I think we'll probably just squeeze the other activities into random days for fun later on and I'll post when we do.
Skeletons and Bones
We started off with a theme focusing on bones and skeletons. To begin we did a little bone math using this worksheet from education.com. We also pulled out her helping hands from our summer mommy camp to help her count.
Picture
Then we worked on a halloween rebus activity sheet where she filled in the story with the correct images by reading key words. That worksheet is also from education.com and can be found here.
Picture
After the math and reading we discussed the importance and function of bones. We then conducted an experiment with rubber gloves and straws. Take one glove and fill each finger with a bendy straw. Leave the other glove alone and compare them. This demonstrates how bones work to give us the ability to move.
Picture
Then it was time for lunch and I made Lilly a sandwich skeleton!
Picture
Then we made Q-tip skeletons! She drew a skeleton head and cut it out. Then glued it to black paper and glued Q-tips for the bones.
Picture
We finished up our focus on skeletons and bones by making skeleton marshmallows and contact paper + tissue paper sun catchers. For the sun catcher, I drew a skull/calavera on the non-sticky side of the contact paper. Then, I pulled off the back and taped it to the table for them to stick pieces of torn tissue paper onto. I also made a decorate your own calavera felt board activity by cutting out a white skull shape and various shapes for decorating from felt. It took very little time and they enjoyed it!
Picture
Picture
Picture
Picture
Picture
Coincidentally, Derek and I went to a fancy costume party and dressed as calaveras! Here's our fun photo!
Picture
Spiders!
The other theme we managed to get done was spiders! We started off with some spider counting math. I purchased a bag of plastic spiders and printed off a handy worksheet from this site. We also discussed the life cycle of a spider and put together a puzzle using this worksheet and read a spider mini book using this free printable.
Picture
Then we made some fun spider hats with construction paper, glue and staples.
Picture
Picture
After the math and crafting it was time for some action! I created a spider web from painters tape for a fun game of tossing paper wads at the spider web. While I was creating the web I had Lilly creating the paper wads from tissue paper.
Picture
Then we did some spider web watercolors by creating a spider web using painters tape for the children to paint over. They enjoyed it and they turned out really nicely.
Picture
Picture
Picture
We finished up our spider theme by participating in a spider web obstacle course! Even though it only lasted about 10 minutes they really enjoyed it!
Picture
We didn't even get to all of the fun stuff I planned about spiders so you may see another post with the stuff we missed! We also have a monsters theme and a pumpkins theme that we didn't even touch! So, keep an eye out for all of the fun they contain. 

I'm currently finishing up work on my Thanksgiving Mommy Camp and we will begin doing those fun activities soon. The themes will be Thanksgiving History, Giving Thanks, Thanksgiving Food and Fall! I can't wait!
0 Comments

DIY Ariel Costume

10/28/2015

1 Comment

 
Picture
This year Lilly and I will have costumes with a matching theme and Derek and Arthur will too but we won't match as a family. I am going to be Ursula (check out that tutorial here) and Lilly will be Ariel. Derek will be Chewbacca and Arthur will be Hans Solo (check out that tutorial here). I am making everyone's costume but my husbands. He purchased a Chewbacca pajama onesie at Target and is planning on wearing that.

To make the Ariel costume (child sized) you will need:
- 1 yard stiff green broadcloth
- 1 yard iridescent blue-green chiffon
- one package of wide white elastic
- one tan bodysuit
- one piece of purple felt
- one small piece of iridescent  purple chiffon
- hot glue gun and glue
- purple thread and needle

I measured the length that I needed for the tail to touch the floor and then free-handed a mermaid tail on the green broadcloth. I cut out two of these tail shapes. Leave enough room at the top to fold over and place the elastic waist band inside.

After cutting out the tail shape, I cut out about a million fish scale shaped chiffon pieces. Then I hot glued the top portion of the scale to the tail shape. I glued them in horizontal rows until, slightly overlapping each other, I filled the tail. You may also have to trim them when they reach the edge and hang off.

Once I had covered both tails in scales, I folded over the top bit and hot glued it to make a pocket. Then I threaded the elastic through the hole and sewed the ends of the velcro together. This created a tail "skirt".

I ordered green fish scale leggings from Easy. If you're into sewing I'm sure you could find some fish scale fabric and make them yourself. I am not into sewing.

For the top, I purchased a tan bodysuit from Spirit of Halloween. Then I cut out a piece of purple felt in a bra shape, drew accent lines for the "shell" with a sharpie and used fabric glue to glue a piece of purple chiffon to the top. Then, using purple thread, I hand stitched the "bra" to the bodysuit.

To finish off the outfit I purchased a red Ariel wig. As a note, this wig is absolutely horrible! In the photo you can tell it is just terrible quality. Thanks Disney!  So, I'm going to give it the liquid fabric softener treatment to make it look better.

​
Picture
Picture
1 Comment

Lilly's 5th Birthday Party - Neon Safari

9/21/2015

0 Comments

 
Lilly decided that a safari themed party would be fun this year so I quickly pulled up Pinterest and made a plan. After pinning like crazy I narrowed down all of my ideas and created a party plan page to keep me organized (even though not everything got done). I also created an adorable birthday invitation in powerpoint and had it printed at Walgreens!
Picture
Picture
I then made a shopping list and got to work! I made or modified a lot of things and purchased a few. Below are the items I made or modified and links to their inspirations or the directions I followed to create them.
- neon tassel banner
Picture
Picture
- burlap birthday banner (seen above party table)
No directions here, I forgot to make a tutorial! But, I bought burlap pennant pieces from Hobby Lobby and printed out the name and number on neon paper. I then cut them out and hotglued them to the pennant pieces which I then hot glued to some twine to hang. It took maybe 10 minutes!
- party animals
I got the inspiration from the link above. I just bought some acrylic paint and began to paint the animals so they looked as if they were wearing brightly colored clothing. Then I made tiny party hats from neon paper and tissue paper.
Picture
Picture
- 3D Giant Cardboard Animals
I got the idea from the link above which has templates for mini animals but, I made mine significantly larger using packing boxes from Home Depot that I purchased for about $1 a piece. They were kind of a pain but did look pretty cool. After I sketched the parts on the boxes I cut them out using an exacto knife. Then I put them together and spray painted them with neon paint.
Picture
Picture
Picture
- Safari Ranger Certification Activity and Badges
I set up activities for the kids to complete and created a checklist sheet for them to take to each activity. Upon completion they received a stamp (found on amazon and also put in goodie bags) next to the activity on their sheet. When they finished all of them they were given their safari ranger badge which we taped onto their shirts. (I was going to make paper bag vests but couldn't find enough paper bags in time!) The activities were: Giraffe Jumping (trampoline), Zebra Zone (pin the tail on the zebra. I free handed a zebra on some poster board along with some neon paper tails and duct tape), Elephant Art (silhouette watercolor painting I have the silhouettes I used in the downloadable file), Tiger Toss (bean bag toss game which I made using this tutorial), Monkey Maze (a bunch of pop up tents put together with pop up tunnels connecting them). I made signs for each zone and printed them out on neon paper. All of my printables are available in the file at the end of this section.
Picture
tiger toss
Picture
stamping their activity sheets
Picture
monkey maze
Picture
elephant art
Picture
zebra zone
Picture
Lilly with her completed activity sheet and badge
- Photo "Booth"
I found a great site with free mask printables and used their animal ones for our photo booth props. I printed them out and then glued them onto neon paper to make them sturdy and to add a little pop around the edges. I then hot glued them to some wooden dowels. For the background I bought a grass doorway hanger from Hobby Lobby. (I think it was meant for luau parties but it worked for me.) I taped it to the wall and also hung a few strands of bamboo leaf garlands that I borrowed from a friend. The masks and sign are in the file you can download. :) I also made a sign for the front door to put guests in the mood upon arrival.
Picture
Picture
Picture
Picture
- Watermelon Hippo & Other Food
I found a great tutorial on the National Watermelon Board site for making a hippo out of a watermelon. It was actually really easy and only took about 15 minutes! I was REALLY proud of my hippo. I made a sign saying "Hungry Hippo" for it. It looked amazing! I also made crescent roll wrapped hotdogs that I called "serpent rolls", cut apples and peaches with a caramel dip lion face (kind of) labeled "lion's mane dip", blue kool aid labelled "watering hole", zebra cakes, and pasta salad labeled "python pasta". I decorated the table with the party animal figurines and purchased the cake from a local bakery. Lilly designed it and I placed the giraffe party animal on top with a sparkly orange #5 candle and it turned out perfectly for the party. I also bought a few wooden crates from hobby lobby for the table and placed the zebra cakes on them. I used blue plastic table cloths for on and behind the table and taped a grass table skirt to the edge of the table to finish it off.
Picture
Picture
Picture
Picture
Picture
- Backyard Safari and Map
I found a cute idea on pinterest to make a safari with a map and put my own twist on it. I created a map in powerpoint using shapes and text boxes of our backyard. I then put red "x's" to mark where the animals were hidden. I gave each child (and parent) a map after hiding the animals and had them go find them. We did this after the cake and presents and it was a perfect way to introduce the idea of going back to the backyard to play. It was also fun since they had all had the opportunity to receive their Safari Ranger Certification. My map is in the downloadable file (Not that it will necessarily be helpful to you unless you have an identical backyard which would be weird but, at least you can see what I created to give you guidance for your own.)
Picture
Picture
-Goody Bags
I ordered neon goody bags, safari animal suckers, animal stampers, animal print slap bracelets, binoculars and safari hats from amazon for the goody bags and placed them on a table with a cute sign that I made. I also used neon price stickers by placing them on the front of each hat and writing each child's name on the sticker to keep them from getting mixed up. It added some more neon and was practical. They were a hit!
Picture
I think everyone had a really good time and several parents said their kid said it was the best birthday party they'd ever been to! I hope you get some inspiration and end up with a great party too! Here is the file with all of my printables for download! You'll find an "Expedition Supplies" printable that I ended up not using because I ran out of time and didn't get the paper bag piñata made. But, here is the inspiration so you can do it if you want to!
0 Comments

DIY Graphic T-Shirts

8/25/2015

0 Comments

 
Picture
Graphic t-shirts are really in right now. I found many that I loved but wasn't super excited about a $25 price tag per shirt. So, I decided to make my own! It's surprisingly easy and the options are endless. Being a Spanish teacher, I chose to make mine Spanish language themed but, you can make yours say anything you like!

Materials:
- Several packages of iron-on letters. (I purchased mine for $3.99 a pack at Hobby Lobby. I bought two large black, two small black and one large white. I have a ton of letters left over but quickly ran out of "s" and vowels. I also made one other t-shirt that is not pictured above.)
- iron and ironing board
- blank t-shirts (I got mine for $4 each on sale at JcPenney's.)

Directions:
1. Iron out any wrinkles in your shirt. Leave your iron on and set to the proper conditions according to your iron-on letters. My directions were to set to cotton and turn off the steam function.
2. Lay your shirt on the board and make sure it is lined up equally on both sides.
3. Begin to place your letters and arrange them how you want them to look when permanently adhered. Take your time. I recommend getting someone else to look at it too before you iron.
Picture
Picture
4. When you are 100% happy with the letter placement, gently set the iron on-top of all or a portion of your letters. Do not move back and forth. Instead, let it sit while applying gentle pressure for 15-20 seconds. Then lift and gently place on the rest of your letters following the same rules. (These were the rules for my letters. I would think most are the same.)
Picture
5. After all of the letters have been ironed into place, turn the shirt inside out and repeat the steps on the inside of the shirt to ensure that the letters are permanent.
6. Turn right side out and enjoy!

This project took me very little time and had a great result that I am really excited about! All of my girlfriends have decided they are in love and we are planning a t-shirt making night. :)
0 Comments

DIY Fiesta Wreath

8/25/2015

0 Comments

 
Picture
Now that it's back to school time I need to focus on getting my room ready! As a Spanish teacher, I thought making a fiesta wreath for my door was a great idea! 
Picture
Materials:
1 foam wreath form
5-6 different types of colorful ribbon (Ribbon can be expensive. I waited until it was 50% off at Hobby Lobby to purchase mine.)
3-5 Spanish inspired chochkys (I found an adorable mini sombrero and mini piñata at Hobby Lobby for under $5 each.) I had a maraca and castanets lying around already.)
hot glue and gun
20 or so fake flowers (in colors that go with your ribbons)
1 package colorful tissue paper (I get mine at the dollar tree.)

Directions: 
1. Make several tissue paper flowers. You can follow this tutorial. I layered different colors to make mine more fun. I also made two sizes. A large and a small so I could fill in the wreath properly. I also varied the type of cuts that I made. Some had a rounded edge and some were pointed.
2. Start glueing! I chose to place my four big ones first and then decided where to place my other items based on that.
Picture
3. Then I slowly added the other items (smaller tissue paper flowers, fake flowers, maraca, piñata, castanets and sombrero) by filling in the gaps. I tried to keep it mostly symmetrical in regards to the flowers and other items. I also glued some flowers inside each tissue paper flower for fun. 
Picture
4. To finish, I flipped it over and glued strips of ribbon (pretty side facing out) to the bottom of the wreath. I cut them to different lengths but all of them were long in the style of a fiesta wreath.
5. To hang it you can use a regular wreath hanger or wrap a ribbon around the top with hot glue and then hang from the ribbon. I have mine with a ribbon and then placed a hook upside down on the inside of my door and tied the ribbon to it. It works wonderfully.
I loved it so much that I made more flowers and placed them around the inside of my classroom door. It's very festive!
Picture
0 Comments
<<Previous
Forward>>
    Picture

    RSS Feed

    meet rachel

    Rachel is a mother of three, elementary Spanish teacher and part-time blogger who loves crafting, creating fun and engaging activities for her children and students and hanging with her friends and family. She blogs about what she's doing and her interests at any given time which vary. She's a little OCD and always looking for her next project. Her husband calls it, "focusing her crazy", but she just calls it fun. 

    Archives

    June 2023
    May 2023
    December 2022
    November 2022
    September 2022
    July 2022
    February 2022
    December 2021
    November 2021
    October 2021
    September 2021
    August 2021
    July 2021
    May 2021
    April 2021
    March 2021
    February 2021
    January 2021
    November 2020
    October 2020
    August 2020
    July 2020
    June 2020
    March 2020
    February 2020
    December 2019
    November 2019
    October 2019
    August 2019
    July 2019
    May 2019
    March 2019
    February 2019
    January 2019
    December 2018
    November 2018
    October 2018
    September 2018
    July 2018
    June 2018
    April 2018
    March 2018
    February 2018
    December 2017
    October 2017
    September 2017
    July 2017
    June 2017
    May 2017
    April 2017
    March 2017
    February 2017
    January 2017
    December 2016
    November 2016
    October 2016
    September 2016
    August 2016
    July 2016
    June 2016
    May 2016
    April 2016
    March 2016
    February 2016
    January 2016
    December 2015
    November 2015
    October 2015
    September 2015
    August 2015
    July 2015
    June 2015
    May 2015
    April 2015
    February 2015
    September 2014
    August 2014
    February 2013
    January 2013
    December 2012
    November 2012
    October 2012
    September 2012

    Categories

    All
    Baby
    Beauty
    Clothing
    Crafts
    Decor
    DIY
    DIY Gifts
    Dramatic Play
    Freebies
    Free Wallpapers
    Fun With Paint
    Holiday
    Inspire
    Kids
    Kid Snacks
    Mommy Camp
    My Thoughts
    Organize
    Parenting
    Party Time
    Photography
    Science Stuff
    Sensory Play
    Silhouette
    Toddlers
    Whole 30

    Picture
    Picture
    Mom Buzz Media
Proudly powered by Weebly